Time Tracking in ServiceChannel Provider
- Joseph Yarborough (Unlicensed)
- Anastasia Troichuk (Unlicensed)
- Natalia Larina (Unlicensed)
For companies that have ServiceChannel Provider Time Tracking turned on, technicians can track their time spent on work orders, breaks, and a variety of other user-defined activities.
With the Time Tracking feature of ServiceChannel Provider, companies will be better able to manage their technicians’ time and determine when it is more efficient to seek the services of an external provider.
The following infographic is an example of the “time” categories that can be tracked with ServiceChannel Provider.
![]()
In all, the Time Tracking feature adds additional functionality, accountability, and accuracy to the management of technicians’ time.
Contact your Customer Success Manager to enable Time Tracking and create a list of custom activity types.
![]()
![]()
If a technician forgets to add time spent at a meeting, they can add it after the fact.
Additionally, technicians can edit logged time to better reflect how their time was spent.
Work Order Time Tracking
After accepting a work order, a technician can log the repair time they have worked on the job, their travel time to and from the job site as well as the admin time.
The fastest way to log time is to tap Log Time on the work order and select the required activity type.


Should you forget to do so, you can enter your time manually by tapping Add New Manual Entry above the Log Time button.
Logging Travel Time
Here is how you can log your Travel time when traveling to and from the job site.
![]()
- On the desired work order, tap Log Time.
- Select Travel. A running clock appears, which keeps running even when you quit the app.
- When you have arrived, tap Stop.
- Select the corresponding status — Arrived or Stop Travel.
- The app will check your location to ensure you are onsite.
- You will see the logged Travel time on the work order.
Logging Repair Time
When onsite and ready to get down to work, ensure you log the Repair time.
![]()
- On the desired work order, tap Log Time.
- Select Repair. The app will check your location to ensure you are onsite.
- In the COVID-19 prompt that appears, read the safety recommendations, and then tap I Acknowledge.
- (When onsite) A running clock appears, which keeps running even when you quit the app.
- (When not onsite) The app will prompt you that you should be closer to the location. Generally, this is within 0.25 miles from the location, but your configuration may differ.
- When finished, tap Stop. The app will check your location to ensure you are onsite, so you are able to continue.
- Select the appropriate status (Waiting for Quote, Parts on Order, Incomplete, Completed, or Stop Repair).
- (For the Waiting for Quote, Parts on Order, Incomplete, and Completed statuses) Add the description of work to describe the work you did on the work order.
- Tap Submit.
- The work order updates with the appropriate status.
- You will see the logged Repair time on the work order.
Logging Admin Time
When you start your day, end the work order time or break time as well as for any other activities you might need to track your non-work-order time, you can use the Admin type.
Should you need to track the Admin time on work orders, please contact your Customer Success Manager to have this activity type added.
![]()
- On the desired work order, tap Log Time.
- Select Admin. A running clock appears, which keeps running even when you quit the app.
- When you need to stop tracking this activity type, tap Stop.
- Select the corresponding status — Admin Complete or Stop Time.
The Admin activity has been successfully logged.
Tracking “Other” Types of Time in ServiceChannel Provider Mobile
With ServiceChannel Provider Mobile, you can track a variety of user-defined activities. The activities that you can track can be customized to suit the needs of your company.
The following list contains the examples of "other" types of time:
- Start and end of work
- Admin
- Van maintenance
- Break
- Travel
- Internal meeting or training
- Retrieving inventory
Contact your Customer Success Manager to create a list of custom activity types.
- On the Work Order screen, tap Time Tracking.

On the available list, tap the activity type that you want to enter time for, for example, Break. A running time clock will appear.
The activity is tracked against the work order you are currently checked in to.


- (When applicable) To add a note to the activity you track, see Notes on Time Other Than Work Orders.
- When the period of time you are tracking ends, tap the End button to stop the clock.
The activity that you have just tracked will appear under the Manage Time tab and can be adjusted as needed.
![]()
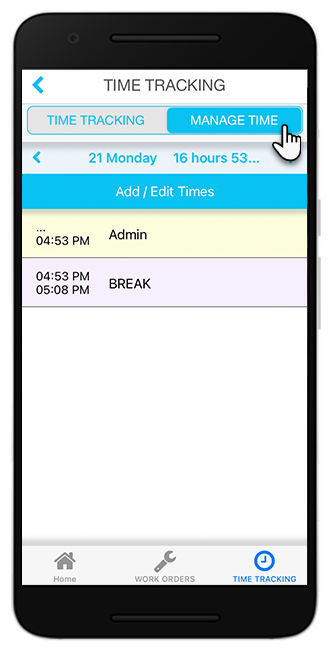
Managing Time in ServiceChannel Provider Mobile
Under the Manage Time tab, you can view and edit the logged activities as well as add new activities.
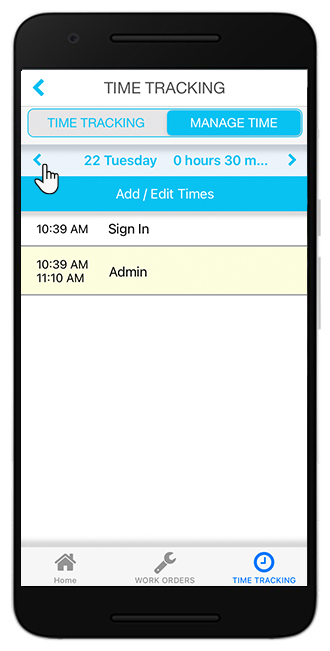
Adding Time
When adding time, you can only add time periods that have passed. For instance, you can add a meeting that occurred the previous day, but you cannot add a meeting that has not yet occurred.
However, if you logged an administrative meeting as being from 1 pm to 3 pm, but in actuality, the meeting was from 1 pm to 2 pm, and then you went on a break from 2 pm to 3 pm, you can edit the administrative meeting to reflect the actual time, then add in your break from 2 pm to 3 pm.
Once a technician has logged in for the day, all time is tracked.
- On the Work Order screen, tap Time Tracking.
- Switch to the Manage Time tab. The app shows the activities logged for the current day.
- Switch to the date for which you want to add a new activity.
Tap the Add / Edit Times button to add a new activity time period.
Tap the Add Time button that appears.

Select the appropriate activity from the available list.


Specify the time spent on that activity.

When finished, tap Save.
If you have not logged in for the day you are adding an activity to, the time you enter for that activity will also become your Sign In time for that day.
![]()
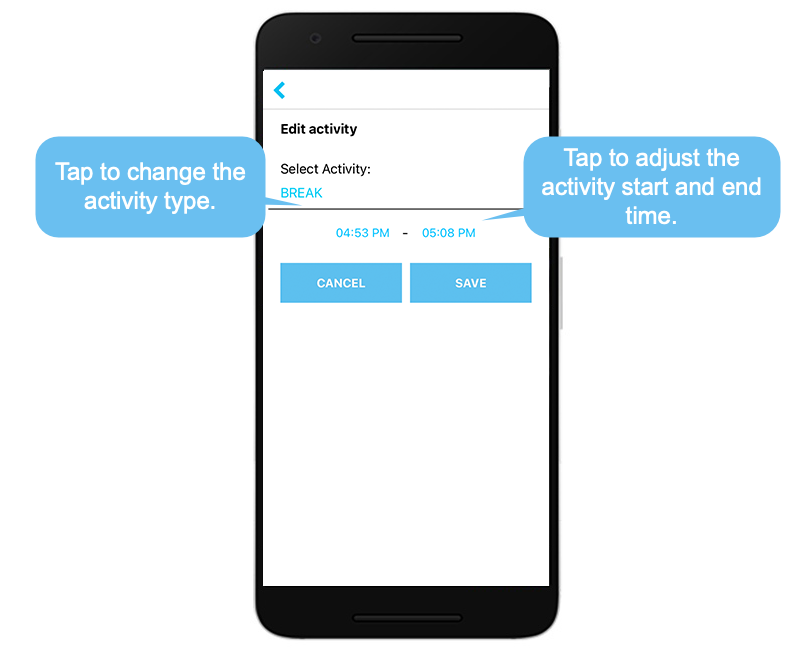
Editing Time
- On the Work Order screen, tap Time Tracking.
- Switch to the Manage Time tab. By default, the tab displays logged activities for the current day.
- To switch to another date for which you need to edit an activity, tap the back arrow.
- Tap the Add / Edit Times button.
- Find the activity you want to edit, and tap the pencil icon next to it.

- Adjust the time as needed, then tap Save.
Notes on Time Other Than Work Orders
For administrators who want additional information about how their technicians use their time, ServiceChannel can enable the Time Tracking Notes feature.
With this feature turned on, technicians will be able to add a note to time other than work order time, for example, to a Break or Inventory activity. It will be up to the administrator as to whether or not to make a note mandatory or optional.
Contact your ServiceChannel representative to have the notes enabled.
![]()
![]()
![]()
