Adding Frequencies to Planned Maintenance (PM) Services
Planned Maintenance Frequencies
Adding frequencies is the second step of the planned maintenance setup process.
Frequencies allow you to indicate how often a service should occur at specific locations. You can create as many frequencies as necessary. For example, you can set a frequency for routine HVAC maintenance to occur every six months for locations in warmer regions, while setting a frequency of quarterly for locations in colder regions.
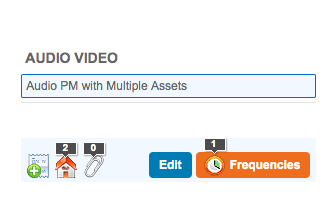
Navigate to the Planned Maintenance module > PM Services. The PM Services page appears.
Click the Frequencies link for the PM Service you wish to set up:

If there are currently no frequencies set up for the service, the Add New Frequency pop-up will appear.
If frequencies exist for the service, the Frequency List will appear. Click Add New Frequency to open the Add New Frequency pop-up.
Enter your desired information. Fields followed with (*) are required:
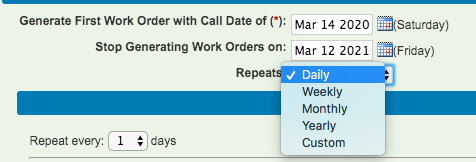
Generate First Work Order with Call Date of (*): Click the calendar to the right and choose the date the PM Services should begin. The date must be a future date. This date becomes the call date.
- Stop Generating Work Orders on: Click the calendar to the right and choose the date the PM Services should end.
- Repeats: This field sets the frequency of the PM. users can select between Daily, Weekly, Monthly, Yearly, and Custom.
Generate in Advance*: Enter a number (3 symbols max.) to indicate how many days prior to the call date, the work order will dispatch to the contractor. This allows the contractor to have advanced notice of service needed and gives them time to contact location and schedule. The best practice is to generate the work order no more than 7 to 14 days in advance. Even if the work order(s) generate 7 days in advance, the contractor cannot check in before the call date.
- Time Offset*: Enter a whole number (from 0 to 12) to delay the work order Call Date and Scheduled date.
This action pushes the Call Date and Scheduled Date forward by X hours from server time (0:00). Thus, the expiration date is also pushed out by the specified number of hours, so you and your provider do not have to update the scheduled date. Length of Work Order*: Enter a number to indicate the time period in days or months in which the service must be performed. For example, if it is a monthly work order, the length of work order(s) would be (1) month (change days to a month). This date becomes the expiration date on the work order(s).
Note: If you selected the first box to “Append Service Window” when you set up the PM, this is where the information will pull from. The work order will not only have the PM Description, but also the service window. Example: Service Window: 1/1/00 through 1/31/00.
- Grace Period: Enter the number of days in which technicians can check in to the work order after the work order expiration date. When the Grace Period closes, technicians will not be able to check in to the work order.
- Currency: Select the country/currency.
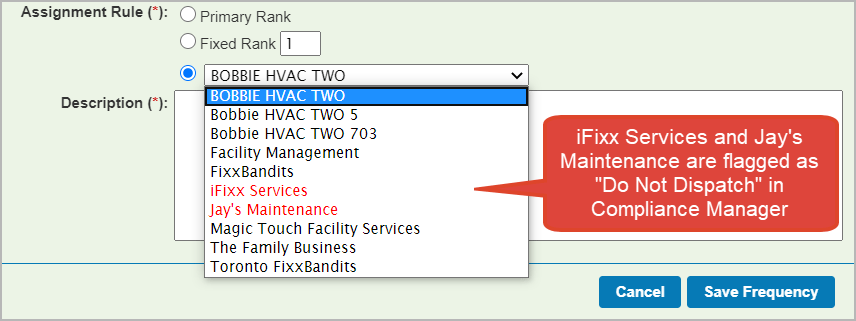
Assignment Rule*: Select which contractor will receive work order(s).
Primary rank: Assign work order(s) to the first ranked contractor for that location and trade.
Fixed rank: Assign work order(s) to a specific rank number for that trade and location.
Contractors Name: Select the required contractor from the drop-down list. Note that only one company can be assigned per frequency. Having the specific contractor selected for a frequency guarantees that work orders will be dispatched to that contractor as long as this company is assigned to that location and trade.
Contractors whose company names are written in red cannot be selected since they are flagged as “Do Not Dispatch” by your company admin in Compliance Manager. These providers cannot take on new work orders. Find more information about Managing “Do Not Dispatch” Providers.
- Description*: Enter type of frequency, for example, Monthly, Quarterly, Annual, January, etc. The best practice is to only enter the name of the frequency in this description box and not the type of service. If you selected Append Frequency when adding the new service, the description you enter will be appended after the PM Service description. If both Append boxes were checked, the work order will display the PM Service description, the Frequency description, and the Service Window.
- Contract ID drop-down field. If you are using the Contracted Services feature, you will see this field, which allows you to link the frequency to the specific contract.

- Add New Locations: If this box is checked, every location added to Service Automation will automatically be added to that PM Service and Frequency. Typically, this box will not be checked.
- Generate Service ID: If this box is checked, contractors will be given a Service ID to use to check in/out instead of using a tracking number. When the contractor checks in/out using a Service ID, the system finds the next available work order assigned to them for that PM Service and Frequency. This option is mainly used for the dispatching of daily work orders.
- Suspend Closed Locations: If this box is checked, when a closed date is entered for a Location and the Location is not removed from the PM module, the system will recognize it has closed and will not load the work order. This option defaults to being checked. Best practice is to leave this option checked.
Click Save Frequency. The new Frequency will appear on the Frequencies page.
Adding Attachments to Planned Maintenance Frequencies
If you wish to add an attachment (e.g., a Statement of Work or other documentation related to that service frequency) to the frequency, click Attachments in the Actions column. Then browse and select the attachment.
Editing Planned Maintenance Frequencies
Once your frequencies are set up, you can always go back and modify them. There are a number of ways to access Frequencies for editing:
- From the PM Services page: Click Frequencies for the service you wish to edit.
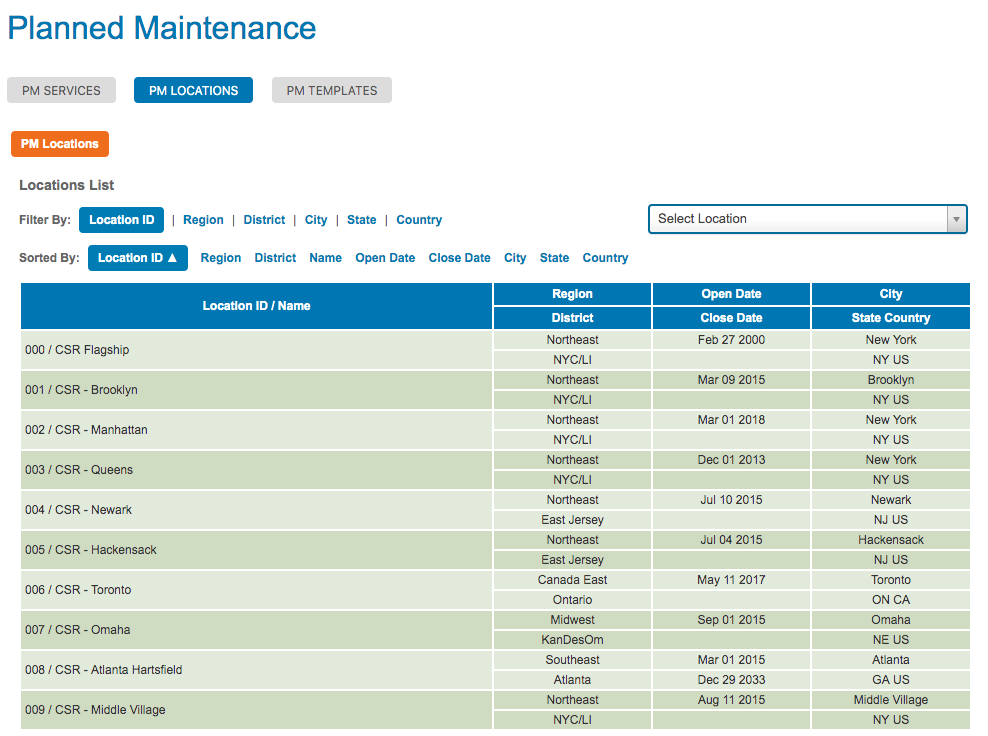
- From the PM Locations page: Click the location attached to the Frequency you wish to edit. The Services page will appear. Then click Frequencies in the Actions column for the service, you wish to edit.
Note: Whenever you make a change to PM Services, Locations, or Frequencies, the changes will not affect work orders that have previously loaded.