Adding Locations and Assets to a Planned Maintenance Service
- Anastasia Medovkina (Deactivated)
- Joseph Yarborough (Unlicensed)
- Chellie Esters
Once you have set up a PM Service and set up corresponding Frequencies, you move to the last step of the planned maintenance process — assigning Locations to the PM Service.
By default, the system does not allow locations to be added to more than one frequency under each PM service.
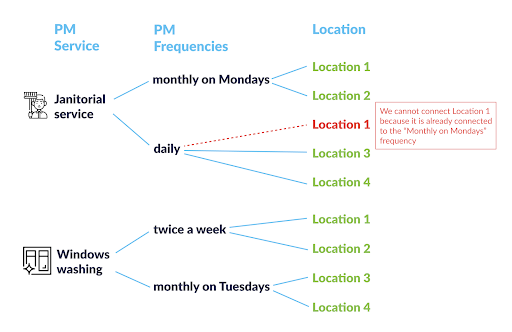
Contact your ServiceChannel manager to assign the same location to multiple frequencies under the same PM service.
Adding Locations to PM Services
Before adding locations, be sure to set up a PM Service and a corresponding Frequency before assigning a service for a location.
- Navigate to the Planned Maintenance module > PM Services section. The PM Services list opens.

- Click Frequencies (#) in the Actions column for the PM Service you wish to add to a Location.
 The Frequency List for the selected PM Service will display.
 - Click Locations (#) in the Actions column for the Frequency you wish to add a Location.

The Locations page for the PM Service and Frequency will display. Click Unassigned. A listing of the locations that are not assigned to the Frequency will display.

There are two ways to add Locations from this page: manually or by importing the Excel template. When you have more than five locations to add, the Excel template may be the quickest way.
Check the box to select your desired Location(s).

To select all locations, check the box in the blue header at the top of the list. If you select all Locations, remember to uncheck any Training or Billing locations that you do not wish to assign PM services to.
Click Assign (#). The checked locations will be assigned to the frequency, and the Assign (#) button will indicate how many Locations are assigned to the Frequency. In the screenshot above, three locations are selected, so the button is updated to Assign (3).
- Once the Location has been assigned to the Frequency, you can then configure the pricing and NTE. Check the box next to the Location and click Edit (1). The Edit pop-up for the location will display.

- Enter your desired configuration for the location.

- Quantity: Enter the number of work orders for each location, which is usually one. Be careful to not enter the price and NTE in this field.
- Subtotal: Enter the agreed upon price or NTE amount for the service.
- Tax: Enter the tax amount, if applicable. If you do not know the exact tax amount, you can make sure the NTE leaves room to cover the tax.
- Tax2Type and Tax2: These fields can typically be left blank (mainly used for Canada).
- CallerIDMatch: When IVR Restriction is set up, check this box to require the provider to only use that phone number to check in to the work order.
- Assets (#): Lists the number of assets linked to the planned maintenance schedule.
- Click Choose Assets, and select the asset(s) to associate with the PM service, then click Update Assets for Location. Learn more about Adding Assets to PM Services.

- Click Update Location.

Your settings now appear in the Locations List for the location you just added. Also, maintenance items with assets will update services in the Assets module.

Adding Assets to PM Services
To track planned maintenance activities associated with your assets as well as their maintenance costs, you can link PM services to the corresponding appliances.
A single PM work order can be associated with multiple assets of the same primary or additional trade. All the assets that you associate with that PM service will be listed on the work order, allowing you and your providers to capture part usage against each asset if required. It also speeds up the work order completion as technicians no longer need to close multiple PM work orders with individual assets on each. To boot, by using the multiple assets feature, you can cut down the overall flow of PM work orders.

To be able to associate a single PM work order with multiple assets, contact your Customer Success Manager.

When there is an annual inspection of the elevators at your locations, you can associate your elevators with the corresponding PM service, which will result in PM work orders being generated with the assets linked.

Another example would be for those who have refrigeration and HVAC appliances containing refrigerants. Such assets must be regularly inspected to proactively identify potential problems and make sure your organization complies with refrigerant regulations in your region.

Let’s say you also have dishwashers that require annual maintenance services. Having dishwashers added as assets in Asset Manager, you can associate them with the corresponding PM service.
You can add assets to a planned maintenance schedule when the trade on the asset matches the trade on the PM service. Let’s say you have PM services for the HVAC trade. You can set up PM services to link them to available HVAC assets.
When setting up PMs with assets, it is important to note that:
- The trade of the asset type should match the PM service trade.
- Based on your business needs, the PM module can create a separate work order for each asset associated with the PM service or a single work order for all the assets at the location linked to the PM service.
- On the PM schedule, only the latest work order will appear.
When you view a list of locations assigned to the PM service and frequency combination, pay attention to the Assets and Merge Assets columns.


How Many Assets Are Linked?
The Assets column tells you how many assets at the PM location are associated with the PM service and frequency.
The column does not display the total number of assets at the location — only assets added to the PM service are counted.
Click the number in the column to add or remove assets.

Multiple Work Orders or a Single Work Order?
The Merge Assets column indicates whether the assets selected for this PM service should be listed on a single PM work order (the flag is on) or should be associated with separate work orders (the flag is off).
When you merge assets, it speeds up the work order completion time as technicians no longer need to close multiple PM work orders with individual assets on each.
To select or remove the flag, open the overlay for editing the location.
- Find the desired PM service, and click Frequencies (#) in the Actions column.

The page displays a list of frequencies created for this PM service.
Look for the desired frequency, and click Locations (#) in the Actions column.

- In the Assets column, check how many assets at each location are associated with the PM service.

- Next to the desired location, click the number under Assets.

Pick the assets you need to associate with your PM service.
You can also remove the assets that should no longer be assigned to this PM service — by clearing the checkbox next to them.

The list contains active assets that exist at the selected location and whose primary or additional trades match the trade of the PM service.
Once you have selected the required assets, click Update Assets for Location.
To merge assets, select the desired location, click Edit, and then select the Merge Assets checkbox in the overlay that appears.
Leave the checkbox empty if you want to create a separate work order for each asset.
- When the Merge Assets checkbox is disabled, the PM module creates a separate work order for each asset that you associated with the PM service for a location.
- When the Merge Assets checkbox is active, a single work order is created for all the assets associated with that PM service at that location.

Contact your Customer Success Manager to turn the Merge Assets feature on.
- Provide any other information in the overlay if required, and click Update Location.
New assets have been added to the PM service. The Assets column updates displaying the number of assets assigned. The Merge Asset column shows whether a single work order should be created with all the assets from the Assets column attached.

Viewing Assets Associated with a PM Service
On the list of locations associated with the PM service and frequency combination, you can see how many assets at each location are linked to that PM service.
- Navigate to the list of locations associated with the required PM service and frequency.
- Click the location ID or name.

- In the overlay that appears, click Assets (#). The list of assets linked to the PM service at the location appears.

To add more assets to the PM service or remove unnecessary ones, click the Choose Assets button.