Managing Locations
- Lamont Eddins
- Joseph Yarborough (Unlicensed)
- Natalia Larina (Unlicensed)
Service Automation allows you to manage locations in real time. Adding, editing, or removing a location takes effect as soon as you save the changes.
You can manage all your locations on the Locations page.

Adding a Location
To create work orders for a location, you need to ensure that each location exists in Service Automation.
When creating a new location, provide the location ID, name, and detailed address. All other information is not mandatory, but we recommend you add as many details as you can for more effective and efficient work order management, reporting, and analytics.
- On the Locations page, click Add New Location under the Locations list. The page for creating a location appears.
- Under Location Address, provide a Location ID, Location Name, Country, City, and Zip / Postal Code. Add any other pertinent information if required.
- (Optional) Under Location Size, specify the square footage of the location's interior. Change the unit of measurement from f to m if needed.
- (Optional) Under Status, set the location Open Date.
- (Optional) Under Contact, enter the main contact details for the location.
Click Save Location Details at the bottom of the page. The Clone Provider Assignments overlay appears.
When adding your very first location, you are not prompted to clone provider assignments as there are no locations where you can clone this info from.
- From the locations drop-down list, choose the location from which you want to clone provider assignments, and click OK. The confirmation message appears, indicating the location has been saved.
- (Optional) Switch between the tabs at the top of the page to add more info on your location. Remember to save your changes on each tab.
- Click Close in the top right corner to get back to the Locations list.
Editing a Location
In some cases, you need to update the information for an existing location. You may also want to add other details or even attachments for the location.
- On the Locations page, find the location you want to update, and click its ID or name. The location details page appears.
Navigate between the following tabs based on the info you need to add or modify:
- Location Details. Manage the location ID, name, region, district, and address as well as the location open and closed dates, main contact phone and fax numbers, and emails. Find out more in Updating Location Details.
- Location Notes. Add extra details about a location by filling out the predefined text fields. Look for more info in Managing Location Notes for a Location.
- Attachments. Use this section as a repository for location-related files, for example, floor or evacuation plans, photos, or videos of the location. See Managing Attachments for a Location for more information.
- Wiki. Find additional location information, such as elevator codes or landlord information, in a free-form text box. Check Managing the Wiki for a Location for more details.
- Provider Assignments. Assign service providers to particular trades for the selected location. See Managing Provider Assignments for a Location to find out more.
Assets. See the list of assets related to the location. You can check a short summary of each asset, including its tag ID, condition, last work orders where it was used, and other info.
- Once you update the info on one tab, save your changes before going to the next tab.
- Click Close in the top right corner to get back to the Locations list.
Depending on your Service Automation system settings and user permissions, you may have more tabs on the location details page.
Closing a Location
There may come a time when you have to close a physical location. When you need to do so, you must also close the location in Service Automation so you are no longer billed.
In order to fully close the location, you need to both enter a closed date and retire all providers from this location. After you do so, you can no longer dispatch work orders for that location. Closing a location stops ServiceChannel from billing your company for managing work orders through that location.
- On the Locations list, find the location that you want to close, and click its ID or name.
- Under Status, set the Closed Date for the location, and then click Save Location Details at the bottom of the page. The confirmation message appears.
- Go to the Provider Assignments tab, and select the Select All checkbox on top of the trades list.
- Click Retire Providers at the bottom of the page, and then click Retire in the opened overlay to confirm your decision.
Click Close in the top right corner to get back to the Locations list.
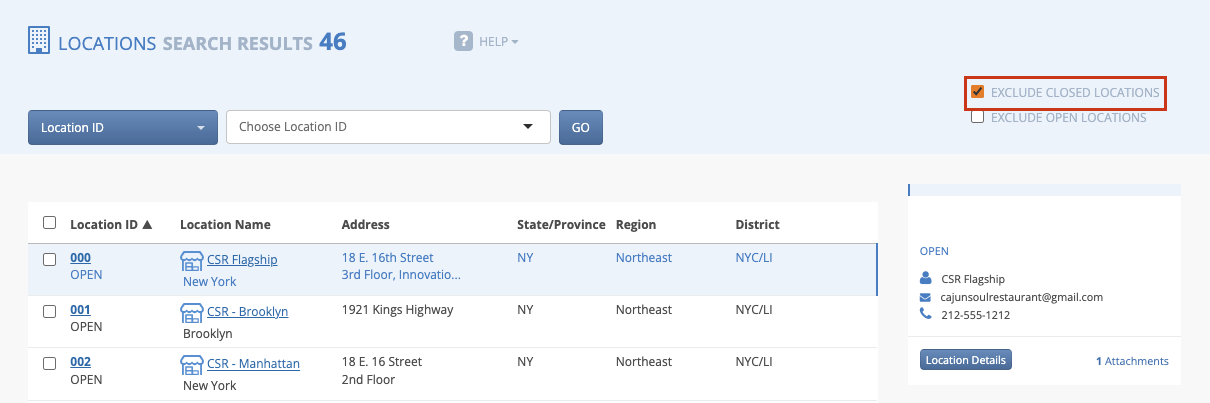
Once you close a location, it disappears from the Locations list's default view. To show closed locations, clear the Exclude Closed Locations checkbox in the upper right corner of the Locations page.
Deleting a Location
In those cases when a location is no longer operating or you don’t need it anymore in Service Automation, you may delete it.
Important
Make sure there are no work orders associated with this location. Otherwise, deleting is not possible.
- On the Locations list, find the location that you want to delete, and click its ID or name.
- Go to the Provider Assignments tab, and select the Select All checkbox on top of the trades list.
- Click Retire Providers at the bottom of the page, and then click Retire in the opened overlay to confirm your decision.
- Atop of the tabs on the location details page, click Delete Location. The confirmation overlay appears.
- Click Delete. The page reloads and displays the Locations list.