Managing Client Rates
- Chellie Esters
- Anastasia Medovkina (Deactivated)
- Joseph Yarborough (Unlicensed)
- Jason Gauntz (Unlicensed)

Go to Info for the US Providers
The Client Rates section allows you to propose charges for standard labor rates (charges for supervisors, technicians, and helpers) or responsive labor rates (hourly charges for emergency versus non-emergency calls), along with material markups, subcontractor markups, and service repair guarantees. Your client must approve these rates before they can take effect in Provider Automation.
With client rates, you can propose different rates for different regions, trades, or types of work. For example:
A contractor who performs both landscaping and snow removal work can propose different rates for each trade.
A contractor who performs work in both major cities and smaller towns can propose different rates based on location.
A contractor who subcontracts work can propose different rates for subcontracted and self-performed works.
Once your client rates are approved, it will affect how you invoice. When you submit an invoice, Provider Automation will check the rates you enter against the agreed-upon client rates. When there is a mismatch, both you and your client will receive a red warning ![]() on the invoice as a prompt to investigate further.
on the invoice as a prompt to investigate further.

 Your client may require you to propose client rates as part of being accepted into their Network, as indicated with an exclamation mark next to it.
Managing client rates happens in six steps:
Adding a rate type
Creating a rate card
Assigning the rate type to the appropriate trades
Submitting proposed rates to your client(s)
Your client approving or rejecting your proposed rates
Resubmitting proposed rates if necessary
Should you need help with your rates, please contact contractorsupport@servicechannel.com
Accessing the Client Rates Section
The Client Rates section gives you the ability to assign rates across multiple regions in a flexible manner and to edit and resubmit the rejected portion instead of entering the entire card again.
- Click the Clients tab on the top navigation panel. You will see the list of clients.
- Choose the client whose rates you want to see, and click the Continue button.
- Click the Client Rates option from the list on the left.

Adding a Rate Type
There are essentially four sections to complete when adding a rate type:
Entering a rate type name, description, and currency.
Indicating whether you charge Standard Rates for supervisors/technicians/helpers, or Responsive Rates for emergency/non-emergency calls.
Entering material markups based on material costs.
Entering subcontractor markups on labor and material, as well as any overhead fees and guarantees.
Click the Create New button.
You cannot apply a new rate type to an existing rate card. Please, create a new rate card to apply your new rate type.

- Click Manage Rate Types.

You will see the overlay with the list of existing rate types.
- Click Create Rate Type.

- In the Edit Rate Type window, enter a rate type name and description, as well as the correct currency (USD is the default).
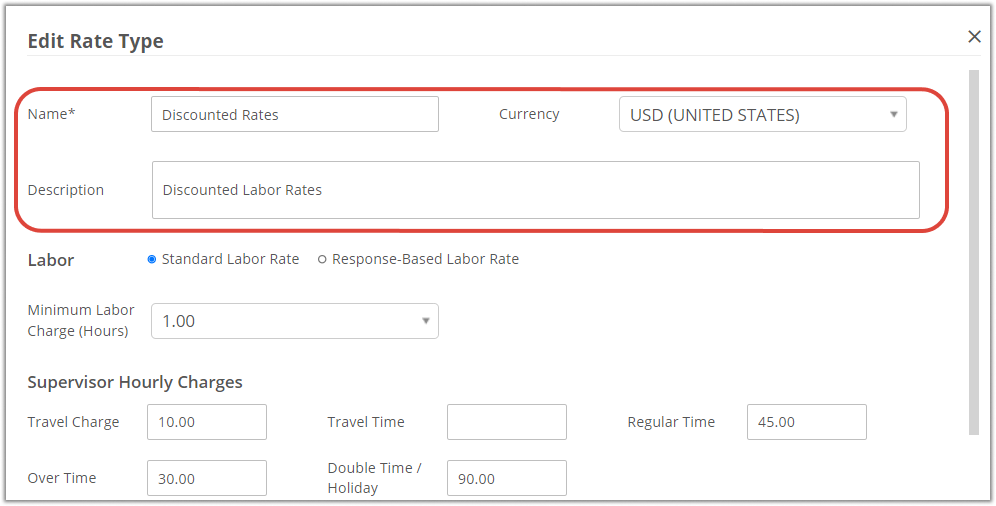
Indicate whether you are entering Standard Labor Rates (charges for supervisors, technicians, and helpers) or Responsive Based Labor Rates (hourly charges for emergency versus non-emergency calls), and (if applicable) select a Minimum Labor Charge (in Hours).
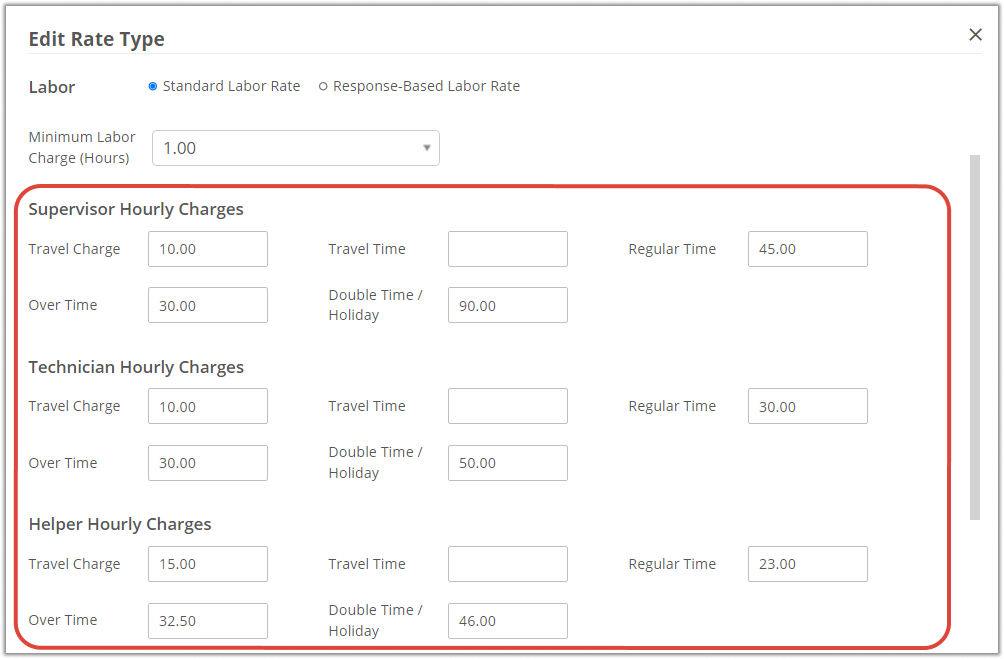
(Selecting Standard Labor Rates): There are three roles — Supervisor, Technician, and Helper. For each applicable role, enter the below information:

Please, contact your ServiceChannel representative should you need to change the decimal point (.) to decimal comma (,) on non-monetary amounts, such as:
- Hours and Duration
- Quantity Amounts
- Weight.

- Emergency Hourly Rate: Enter an hourly rate for emergency calls.
- Emergency Travel Charge: Enter a flat rate for emergency trip charges.
- Non-Emergency Hourly Rate: Enter an hourly rate for non-emergency calls.
- Non-Emergency Travel Charge: Enter a flat rate for non-emergency trip charges.
- Travel Charge: Enter a fixed rate for travel. For hourly travel rates, use the Travel Time field.
- Travel Time: Enter an hourly rate for trip charges.
- Regular Time, Over Time, and Double Time / Holiday: Enter hourly rates for each field, as applicable.
(Selecting Response-Based Labor Rates): Enter flat rates for emergency and non-emergency work rates and travel charges:

Emergency Hourly Rate: Enter an hourly rate for emergency calls.
Emergency Travel Charge: Enter a flat rate for emergency trip charges.
Non - Emergency Hourly Rate: Enter an hourly rate for non-emergency calls.
Non - Emergency Travel Charge: Enter a flat rate for non-emergency trip charges.
Material Markup: break down how you mark up parts or materials in terms of "the maximum cost of the part (X) is marked up at Y%. For example: for Parts that cost no more than $200, the markup is 200%; for parts that cost between $201 and $500, the markup is 105%, and so forth. You may add up to six material markups.
Enter amounts and percentages as numbers only. Do not append currency or percentage symbols, as these symbols are not valid in these fields. Should you need to change the decimal point (.) to decimal comma (,) on monetary amounts, contact your ServiceChannel representative.

Subcontractor Markup: Similar to Material Markup, indicate your labor and materials percentage markups for when you utilize subcontractors. You can also indicate any Overhead and Fixed Management Fees in percentages. Finally, for Service Repair Guarantee, enter the number of days of the service repair warranty (from the date of successful work order completion).

Add any Additional Information as needed, and then click Save. You will see the new rate type in the overlay Manage Rate Types. Select the checkbox with the rate type to apply to the new card.

You may edit or delete this rate type as long as your client has NOT accepted it.
- Click Update to bring the new rate type into the action.

- You will now see that your new rate type has been added under the Rate Type tab.

You CANNOT apply a new rate type for the cards already submitted by you or approved by the client.
Editing a Rate Type
You may modify labor rates, material and subcontractor markup for the selected rate type using the Edit option.
- Click Manage Rate Types.
You will see the overlay with the Rate Types list. - Navigate to the chosen rate type, and click the Pencil icon to change the information on the rate type.

- Change the necessary information in the Edit Rate Type overlay.

- Click Save.
Once you save the information, you will see the overlay proposing to update the rate type.
- Click Update. Confirm that you want to update the information.
- Click Compare to see the changes.
 You will see the changes highlighted in yellow.
- Click Update when finished or Back to go back.
- Once you are sure you agree with the changes, select the Rate Type checkbox, and click the Update button.

To continue, click the Update button. The changes will apply to the chosen rate card if not submitted or approved yet.
You CANNOT apply the edited rate type for the cards already submitted by you or approved by the client.
Creating a Rate Card
You can have only one active rate card for one client. When creating a new card, keep in mind that once the new card is approved by the client, it will replace the existing card.
- Open the Client Rates page.
Once you are on the Client Rates page, you see your current rate card (if there is one) and have the ability to create a new one to send to a client for approval.
Click the Create New button to start a new card.

While setting up your profile, you also chose the Trades and Regions you service, whether through self-performing or subcontracting. These trades and regions appear in your Rate Card automatically, allowing you to propose rates based on trade, regions, and who performs services.
 The new Rate Card page opens.
1. The Card Status changes automatically after you start filling out the information. For example, when creating a card, you have the Not Started status. On assigning the rate types, it changes to In Progress.
2. Effective as of Date is filled in with the date that you want this rate to start. You can start it no earlier than tomorrow.
3. The Progress Bar shows how many rates are assigned and how many of them are left unassigned.
4. The Current Trades that are assigned to you as a provider. They are automatically applied from those selected in the profile before.
5. The Manage Rate Types button allows you to create, edit, and update the rate types and choose the rates you want to connect to this specific card.
6. The History tab shows all the actions taken on a card.
7. The Submit button will be available after assigning rate types to all the trades on a card.
8. The Discard button will delete this card without any savings.
3. Assign the Rate Types to the Trades. See Assigning and Submitting Proposed Client Rates for more information.
