Managing Locations
Jing Tong (Unlicensed)
Anastasia Medovkina (Deactivated)
Natalia Larina (Unlicensed)

On the Locations page, permissioned users can view a list of locations and their details. Locations are essential to the work order generation process: a technician cannot be dispatched to a physical location until your client configures it as a location.
- In the hamburger menu, click Administration > Locations. The Locations page appears.
Overview of the Locations Page
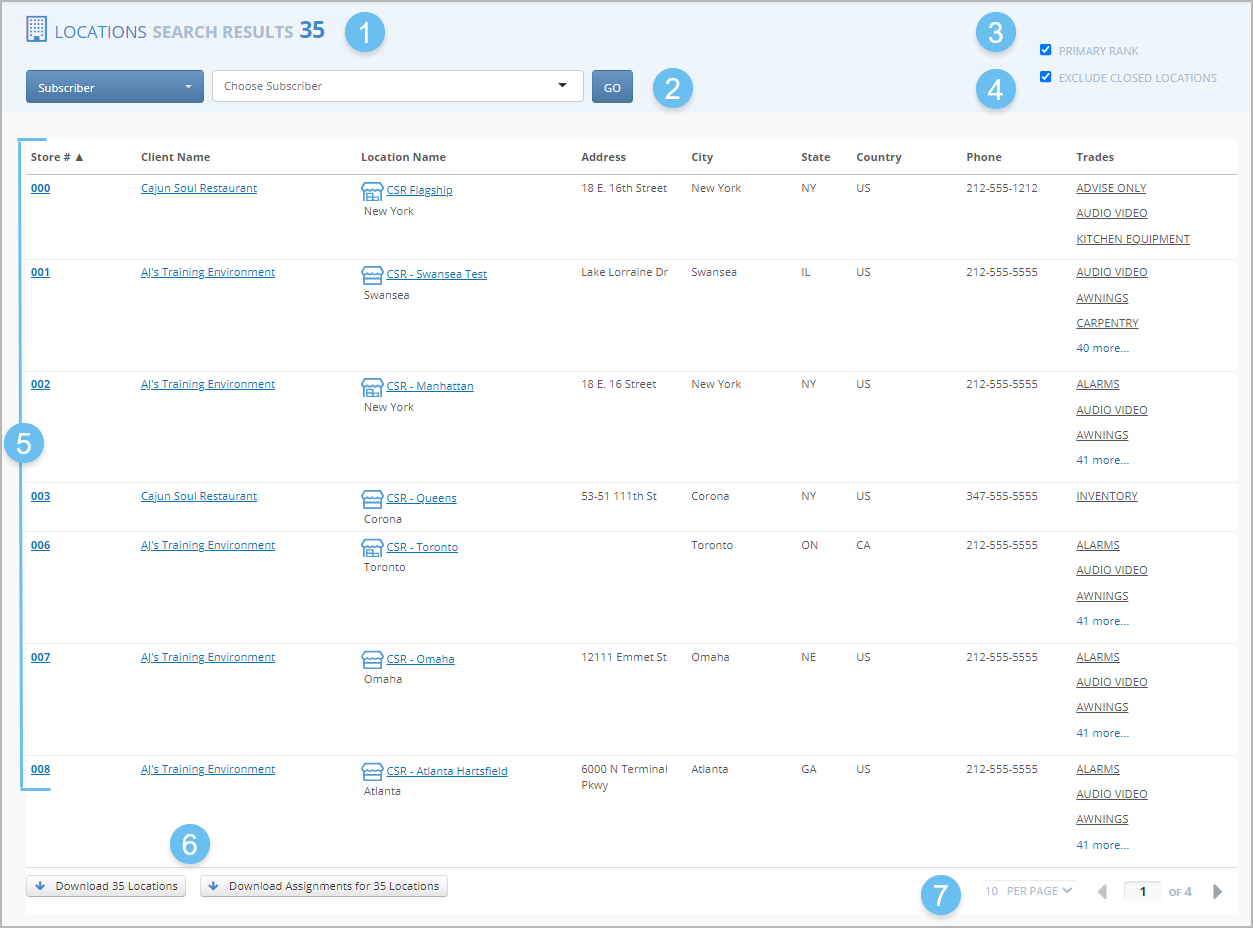
The image below shows an overview of the Locations page.

- Locations count. At the top of the page, you can see the total number of displayed locations. Once you apply filters to the locations list, the number updates accordingly.

- Filters. Apply filters to the locations list to find the locations you need.
- Primary Rank. The Primary Rank checkbox is clear by default. Select this checkbox to display only those locations and trades for which you are assigned as a primary rank provider by your client.

- Exclude Closed Locations. The Exclude Closed Locations checkbox is used for hiding closed locations. By default, closed locations are hidden. To display them on the list, clear the Exclude Closed Locations checkbox.

- Locations list. View a list of locations you have access to. You can sort locations by specific parameters or navigate to the details page of the desired location to view extended information about it. In the table listing locations, you can see the following details for each location:
- Store # showing the location number
- Client Name displaying the client company name
- Location Name showing the location name and city
- Location address information, including:
- Address
- City
- State
- Country
- Phone number of the main contact
Trades you are assigned to for this location. Only the first three trades are shown for each location. To view the full list of trades, click # More. To collapse the list, click Show Less.
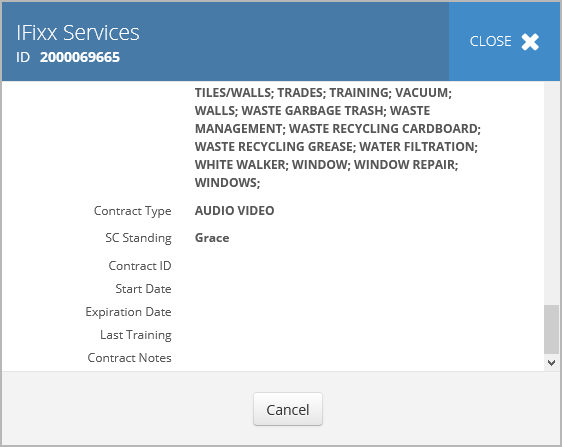
To view the contract information for a trade you service at a specific location, click the desired trade. In the overlay that opens, you can also see location details and your account status.
Click here to view a screenshot.
- Download options. Click the button at the bottom left of the locations list to download the desired Excel report:
- Locations report. Contains a list of locations and their basic details: location ID, name, address, opening and closing dates, contact person, and phone number.
- Provider assignments report. Includes a list of locations with their basic details, location notes, and the trades you are assigned to service.

- Pagination. Use the pagination options at the bottom right of the locations list to set the number of locations displayed per page — 10, 20, or 50 — and switch between pages. By default, 20 locations are shown.

Sorting and Filtering Locations
You can sort locations by a specific parameter and apply multiple filters to the locations list.
Sorting Locations
You can sort locations by the location number, client name, location name, city, state, or country. By default, the list is sorted by the location number (Store #).
To sort the table by a specific column, click the column header. You will see an up arrow 🔼 next to the column name showing the column is sorted in ascending order. To change the sort order to descending 🔽, click the column header again.

Filtering Locations
You can dynamically fine-tune the filters on the Locations page by using multiple filtering criteria. Below are the filtering options:
- Subscriber you have a contract with
- Location attributes: location ID, name, region, district, address, city, state/province, zip code, and country
- Opening date. You can set a range for the opening date of locations using the Open From or Open To options.
- Trade you service at a location
Choose the desired filtering criteria from the drop-down list, and then enter or select the required parameter from the field on the right. The locations list updates accordingly.

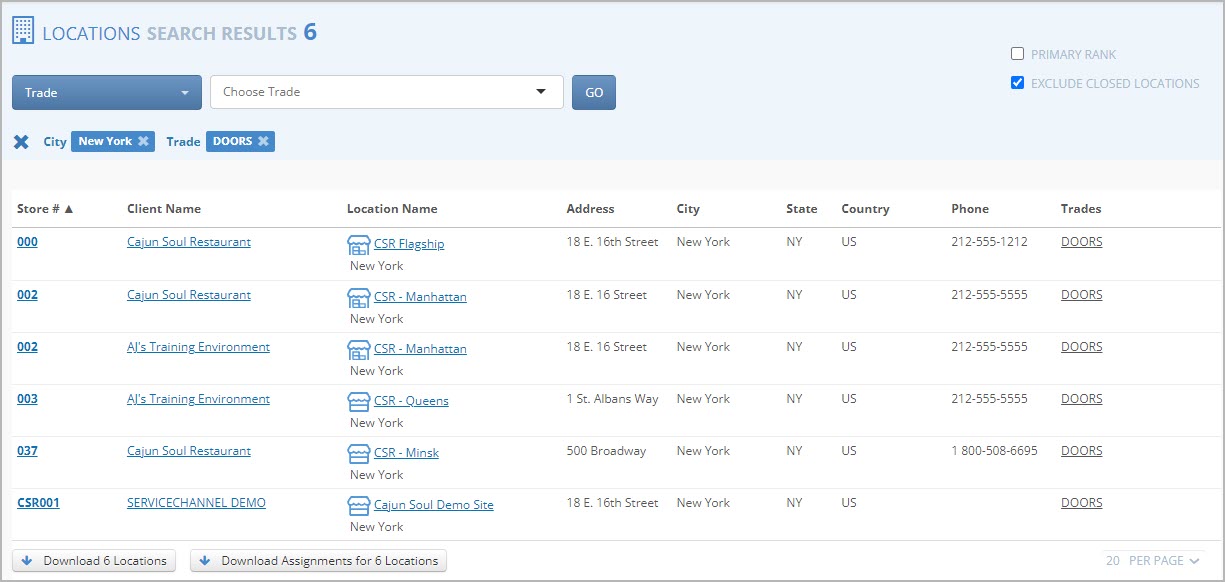
You can dynamically filter the locations list using multiple filtering criteria.

When you no longer need your filtering results and want to return to the full list of locations, you can clear the applied filters.
- Click X on the desired filter name to clear a specific filter. The remaining filters stay active, and the locations list updates according to the remaining filters.
- Click X to the left of all filter names to clear all applied filters at once.
Viewing a Location
From the locations list, you can navigate to viewing detailed information about a specific location.
- On the locations list, find the location you want to view, and click either its Store # or Location Name. The location details page appears.
At the top of the location details page, you can see the location number and name. Switch between the tabs to view the information you need.
-
Page:
-
Page:
-
Page:
-
Page:
-
Page:
-
Page:
-
Page:
-
Page:
