Each audit submitted through Service Automation and SC Mobile is listed in Site Planning Reports. Permissioned users can:
Drill down into each audit to view checklists, checklist items, ratings, media files, comments, work orders, and quantities or costs
Download individual site audit data
Download filtered audit data
Attach related work orders
Individual audit data, as submitted by an auditor, capture actionable information about the location. The data are grouped by area, then checklist, then checklist items. Drill down to view:
The number of checklist items in each area and checklist that failed the inspection
Checklist item ratings that determine whether each item passed or failed inspection
Related photos, videos, and comments to support the item data
Related work orders, and total quantities and dollar costs of checklist items indicated at the location during an audit (or the total of the related cost of a checklist item)
In the Site Audit Reports list, locate the desired audit line item. You can use filters to help you narrow down the audit list.
On the desired audit, click View. The audit report appears.
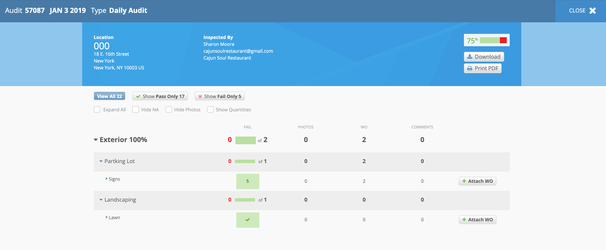
On the top of the page, you can see the audit number, the date the auditor submitted the audit, and the audit type used for the audit.
In the bright blue bar, you can view the following:
Location (left column). The location number and address, as configured in the Locations module.
Auditor (middle column). The person who inspected the site and ran the audit, including contact information, as configured in the Users module.
Overall Score (right column). Calculated "Pass" against "Fail" rating values for checklist items within the audit.
Download (right column). Click to download an MS Excel version of the audit.
Print PDF (right column). Click to generate a printed view of the audit, controlled by your browser settings.
Click the triangles to the left of each area, checklist, and checklist item to show or hide the data. You can also view the audit data using filters to hone in on specific details. See Drilling Down into the Site Audit Report, below, for more information on reading audit data.
When you finish reviewing the audit results, click Close in the upper-right corner of the page to return to the Site Audit Reports list.
Drilling Down into Site Audit Report
The Site Audit Report consists of the following sections:
Area. The example is BOH.
Checklist. The example is Bathroom.
Checklist items. The examples are Doors, Exhaust Vent, and Floors.
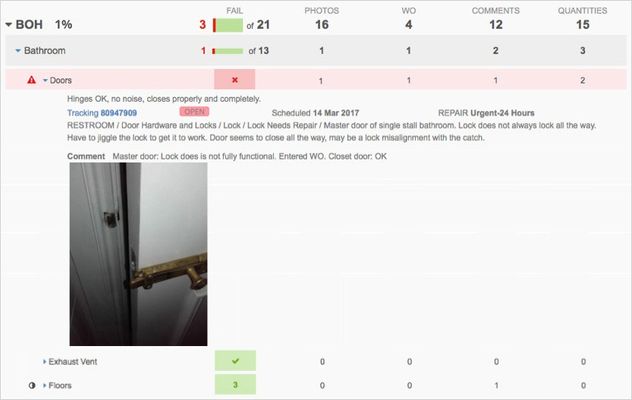
Let's discuss how to read each line item.
Area
Area BOH has 3 checklist items that failed the inspection, out of 21 items. There are 16 photos and videos, 4 work orders, 12 comments, and 15 quantities associated with the BOH Area. The area score is 1%.

Checklist
Checklist Bathroom has 1 checklist item that has failed the inspection, out of 13 items. There is 1 photo or video, 1 work order, 2 comments, and 3 quantities associated with the Bathroom checklist.

Checklist Items
Checklist Item Doors is highlighted in pink as an item that has failed the inspection. The red X indicates that the Pass/Fail rating system was used. See Site Planning Rating System for more information. There is 1 photo, 1 work order, 1 comment, and 2 quantities associated with the Doors checklist item.

When you expand these items, you will see more audit data:
Instructions to the auditor, as configured in Site Planning Manager - Admin, are listed first under the checklist item. In this example, "Hinges OK, no noise, closes properly and completely" is the instruction.
Work orders associated with the item are listed next. Full details (Area/Problem Type/Asset Type/Problem Code/Description) are listed, along with the tracking number, status, scheduled date, and priority. In this example, "Tracking Number 80947909" was logged while this item was being inspected. Click the tracking number to navigate to the work order in Service Automation.
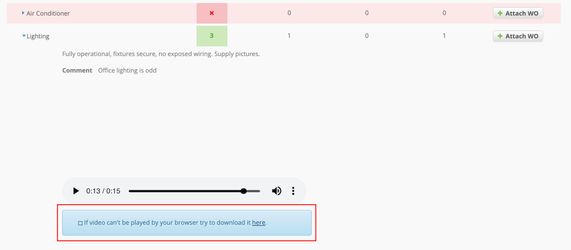
Comments entered by the auditor during the inspection are listed next. Comments about the "Master Door" were logged in this example. To view a video attached to the report, as shown below, follow the highlighted instructional text to download the video when it can't be played in the report.
Checklist item Exhaust Vent is not highlighted in red, which indicates it has passed the inspection. Again, the Pass/Fail rating system was used, but this time the green check mark indicates a passing rating. There are no media files, work orders, comments, or quantities associated with this item.
Checklist item Floors has also passed the inspection. For this item, either Numeric or Weighted rating system was used. See Site Planning Rating System for more information. There is only 1 comment associated with this item.
Veto checklist items, which are marked with a warning sign, have the highest impact on the audit score. When at least one of the Veto checklist items is marked as Fail, the total score of the audit drops to 1%. However, when the same item gets Pass, it is counted as a regular checklist item. The checklist item Doors is a Veto item.
Ignore checklist items, which are marked with a semi-filled circle, are ignored when the audit score is calculated. The checklist item Floors is an Ignore item.
Filtering Report Data
When you open a report, the audit displays all items by default under the View All button. At the top of the report page, are filters to help you organize the data.

Click Show Pass Only to display only those items that have passed the audit.
Click Show Fail Only to include only the items that have failed the audit.
Select the Expand All checkbox to show the report with all the photos, videos, work orders, and comments displayed.
Select Hide NA not to show the items that were not rated by the auditor.
Select Hide Photos not to display photos and videos.
Select Show Quantities to include the Quantities and Dollars columns hidden by default.
Printing or Saving Report Data
You may print the report data or save it as a PDF file.
Note that only the data that appears on the screen will be printed. For example, when you have expanded all data or hidden photos, what you see on your screen is exactly what will be printed or saved as PDF.
On the desired Site Planning report, arrange data to show what you want to print or save as a PDF.
Click Print PDF on the top blue bar. The print dialog box appears.
Choose what you want to do next:
(Printing the report) Select the printer, and click Print.
(Saving the report) Select Save as PDF, and click Save.
The report saved as a PDF file is similar to the report you see on your screen in the Site Planning Reports module.

Work order tracking numbers are clickable links to the corresponding Work Orders List in Service Automation.

After you have expanded the section with an attached work order to see it in your PDF report, you can get to the Work Orders List by clicking the tracking number. Note that you should be logged in and have the permission to view work orders.
Attaching and Detaching Work Orders in Site Planning Reports
Attaching a Work Order
If a work order is created during the site audit, you can link it in the Site Planning Report.
- On the desired site audit report, click Attach WO button, the attach WO pop up window displays.

- Type in the relevant work order number, click Attach WO.

- The onscreen prompts will tell you if the work order has been successfully attached.
After attaching the work order to the desired report, you can view the work order details on the Work Orders page by expanding the checklist items.
Detaching a Work Order
If you accidentally attach the wrong work order to an item, you can detach the work order from that item.


