Replacing a Current Provider on the Mapping Details Page
- Anastasia Medovkina (Deactivated)
Your previous step was navigating replacement mapping options.
The Mapping Details page hosts providers selected from the Replacement Mapping Options page.

On this page, you can:
- Extend the expiration date for the opportunities that are In Progress.
- Invite opportunity providers to join your Private Network.
- Rank opportunity providers and assign them using the Quick Assign function to replace the current primary-ranked provider at specific locations.
If you need to understand how we analyze current and opportunity providers, estimate cost savings, and more, please read Optimizing Private Network with Network Opportunities.
If you are having trouble understanding the workflow for navigating through opportunity cards, groups, and providers, consider reading our Network Opportunities Pages Roadmap.
About Mapping Details Page Sections
The Mapping Details page is organized into 4 main sections:
- The Current Provider’s Name link for replacing the current provider with opportunity providers. Clicking on the name opens the provider’s profile.
Opportunity Expiration Date is visible if the selected opportunity is in the In-Progress status.
You can select a new expiration date for the In-Progress opportunity by clicking on this date.
- Mapping Details:
- Potential Score Improvements highlight the percentage improvement possible for the selected group.
- The number of providers included in the Mapping Group
- Opportunity Status displays the current status of the opportunity.
- Potential Annual Savings shows the potential yearly savings that could be achieved by taking advantage of the opportunity.
- Opportunity Provider Details cards offer detailed information about each provider within the Mapping Group.

About Opportunity Provider Card Sections
The Opportunity Provider Card is organized into 6 sections:
- Provider Name. Click to open the provider’s profile.
- Card Status indicating the current stage of your relationship with a provider:
- Dismissed. This provider was dismissed. Click Restore to reinstate them.
- Available. This provider is currently not in your network. You can invite them to the specified locations.
- Waiting for Response. Invitation sent; awaiting the provider's response. No further action required.
- Rejected. This provider has declined your invitation.
- Accepted: Compliance. The provider has accepted your invitation and is completing the compliance requirements.
- Awaiting Counter Acceptance. The provider has fulfilled all compliance requirements. Review and confirm to add them to your network.
- In-Network. The provider is already in your network. You can assign them to the specified locations.
- Assigned. The provider is assigned to the specified locations as primary. No further action required.
- Profile Information Summary provides a quick overview of:
- Coverage
- SC Client #
- Industries Covered
- Trades Covered
- Recently calculated Search Score
- % increase in score when compared to the current primary-ranked provider.
- The number of locations covered by provider
- Locations where you can potentially assign this provider and associated potential savings.
- Action buttons. Actions vary based on the provider’s status:
- Dismiss. Removes the provider from the Mapping Group.
- Restore. Allows to add a provider back to the Mapping Group after they have been dismissed.
- Message. Initiates a dialogue with a provider.
- Invite. Sends an invitation to join your Private Network.
- Assign. Visible for providers with the In Network status. Assigns the provider to locations.
- Counter Accept. Finalizes adding the provider to your network and after they have completed compliance requirements.

Inviting an Opportunity Provider to Private Network
When an opportunity provider is marked as Available, you can invite them to join your Private Network. Upon accepting the invitation and meeting compliance requirements, you can add this provider to your Private Network and assign them to the locations within the selected Mapping Group.
- Navigate to the Mapping Details page, by clicking Provider Search > View all > View Opportunity > Select Group.
On the provider’s card you want to invite, click Invite.

You can invite 1 provider at a time.
Complete the Invitation Flow to finalize your invitation.
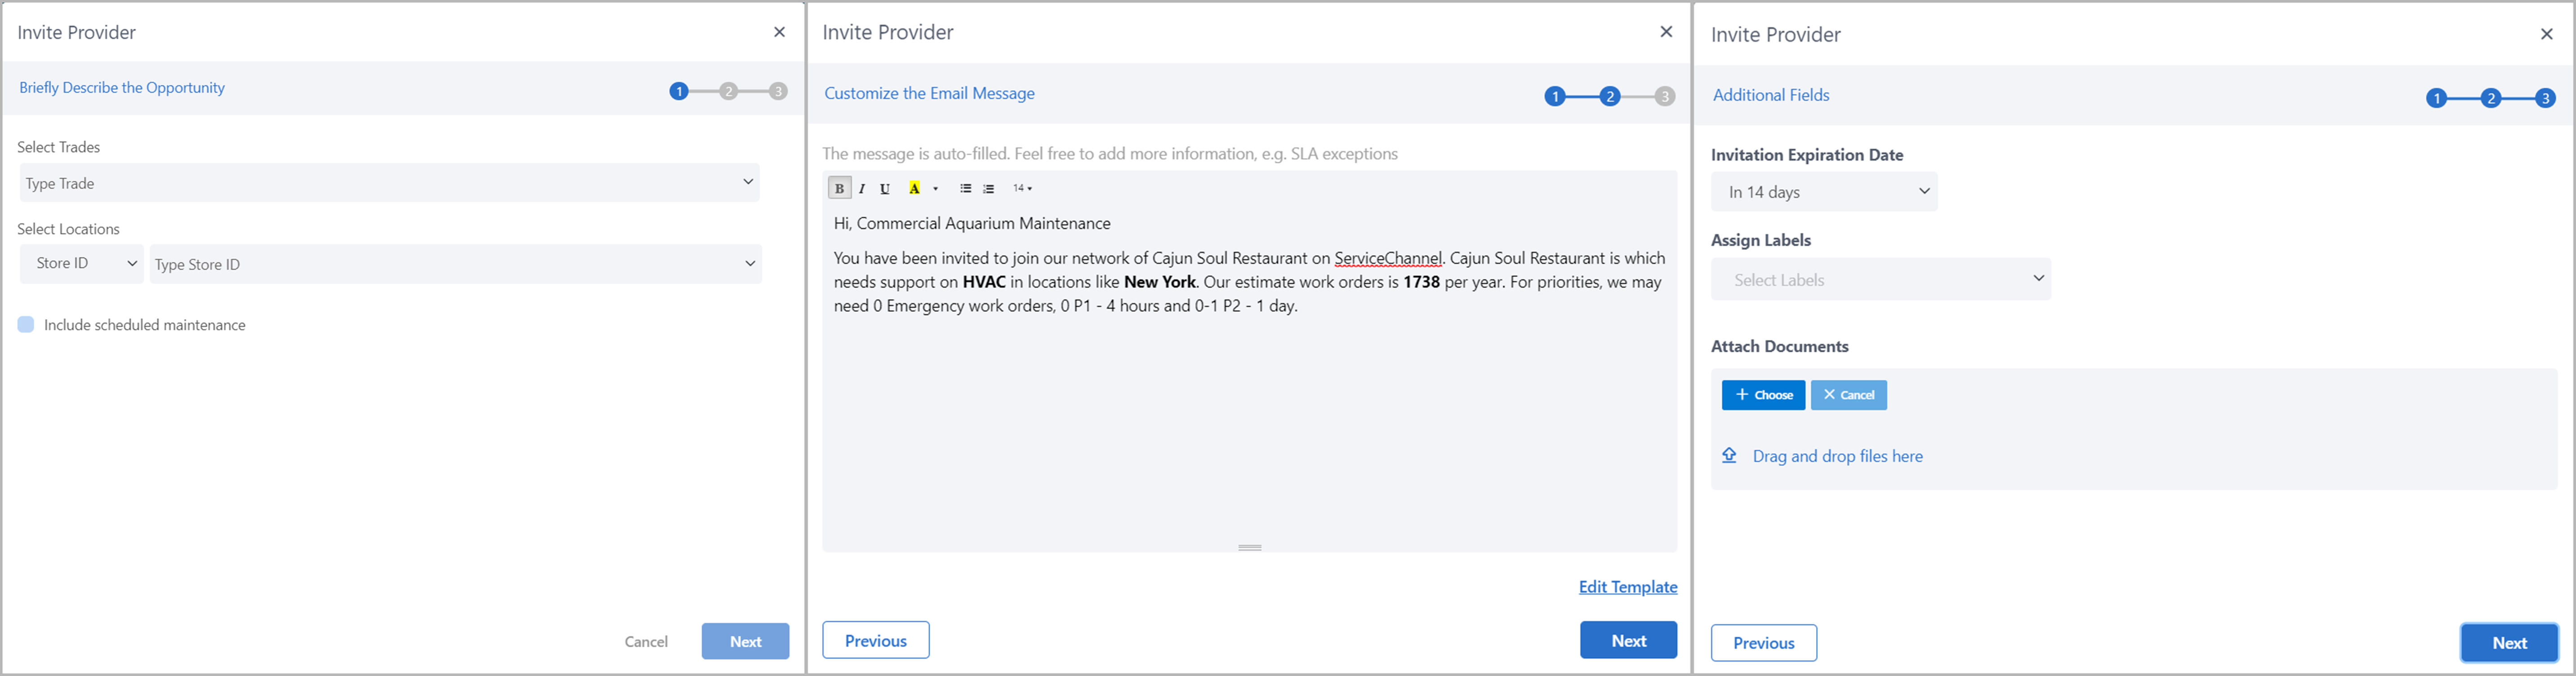
On the Invite Provider window, you can deselect any locations you do not wish to include in the invitation.
- Click Invite to send the invitation.
The Opportunity Provider card will update to Waiting for Response.
What’s next?
Await the provider's response. Once they accept your invitation and become compliant with your requirements, you will see the Counter Accept button on the provider’s card. Click it to officially add this provider into your Network.
With the provider now in the In-Network status, you are ready to assign them to locations.
Ranking an Opportunity In Network Provider
Once a provider accepts your invitation and joins your Private Network, they are considered In Network providers and can be assigned to locations.
- To navigate to the Mapping Details page, click Provider Search > View all > View Opportunity > Select Group.
On the chosen provider’s card, click Assign.

You can assign only 1 provider at a time.
You will then proceed to Step 3 of the Provider Quick Assign process.

If you do not see the Provider Quick Assign page, check if:
- You have turned on the Provider Quick Assign function. Contact your ServiceChannel manager, if not.
- Your user has Power User or/and Provider Assignment Editor secondary roles to be able to view Network Opportunities.
Select the desired locations and replace your current provider with the chosen opportunity provider.
The count of locations in the Quick Assign tool might be less than the count on the card located on Mapping Details page. Note that Closed locations are included when being analyzed by the Network Opportunities tool, but Closed locations are EXCLUDED in the Quick Assign tool by default.
- Deselect the checkbox above the Locations Table to reveal closed locations.


Upon completing the assignment, the status on the provider’s card will update to Assigned.
