Managing Trades
- Chellie Esters
- Jing Tong (Unlicensed)
- Uma Srinivasan (Unlicensed)
A Trade is a bucket that work orders are placed in for further categorization. Typically, a Trade is akin to a contractor or service provider in a specialty trade. Trades are required to create work orders, and are also used for reporting (for example: determining how many HVAC requests are open/in progress) and GL Coding. You may add or edit Trades/NTEs in the Work Order Properties section in Service Automation Admin.
A few important notes to consider while creating Trades:
- To optimally use the Service Automation Dashboard, you must add the Trade in the Admin module first before you add it to the Dashboard using the Dashboard Admin Template.
- Trades listed in the Dashboard and Trades listed in Admin must be spelled exactly the same so that Service Automation can create work orders. For example, listing the trade “Roof Leak” as “Roof Leak” in the Admin module but as “Roof Leaking” in the Dashboard Template will cause errors.
- You may automatically reassign a Trade to the next service provider listed in your provider assignments for a location. See Automatically Reassigning Work Orders for a Trade, below.
Adding a Trade
Trades listed in this module must also exactly match trades in your Dashboard Issues List. Once you adjust your Trades here, also adjust your Dashboard Issues List at the same time.
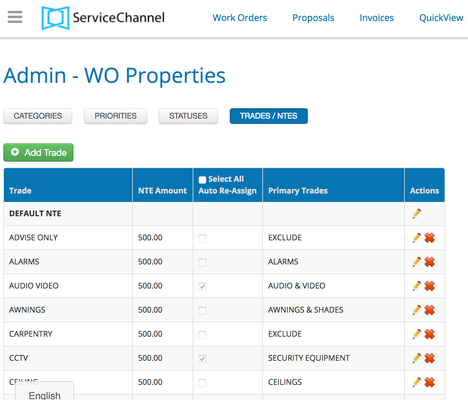
- On the top-left of the page, click the menu icon, and select Admin > WO Properties > Trades/NTEs. The list of Trades currently in the system appears.
- Click Add Trade. The Trade overlay appears.
- Enter the name for the new Trade in the pop-up.

- (Optional) Check the Auto Reassign box to turn on automatic reassigning of all work orders in that Trade. (See Automatically Reassigning Work Orders for a Trade , below.)
- Click Save. Your new Trade will appear in the Trade list.
For Trades where Auto Reassign was selected: The Trades list will appear with the Auto Reassign box checked.
The Auto Reassign box cannot be controlled from the Trades list. You must edit the Trade in order to turn Auto Reassign on and off.
6. Download your Dashboard Issues List and add the Trade to that list.
Automatically Reassigning Work Orders for a Trade
While creating a Trade, you may elect to have related work orders automatically reassign to the next service provider in your provider assignment list. This is beneficial because you do not have to go into the system to reassign a work order manually when your first provider declines a work order.
You can auto-reassign in two ways: single auto-reassign and multiple auto-reassign.
| Single Auto-Reassign | Multiple Auto-Reassign |
|---|---|
| Please reach out to your ServiceChannel representative to turn this feature on.
|
You don't get notified when the first provider declines a work order — an email alert is only sent when the next ranked provider declines the request. You are notified only when you need to take action. Learn more about reassigning work orders.
Editing or Deleting a Trade
At anytime, you may edit a Trade so to control automatic reassign or NTE changes.
For Dashboard users, you must edit NTE changes through the Issue List in Dashboard Administration.
You cannot rename or delete a Trade with data associated with it — such as work orders, proposals or invoices. An error message will appear should you attempt to rename or delete a Trade associated with data.
Warning: We do not recommend deleting or renaming a trade that was associated with work orders unless absolutely necessary. All work orders and data associated with a trade name that is changed or deleted must be manually remapped. We recommend you contact for assistance.
- On the Trades/NTEs page, locate the desired Trade and click the edit pencil next to it. The Trade overlay appears.
- Enter a new NTE in the associated text field.
- Check (to turn on) or uncheck (to turn off) the Auto Reassign box.
- Click Save. The Trades list will appear with your desired changes listed.
- On the Trades/NTEs page, locate the desired Trade and click the edit pencil next to it. The Trade overlay appears.
- Enter a new name in the Trade field.
- Click Save. The Trades list will appear with your desired change listed.
- On the Trades/NTEs page, locate the desired Trade and click the red X icon. A confirmation page appears.
- Click OK. The trade will be removed from the Trade list.
About GL Codes and Trades
You may setup GL Codes on:
- an individual Category
- an individual Trade
- a Category/Trade combination
- a Location/Trade combination
- a Location/Category combination, or
- a Location/Category/Trade combination.
The table below shows an example of how Trades can be used with GL Codes:
| Category | Trade | GL Code |
| Roof Leaks | 784322 | |
| Maintenance | HVAC | 344455 |
| Repairs | HVAC | 344457 |
See Managing GL Codes for more information.