Refrigerant Tracking
Lamont Eddins
Anastasia Medovkina (Deactivated)
Refrigerant Leak Settings sets the parameters for when refrigerant or HVAC asset types require maintenance or repair. Having accurate leak settings is necessary to ensure guidelines and protocols are met. When configuring, you can change the:
- Creating Refrigerant Leak Setting
- Calculation methods
- General Leak Inspection
- Open Leak Notification
- PM priority
- Refrigeration thresholds
- Refrigerant tracking for all or specific locations
- Refrigerant Tracking Provider
- Trigger leak rates
- Units of measurements
- Leak Inspection Category
- CARB Report
- PM Leak Inspection NTE
- Refrigerant Tracked By
- PM Advance Time
- Follow-Up Work Order
- Minimum Threshold Annual and Quarterly Leak Inspection
- System Charge
- Adjusting Refrigerant Leak Setting
- Delayed Secondary Verification
- Compliance Acknowledgement Statement
Please, contact your ServiceChannel representative should you need to change the decimal point (.) to decimal comma (,) on non-monetary amounts, such as:
- Hours and Duration
- Quantity Amounts
- Weight.

- Click the menu icon to expand the list.
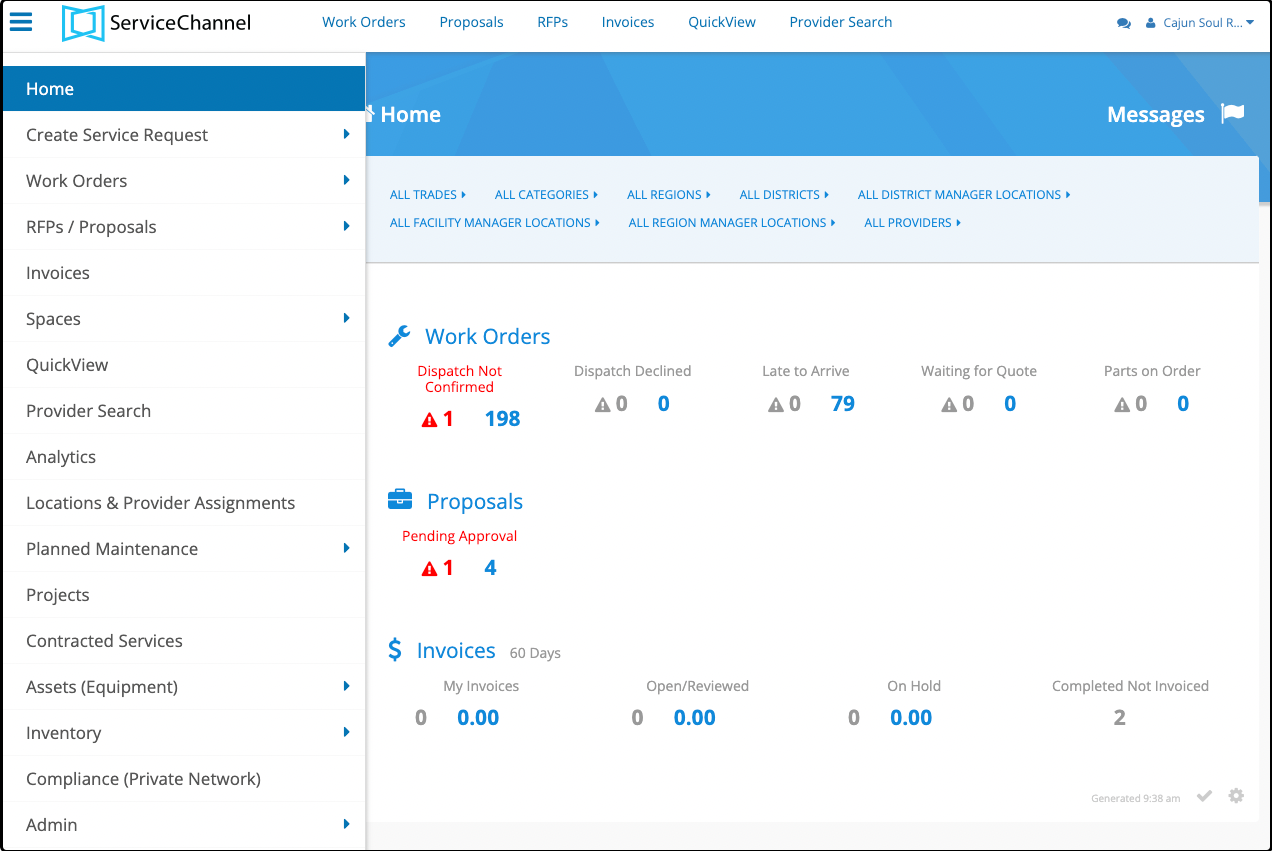
- Select Admin from the list.
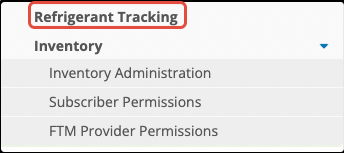
- Click Refrigerant Tracking to enter Refrigerant Leak Settings.
Creating Refrigerant Leak Settings
You can create specific requirements for those refrigerant or HVAC asset types based upon the guidelines and protocols for a specific country. In doing so, it provides consistency and precision for monitoring those assets within that country.
- Use the drop-down arrow to select a country.
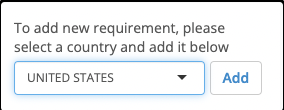
- Click the add button to start adding refrigerant leak setting.
Adjusting Leak Threshold
The next part of the process is to set the Leak Rate Threshold for all your refrigerated asset types. The rate that you set must be in compliance with all guidelines and protocols. It is necessary to check your local environmental agency for additional information. The thresholds you set for each of the four types of refrigerated asset types will be the same for all assets in that asset type. When any refrigerant or HVAC equipment is leaking and the leak rate meets or exceeds the specific threshold, Service Automation creates a leak record.
Trigger Rates
The following Trigger Leak rates applies for a 12-month period.
| Application Type | Leak Rate Effective (1/1/2019) |
|---|---|
| Industrial Process Refrigeration | 30% |
| Commercial Refrigeration | 20% |
| Comfort Cooling | 10% |
| All Other Appliances | 10% |
Calculating Methods
EPA outlines four acceptable methods that can be used either individually or in combination to assets full charge:
- Equipment manufacturers' determination
- Calculations based on component sizes, refrigerant density, volume of piping, and other considerations.
- Actual measurements of the amount of refrigerant added or evaluated from the appliance.
- Use of an established range based on the best available data. This method requires you to document how you determined the full charge.
The full charge is necessary to determine the leak rate. For commercial refrigeration equipment, EPA says the trigger leak rate for a 12-month period is 35 percent of the full charge. According to the latest rule, there are two acceptable methods for calculating leak rate:
However, the equipment owner must select and consistently use only one method over the lifetime of all the appliances located at a facility.
Annualized Method
Check the formula below to see how leak rates are calculated when you use the annualized calculation method:

Number of days between refrigerant additions — the number of days that have passed since the last time the refrigerant was added to the system. The maximum number of days that you can use is 365. If there were no additions in the past except for the initial charge addition, the system counts the number of days that passed since the initial charge.
Rolling Average
Check the formula below to see how leak rates are calculated when you use the rolling average calculation method:

Whenever the leak rate meets or exceeds the leak rate threshold you set for each refrigerant use purpose (Commercial Refrigeration, Industrial Refrigeration, Air Conditioning, or All Other Appliances), the system generates a leak record, also known as leak event. Learn more about Refrigerant Leak Events.
Units of Measure
These options provide greater flexibility and compatibility to existing systems. It is possible to choose between three different units of measurement when tracking refrigerants:
- Pounds and decimals
- Pounds and ounces
- Kilograms and grams
The option chosen is for all assets.
Contact your CSM representative if you want to track refrigerant usage in kilograms and grams.
Generate Leak Inspection
Able to select whether all types of refrigerant assets to be inspected or select specific ODS (ozone depleted substance) type refrigerant assets.
Minimum Threshold Annual and Quarterly Leak Inspection
If refrigerant is leaked based on various set trigger rates or exceeds the minimum thresholds, you must go back and inspect that asset. You can set the threshold based on a quarterly or yearly review based on the amount of refrigerant the asset holds.
| Equipment | Full Charge | Number of Leak Inspections |
|---|---|---|
| Commercial Refrigeration and Industrial Refrigeration | 500 Pounds or more | Once every 3 months |
| Commercial Refrigeration and Industrial Refrigeration | 50 to 500 Pounds | Once per calendar year |
| Comfort Cooling | 50 Pounds or more | Once per calendar year |
- Commercial Refrigeration can stop leak inspections if calculations of the leak rate doesn't go over 20% for 4 quarters in a row.
- Industrial Refrigeration can stop leak inspections if calculations of the leak rate doesn't go over 30% for 4 quarters in a row.
- Comfort Cooling can stop leak inspections if calculations of the leak rate doesn't go over 10% for one year.
Leak Inspection Category
Selecting the specific category when Planned Maintenance refrigerant asset work orders are generated.
Refrigeration PM Priority
The Refrigeration PM Priority sets the priority assigned to all automatically generated Leak Inspection and Leak Detector Planned Maintenance Work Orders. Whenever a refrigerated asset has been repaired following a leak event, subsequent follow-up inspections are required to ensure the leak has been adequately repaired. The number of inspections required is dependent on the amount of refrigerant the asset holds. By setting all follow-up leak inspection work orders to the Refrigeration PM Priority, you will have an additional tool for monitoring your refrigerated assets. By default, the Refrigeration PM Priority is set to PM Leak Inspection.
Refrigerant Tracking Provider
Which specific provider is going to be used for the Planned Maintenance refrigerant work orders.
CARB Report
Subscribers who operate refrigerated assets in the state of California are required to submit an annual report. The CARB Report is automatically generated from information contained within ServiceChannel. By selecting the Run CARB Report checkbox, the report will run once the user triggers the report from the Asset Manager module. Before running the CARB report, users must identify which assets are to be included in the report. This is done in the Asset Manager module. See CARB Reporting for more information.
PM Leak Inspection NTE
The PM Leak Inspection NTE sets the maximum rate that can be charged for an inspection of this type. When an administrator sets this rate, it is applied to all future PM leak inspections.
Refrigerant Tracked By
Where refrigerant needs to be tracked. There could be X number of locations that only need to track refrigerant or all locations can be tracked.
PM Advance Time
How many days prior to service should a Planned Maintenance work order is generated.
Follow-Up Work Order
You can specify whether a follow-up work order should be automatically created after the original service request is completed with the associated leak record left open.
Once a work order is moved to the Completed status while the associated leak record stays open, a follow-up request gets created and dispatched to the provider so that they can repair the leak and close the leak record. In the meantime, the provider can invoice the original service request.
Selecting this option ensures that no follow-ups get generated. Providers should first close leak records associated with work orders to be able to invoice them. When providers check out of a work order with a leak record left open and specify that they completed the requested service, the work order moves to the Completed / Open Leak Record status. The status signals that providers should go back to this work order to enter all the required leak record information before they can submit an invoice. With an open leak record, the work order cannot be moved to the Completed, Completed / Confirmed, or Completed / Pending Confirmation status. After the leak record is completed, the work order status changes to Completed / Pending Confirmation.
You need to create a new Completed/Open Leak Record status in your admin settings.
Refrigerant Tracking by Location
You can decide whether refrigerant tracking should happen across all your locations or only at those where it’s required.
- For specific locations: Should you want to track refrigerant usage only at the locations where you have assets containing ozone-depleting refrigerants, the ServiceChannel team can activate refrigerant tracking only for these locations.
- For locations where there is no equipment with substances that are required to be tracked, the refrigerant tracking process can be deactivated. Turning off refrigerant tracking for a location implies that providers are not prompted to record information on refrigerants they use while servicing refrigeration or HVAC assets at the location.
- For all locations. You may need to track refrigerant usage across all your locations regardless of refrigerant types and quantities contained in assets at these locations.
Once the ServiceChannel team configures this for you, the Refrigerant Leak Settings page displays locations the refrigerant tracking process is on.
Contact your CSM representative to add more locations, exclude a location, or make any other changes.
Open Leak Notification
- Charge: Who receives notifications about the open leak receipt.
- Certification: Which certified provider receives notification about open leak receipt.
- Number of Days: How many days before receiving the next notification about open leaks events.
System Charge
When the entire system exceeds, you can send out a notification.
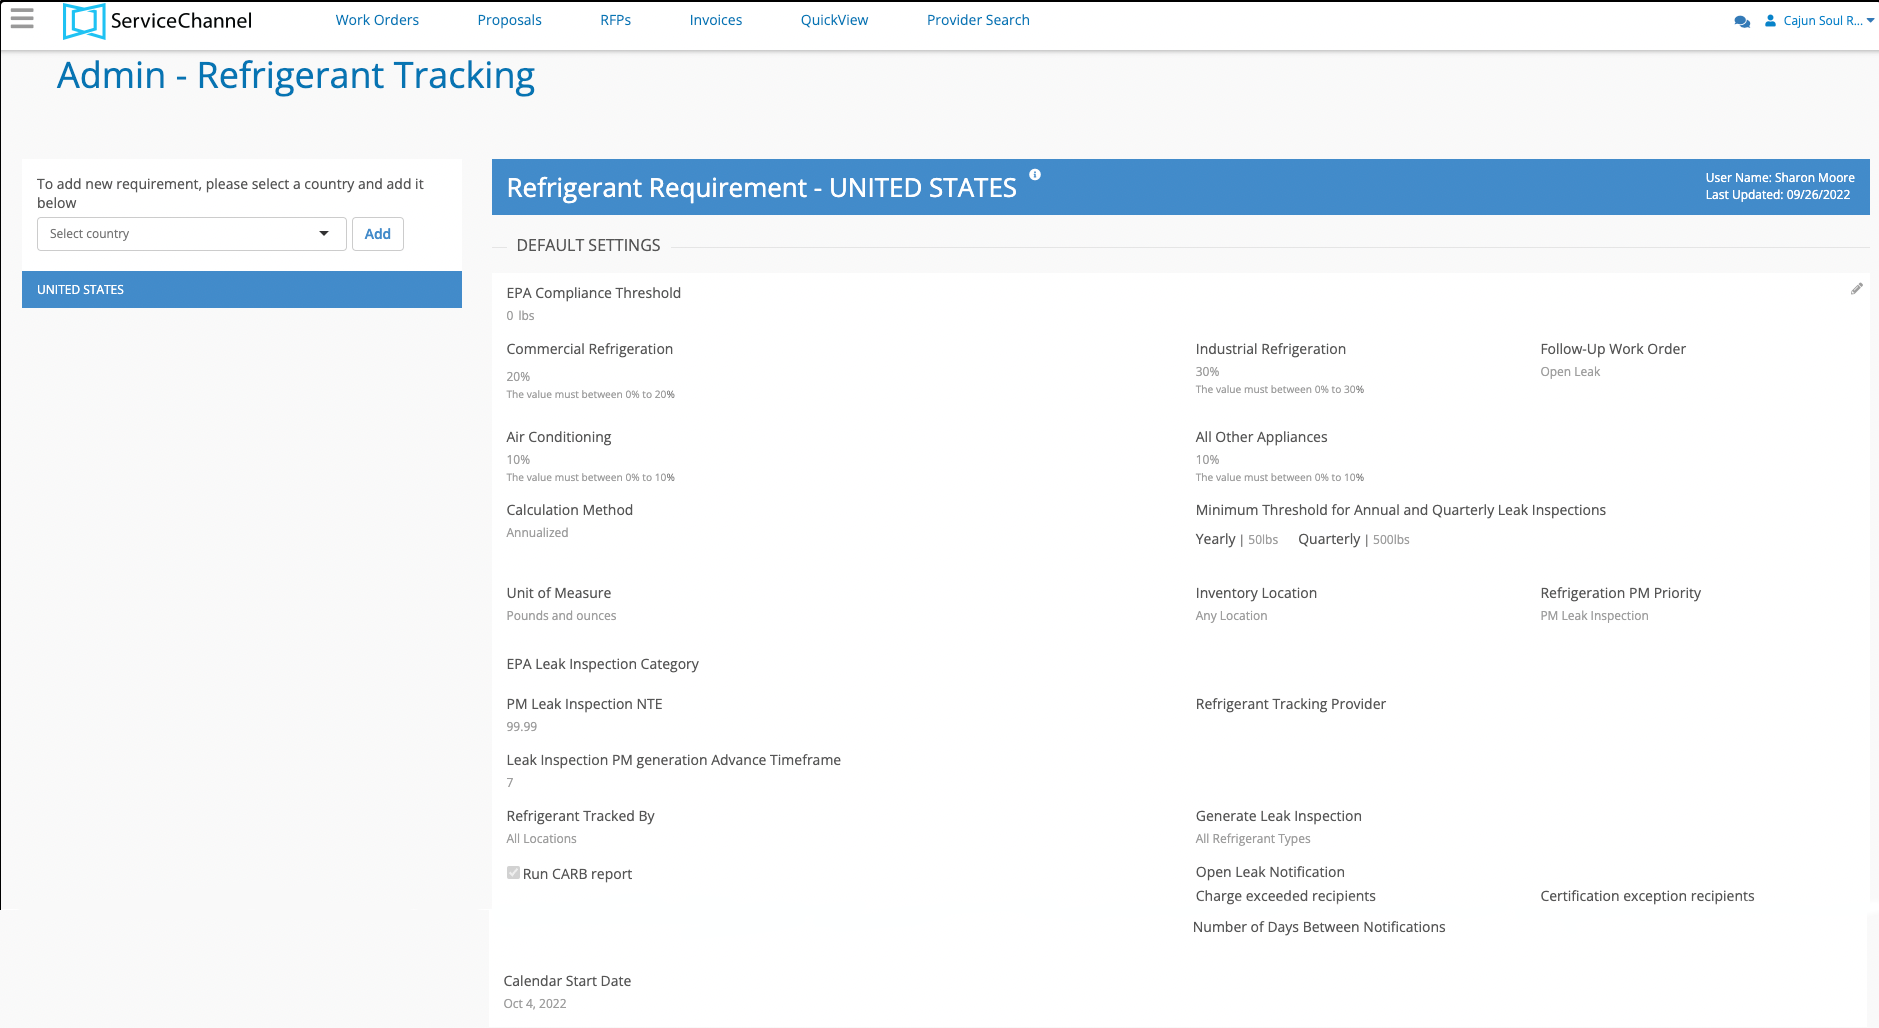
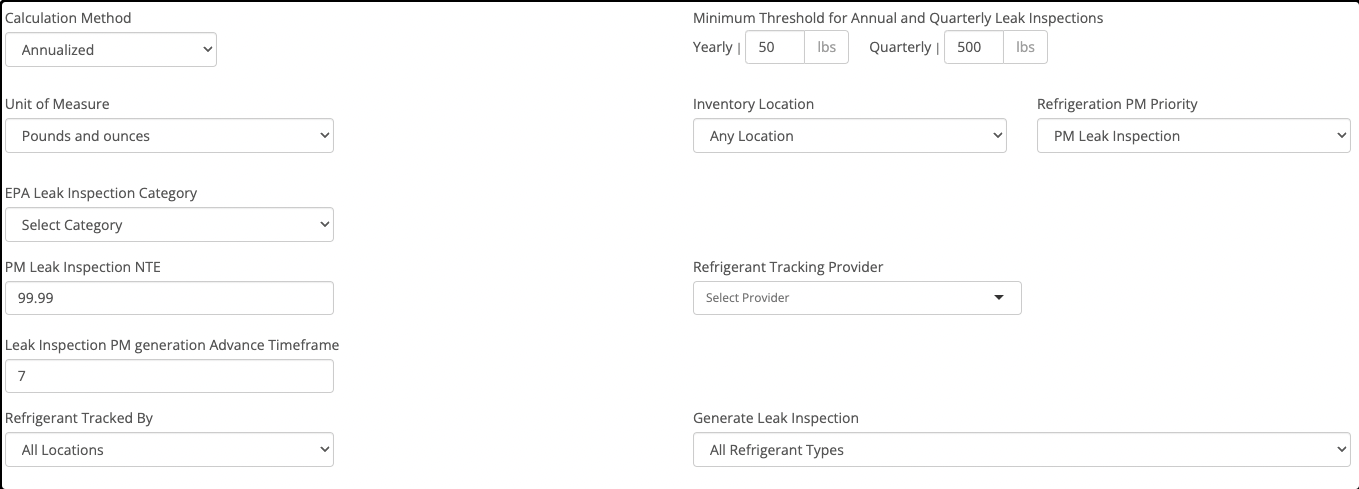
- Click the pencil icon in the upper right-hand corner to edit the refrigerant requirement Info: Hover the mouse over the information icon to learn more about each individual setting.

- Add EPA Compliance Threshold lbs.
- Add Commercial Refrigeration percentage.
- Add Industrial Refrigeration percentage.
- Use the drop-down arrow to select follow-up work order for open leak or never.
- Add Air Conditioning percentage.
- Add all Other Appliances percentage.

- Use the drop-down arrow to select Calculation Method.
- Add Yearly and Quarterly Minimum Threshold Annual and Quarterly Leak Inspections.
- Use the drop-down arrow to select Unit of Measure.
- Use the drop-down arrow to select Inventory Location.
- Use the drop-down arrow to to select Refrigerant PM Priority.
- Use the drop-down arrow to select EPA Leak Inspection Category.
- Add PM Leak Inspection NTE.
- Use the drop-down arrow to select Refrigerant Tracking Provider.
- Add Leak Inspection PM generation Advance Timeframe.
- Use the drop-down arrow to select Refrigerant Tracked By.
- Use the drop-down arrow to select Generate Leak Inspection.
- Select or unselect the checkbox to run CARD Report.
- Add Open Leak Notification
- Charge exceeded recipients.
- Certification exception recipients.
- Number of Days Between Notifications.
- Select or unselect the checkbox for System Charge Exceeded Notifications
- Select or unselect CARD Inspections
- Add Calendar State Date

- Add Calendar State Date
- Click the Save button to finalize the settings.
It is necessary to complete each step to ensure accuracy for Refrigerant Leak Settings.
Adjusting Refrigerant Leak Setting
After finalizing the settings, you can make adjustments at any point in time. The easy and simple access allows for instance changes whenever there is a need and for keeping all refrigerant assets in compliance.
- Click the pencil icon on the upper right hand side to edit the settings.
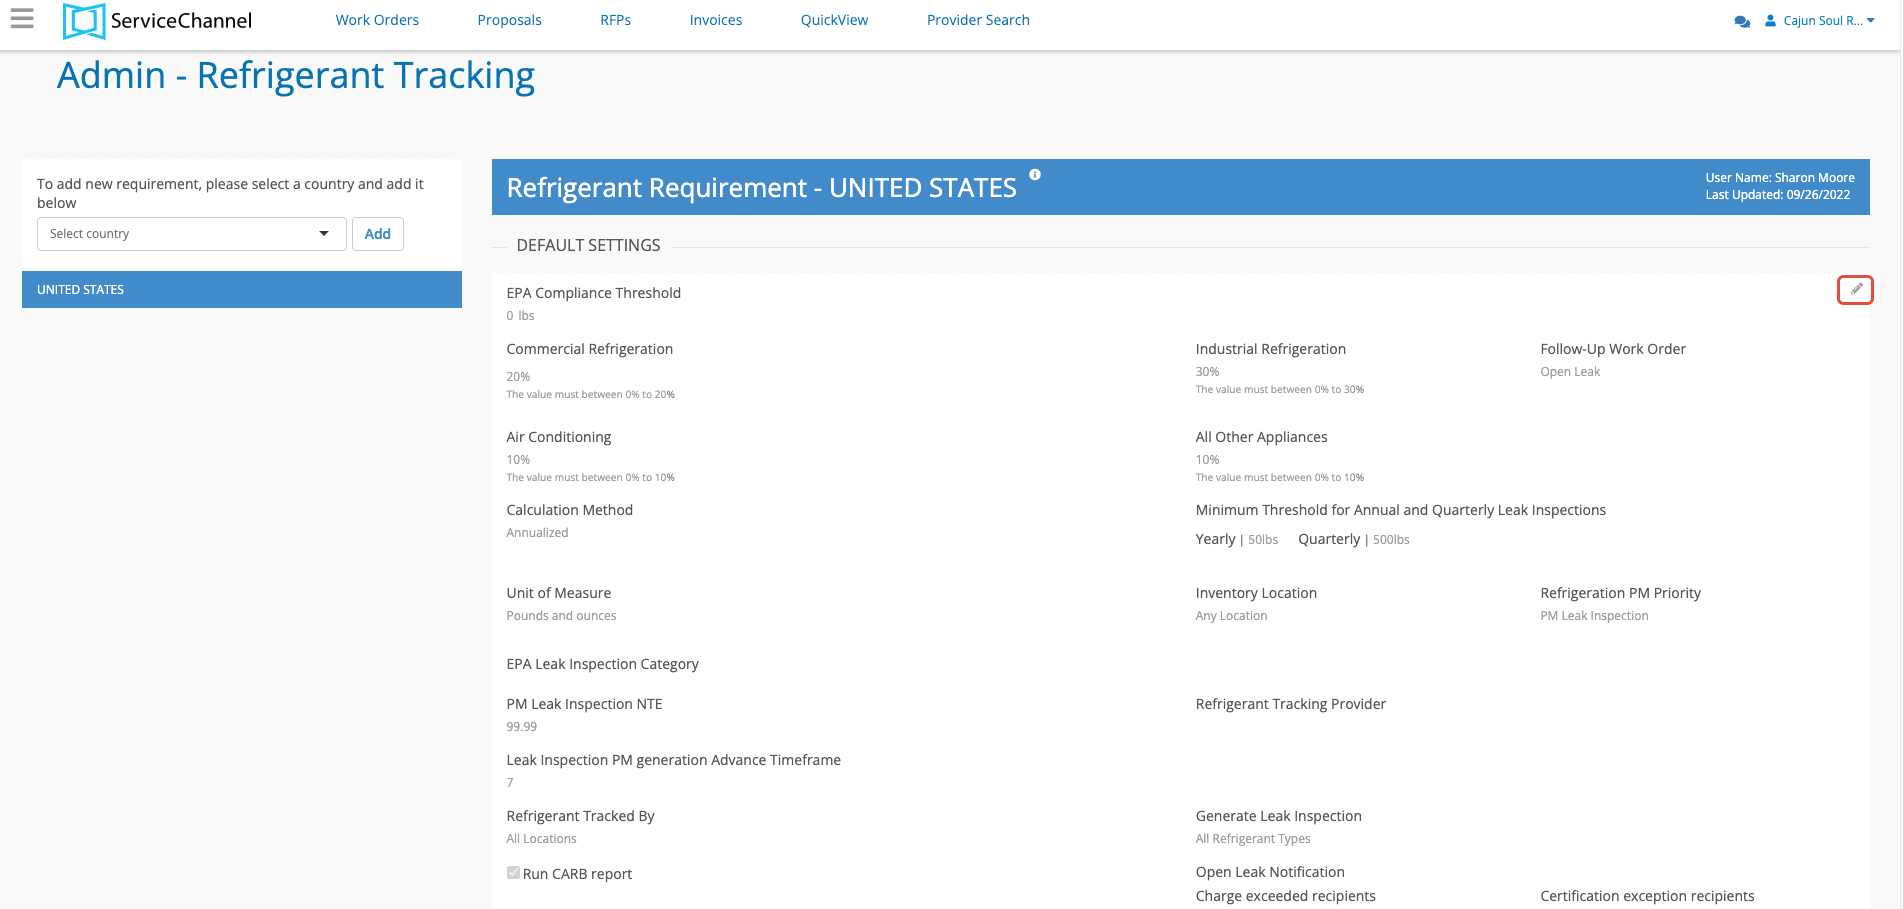
- Make any or all change(s) to the settings.
- Click the Save button to finalize the change(s).
Delayed Secondary Verification
Enabling this feature by checkbox allows you to control when providers can enter the secondary verification on a leak event. The different types of refrigerant assets can each have their own configuration measured in days. This is the number of days a provider would be unable to enter a secondary verification.
A status and extended status called Completed/Pending Secondary Leak Verification in Work Order Properties as part of the process. Without this status the feature does not work properly.
- Click the pencil icon on the upper right-hand side to edit the settings
- Click the Delayed Secondary Checkbox to open the options
- Enter the amount of days for at least one refrigerant asset

- Click the Save button to add the delayed secondary verification days
Compliance Acknowledgement Statement
While closing a leak inspection work order during the check-out process on a Planned Maintenance work order with at least one refrigerant asset, you can choose to add a requirement to select the leak inspection method used. There can be more than one method selected. In addition, the ability to add an acknowledge statement for users in Provider & Service Automation and SC Provider Mobile to confirm the leak inspection method. You can select at least one or all three platforms.
- Click the pencil icon on the upper right hand side to edit the settings.
- Click the checkbox to include the message for a specific platform(s).
- Add your specific statement(s) into each box.
Click Save to include the statement(s)

255 is the maximum number of characters for each statement box.
