Configuring Restrictions for Invoice Numbers
- Natalia Larina (Unlicensed)
- Anastasia Medovkina (Deactivated)
To keep invoice numbers consistent within your company, you can set specific rules to be applied when your providers create an invoice. No matter how you submit an invoice, we make sure the invoice number meets the criteria that you specify in your settings.
On the General tab of invoice settings, you can configure the rules for invoices created manually by your providers and for invoices that get generated automatically.
Under the Invoice Number section, admins can configure invoice number rules.

Configuring Invoice Number Restrictions for Manually Created Invoices
To impose validation rules on invoices created by your providers or, on the contrary, remove any restrictions, use the Restrictions dropdown. You can select one of the following options:
- None. No invoice number restrictions are applied. This is the default setting.
- Custom. Allows you to create your own restriction rule for the invoice number as well as add a hint that pops up every time a provider violates the rule.
- Digits Only. Permits providers to use only digits in the invoice number. No letters, special characters, or spaces are allowed.
- Alphanumeric Only. Allows providers to use letters, digits, or both in the invoice number. No special characters or spaces are allowed.
Reach out to ServiceChannel to get a hand with creating a custom restriction rule.
- In the Invoice Number section, select Custom from the Restrictions dropdown.
In the fields to the right, enter the regular expression and comment to be shown to providers that were given to you by ServiceChannel.
Upon your request, ServiceChannel provides you with a regular expression depending on your requirements for invoice numbers. For example, an expression may look like ^.{1,20}$, which means that the invoice number cannot be longer than 20 characters, and any characters are allowed.

Click Save to apply your changes. An alert pops up to confirm that the rule has been saved.
- In the Invoice Number section, select one of the following options from the Restrictions dropdown:
- Digits Only — if you want providers to use only digits when entering an invoice number.
- Alphanumeric Only — if you want providers to use only letters, digits, or both when entering an invoice number.
The fields on the right are automatically populated with a corresponding regular expression and comment.
- Click Save to apply your changes. An alert pops up to confirm that your progress has been saved.
- In the Invoice Number section, select None from the Restrictions dropdown.
- Click Save. An alert pops up to confirm that your progress has been saved.
Once you save your changes, a new record appears at the bottom of the page. This record contains information about who was the last to change the settings and when.
Configuring Invoice Number Restrictions for Automatically Generated Invoices
To configure validation rules for invoices that are automatically created by the system, select one of the options in the Generation Uniqueness Rule dropdown:
- None. No invoice number restrictions are applied. This is the default setting.
- Current Date. Adds the current date in the YYYYMMDD format to the beginning of the invoice tracking number when an invoice is generated.
- In the Invoice Number section, locate the Generation Uniqueness Rule dropdown, and select Current Date.

- Click Save to apply your changes. An alert pops up confirming that your progress has been saved.
- In the Invoice Number section, select None from the Generation Uniqueness Rule dropdown.
- Click Save. An alert pops up confirming that your progress has been saved.
One of the cases when an invoice number gets generated automatically is when you create or edit a work order and select the Dispatch Avoided checkbox. In this case, the work order moves to the Completed / No Charge status without being dispatched to the provider. Find out more about typical work order statuses.
For example, you set the generation uniqueness rule to the current date, create a work order, and decide not to dispatch it to the provider. Once you submit your work order with this option, an invoice is created against this work order.

The invoice number includes the current date that goes before the invoice tracking number. In the screenshots, 20200207 is the current date that precedes the tracking number. On the Invoices List, such an invoice looks as shown in the screenshot below.

Configuring Invoice Number Reuse Permission
Contact your ServiceChannel manager to enable the feature for you and your providers.
When creating a new invoice, you can allow your providers and internal employees to enter previously used invoice numbers. It can help you reduce administrative costs for managing unique invoice numbers, especially if you have high invoicing volumes.
Important!
The following conditions should be met for the invoice number to be reused:
- Both you and your provider should turn on the feature.
- On the Menu > Admin > Invoices > General > Allow Provider To Reuse Invoice Number dropdown, the Yes option should be selected and saved.
- Previous invoices with the same number should be in the Rejected status.
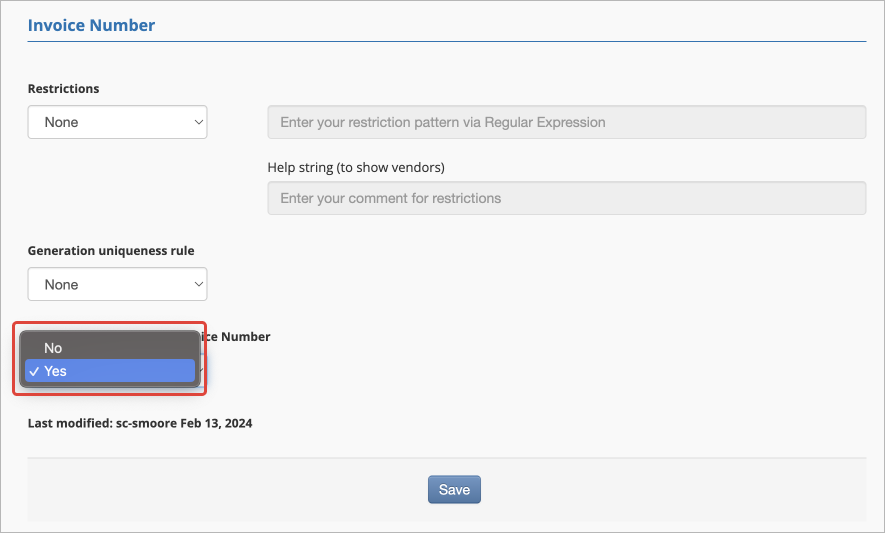
- In the Invoice Number section, locate the Allow Provider To Reuse Invoice Number dropdown.
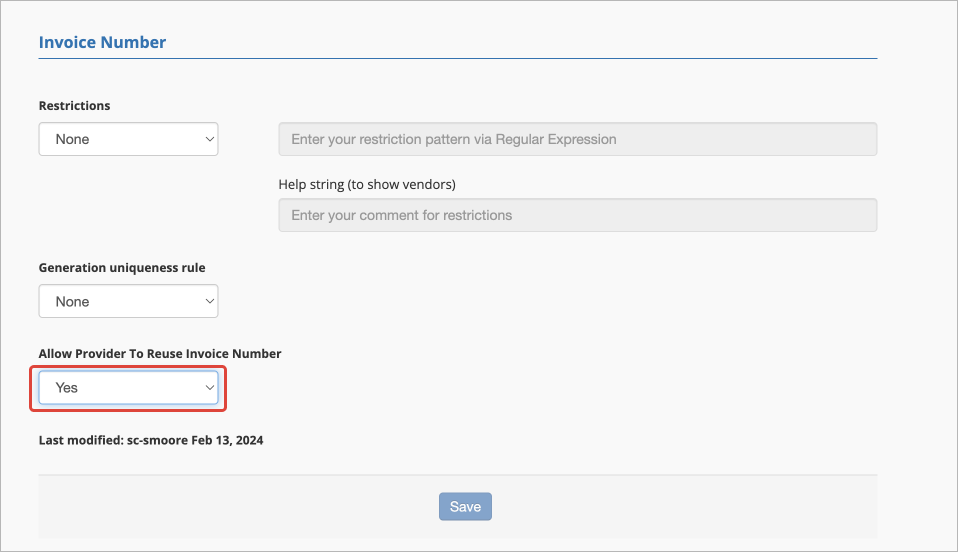
- Select Yes to allow providers to reuse the number or No to forbid it.
- Click Save to apply changes.
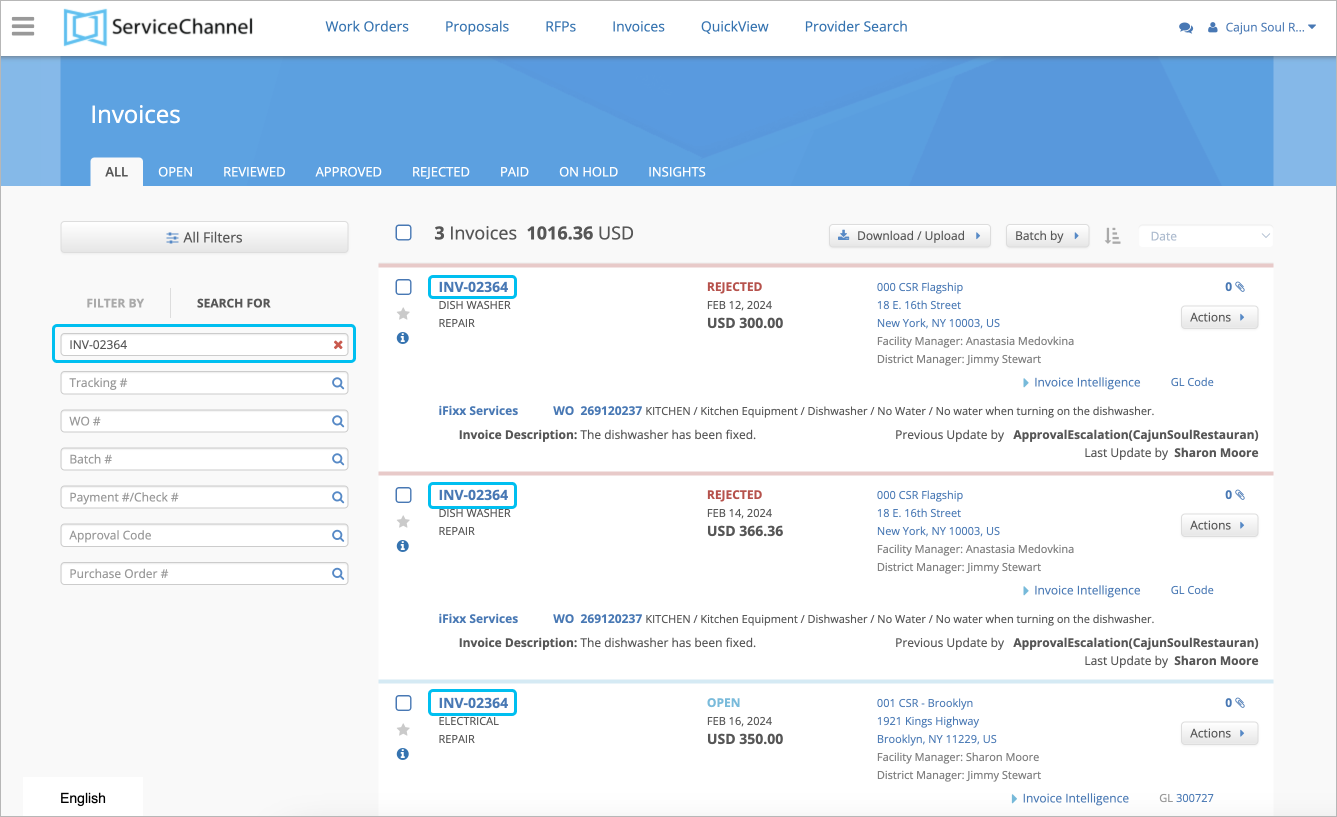
On the Invoices List, in the Search For filter > Invoice# field, enter the invoice number to view the history of the invoice number. For comprehensive search results, make sure you are performing a search under the All tab to view invoices with different statuses.
On the list that appears, you will see all the invoices with the number entered.