Disabling & Enabling Users
- Jing Tong (Unlicensed)
- Natalia Larina (Unlicensed)
- Uma Srinivasan (Unlicensed)
Users cannot be deleted from Service Automation. This is done to maintain a history of work orders in the system (e.g., this can be useful for protection in the case of future litigation). If you no longer want a user to access the system, instead of deleting a user, you must disable them. You can always enable a user if the account is needed in the future.
Disable a User
- Click the hamburger menu icon, and select Admin > Permissions > Users. A list of users appears.
- Search for the user you want to disable, and select the checkbox next to their name. You can disable multiple users at once.
- Click Disable/Enable User(s), and click OK in the confirmation pop-up.
Alternatively, you can click the red cross ❌ icon next to their name in the Actions column and confirm your action.
An alert confirming that the user has been disabled appears at the top of the screen.
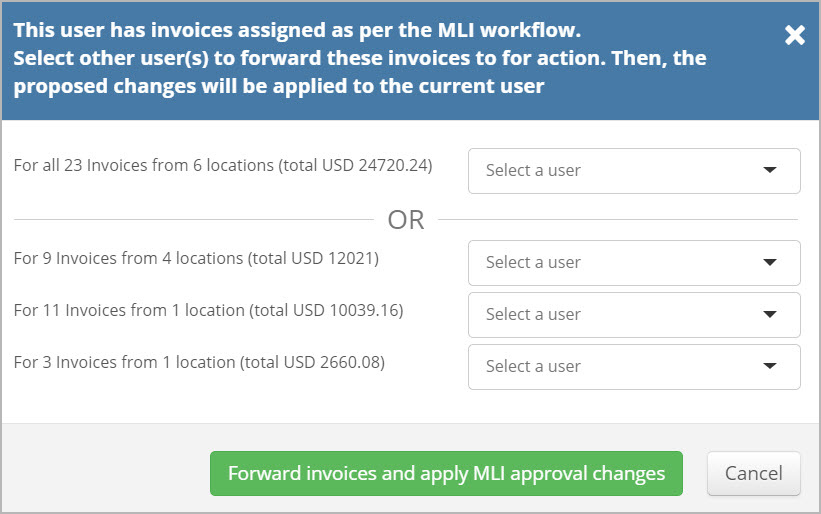
Should a user that you’re disabling belong to any MLI level and have invoices assigned to them, an overlay appears where you’re prompted to reassign these invoices to another person. You can either reassign all invoices to one employee or split them between multiple MLI users. Mind that this overlay appears only when a specific feature is enabled for your company.
To see a list of all disabled users, click the Disabled Users radio button in the search area on the Users page.
Important Notes about Disabled Users:
- If a disabled user tries to log into ServiceChannel, they will receive an error message.
- If a disabled user tries to obtain a password, they will receive an error message.
- Disabled users will be hidden in the work order notes recipient list.
- Disabled users will not be shown in the work order assignee list.
- Disabled users will not be shown in the proposal assignee list.
- Disabled users will be skipped during the MLI approval process.
- Disabled users will be skipped during auto-escalation process
Enable a User
- In the upper-left corner of the page, click the menu icon, and select Admin > Permissions > Users. The list of users appears.
- Click Disabled Users in the search area.
- Select the checkbox next to the user you wish to enable. You can enable multiple users at once.
- Click Disable/Enable User(s). An alert confirming that the user has been enabled appears at the top of the screen.
-
Page:
-
Page:
-
Page:
-
Page:
-
Page:
-
Page:
-
Page:
-
Page: