Creating Budgets and Uploading the Budget Template
- Anastasia Medovkina (Deactivated)
On the Budget Insights page, you can add a new budget into ServiceChannel, set parameters, fiscal calendar, and upload budget amount for each fiscal period.
If you want to learn more about budget insights in general, read Budget Insights.
You can create budgets in 2 steps:
- Configure budget settings, including name, currency, parameters, and a fiscal calendar.
- Upload the fiscal amounts using the budget template.
Contact your ServiceChannel manager to enable budget insights.
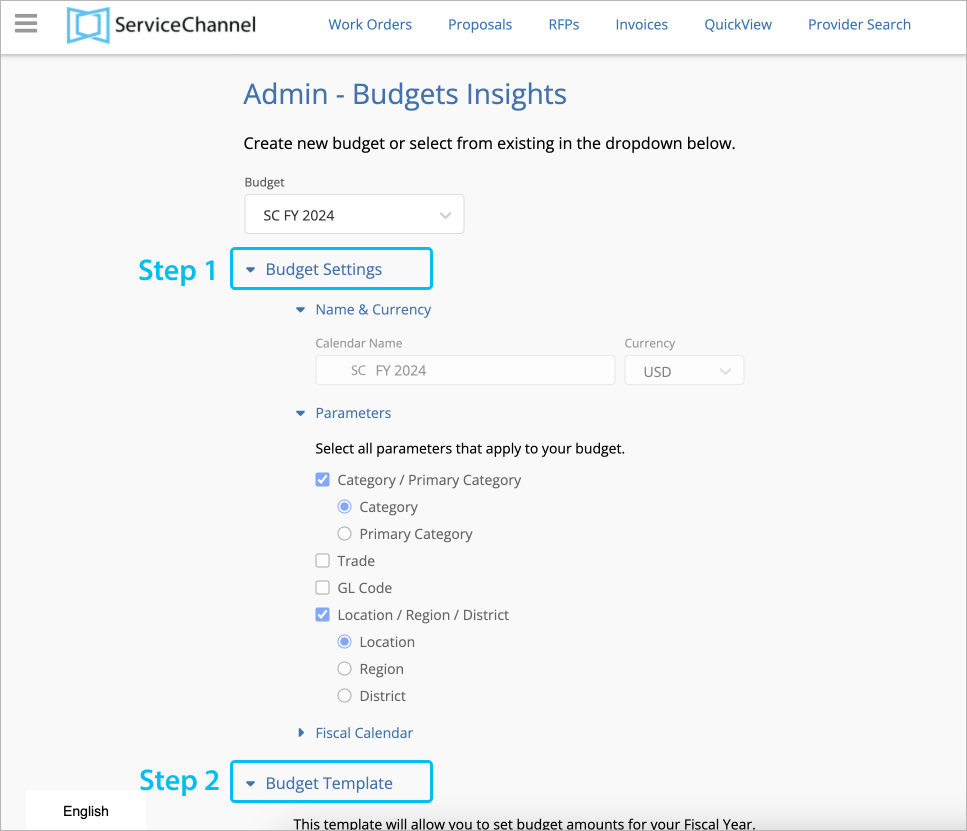
Configuring Budget Settings
The Budget Settings section allows for configuring the basic information about your budget:
- Calendar Name
- Budget Primary Currency
- Parameters (Category/Primary Category, Trade, GL Code, Location / Region / District)
- Fiscal Calendar Periods.
- On the hamburger menu, click Admin > Budgets Insights.
The Budget Insights page opens.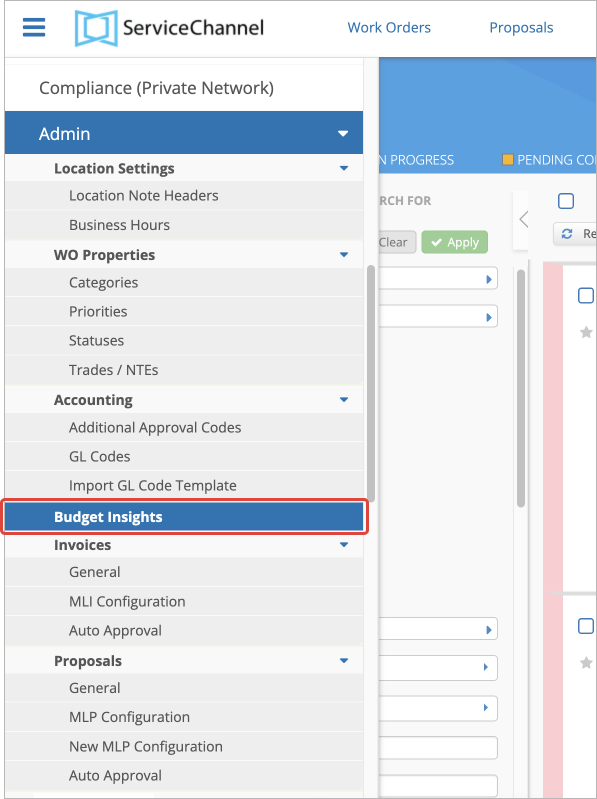
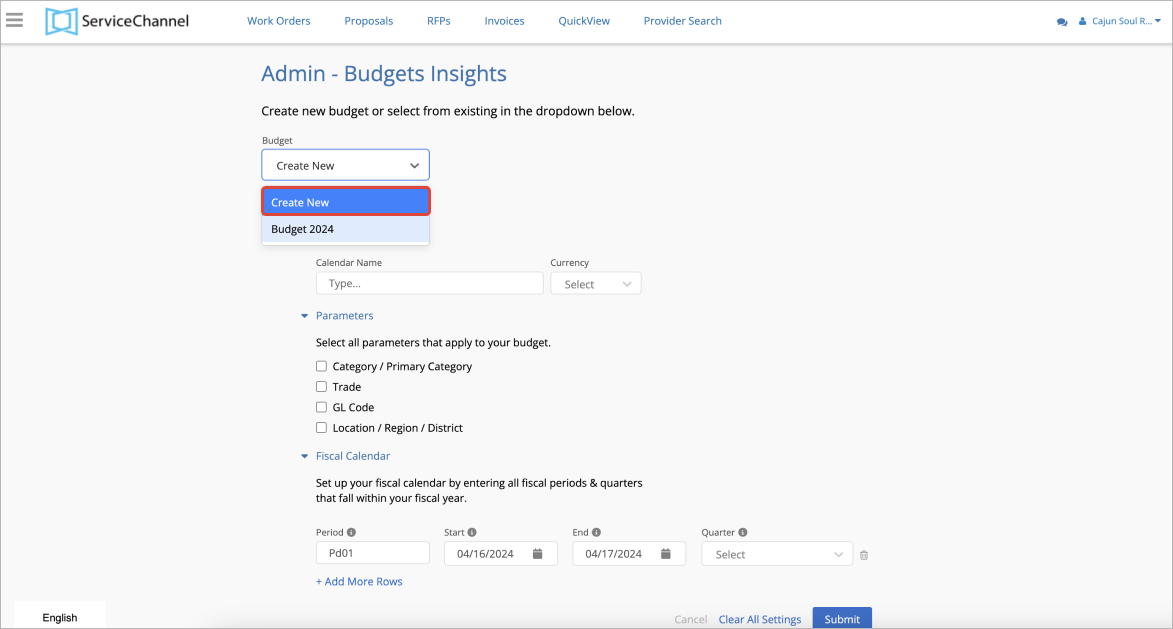
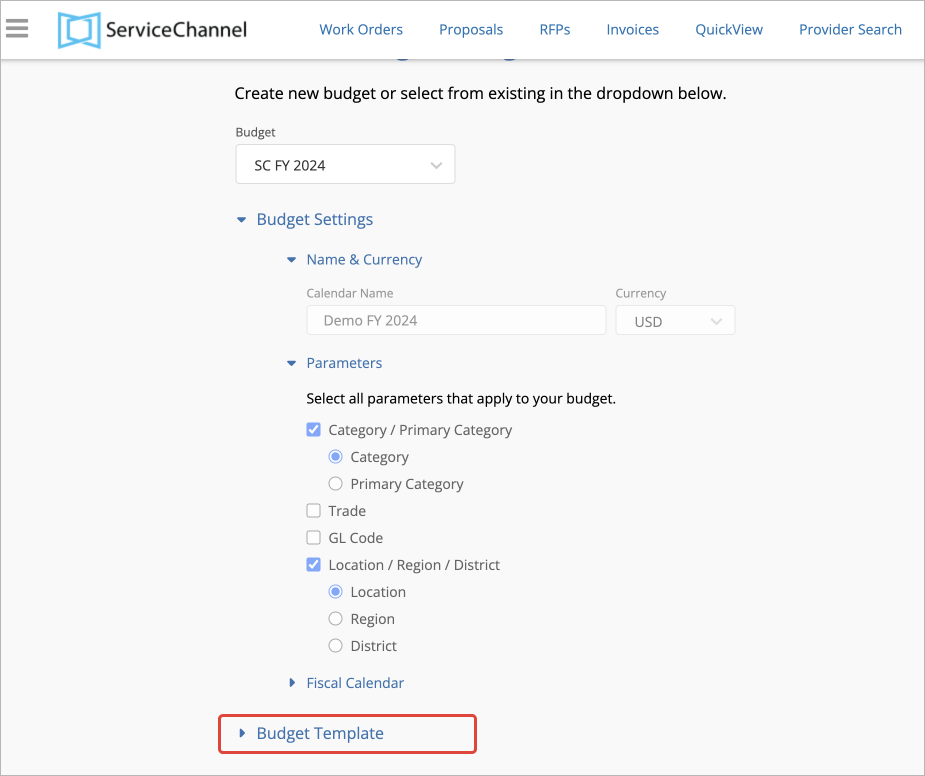
- In the Budget drop-down menu, click Create New to start configuring a new budget.
- In the Name & Currency section, enter the budget name.
In the Name & Currency section, select the primary currency of the budget.
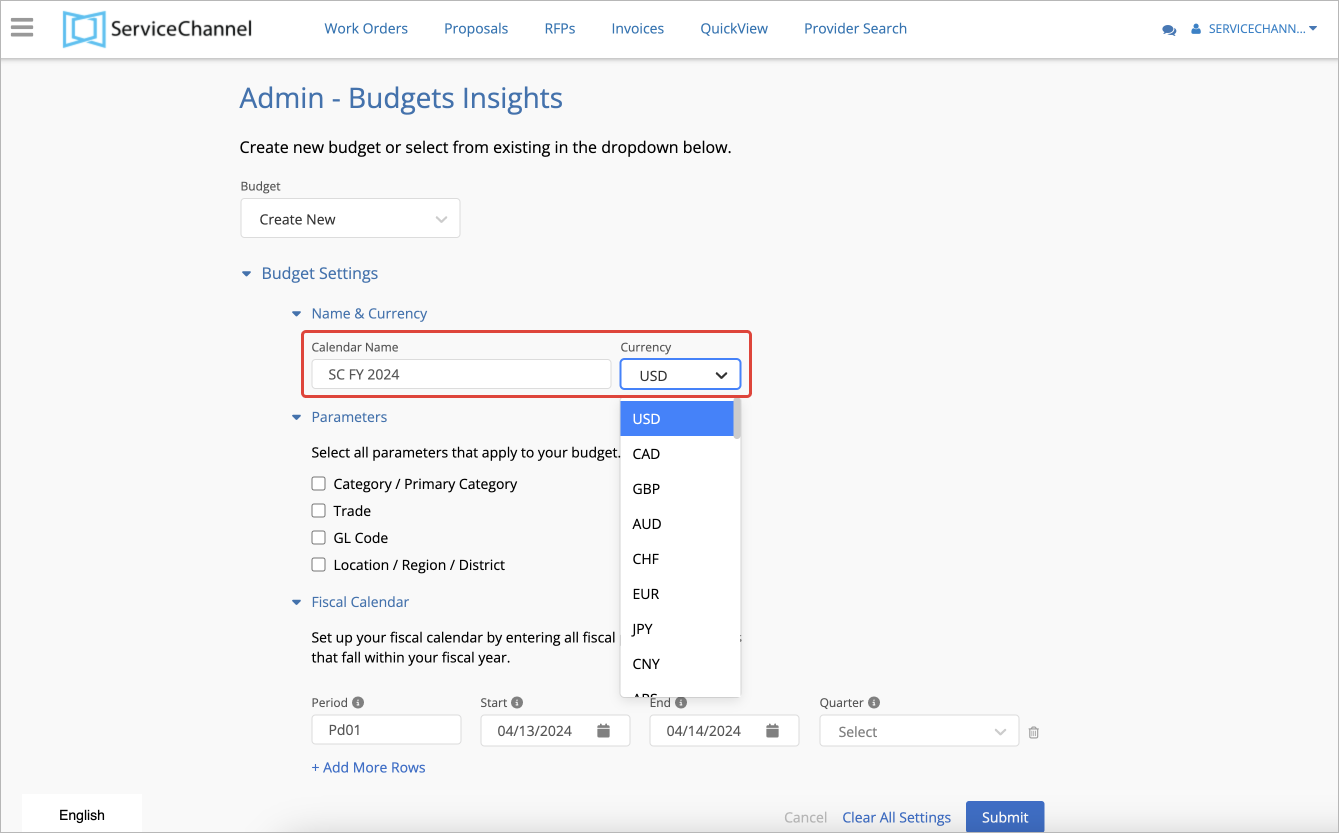
The work orders that fall into the budget allocation may have different currencies. However, the primary currency must be selected for the entire budget that will be shown in the Budget Insights window on proposals and work orders. You will also see the selected currency on the Budget Insights Analytics Report dashboard.
- Category / Primary Category. Primary categories mean standard ServiceChannel categories. Simple categories are the customized categories serving as additional categories to the primary ones. See Managing Categories to learn more about category creation.
- Trade. The trades can be configured in the Admin module. See Managing Trades for more information.
- GL Code. GL Codes can be configured on the Admin – Accounting page. See Managing GL Codes for more information.
Location / Region / District. You can manage locations in the Locations & Provider Assignments module. Regions and districts are specified on the Location Details page.
The parameters selected affect the following ServiceChannel modules and sections:
- When completing the Budgets Template, you should fill out only selected parameters and leave other columns blank.

- Work orders and proposals fall into the budget if they meet the selected parameters. For example, if the GL Code parameter is selected, work orders without the GL code will not be assigned to the budget.
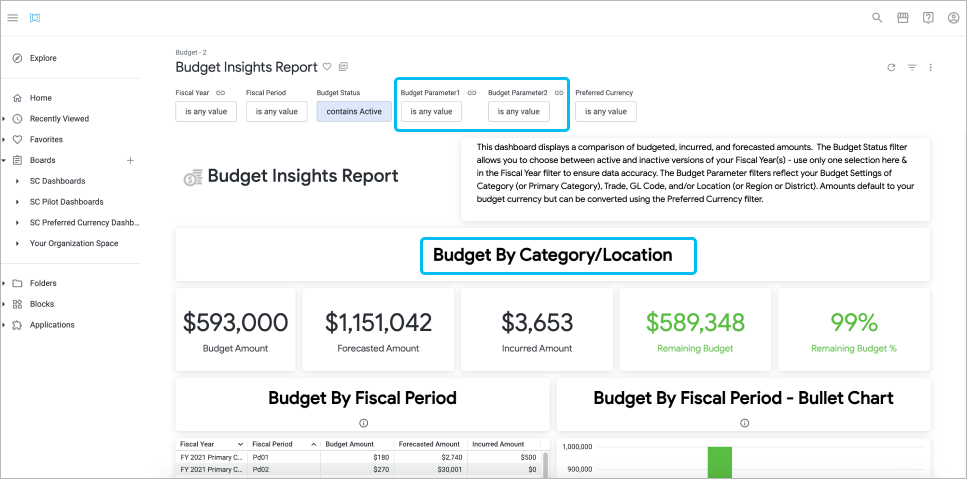
- The Budget Insights Analytics Report dashboard will show you the analysis by the selected parameters. For example, if your budget has the Category parameter, you will see the Budget By Category section on the analytics dashboard.
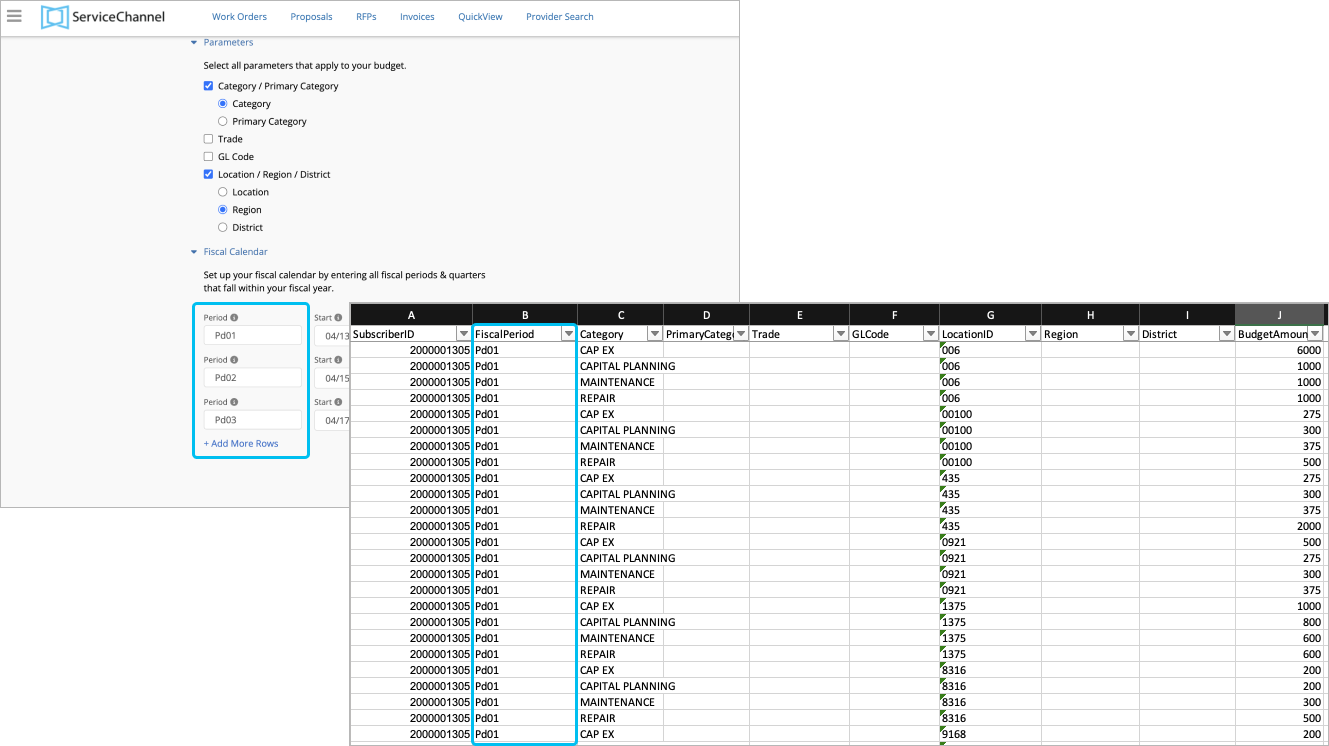
In the Parameters section, select at least 1 parameter that should be applied to the budget:
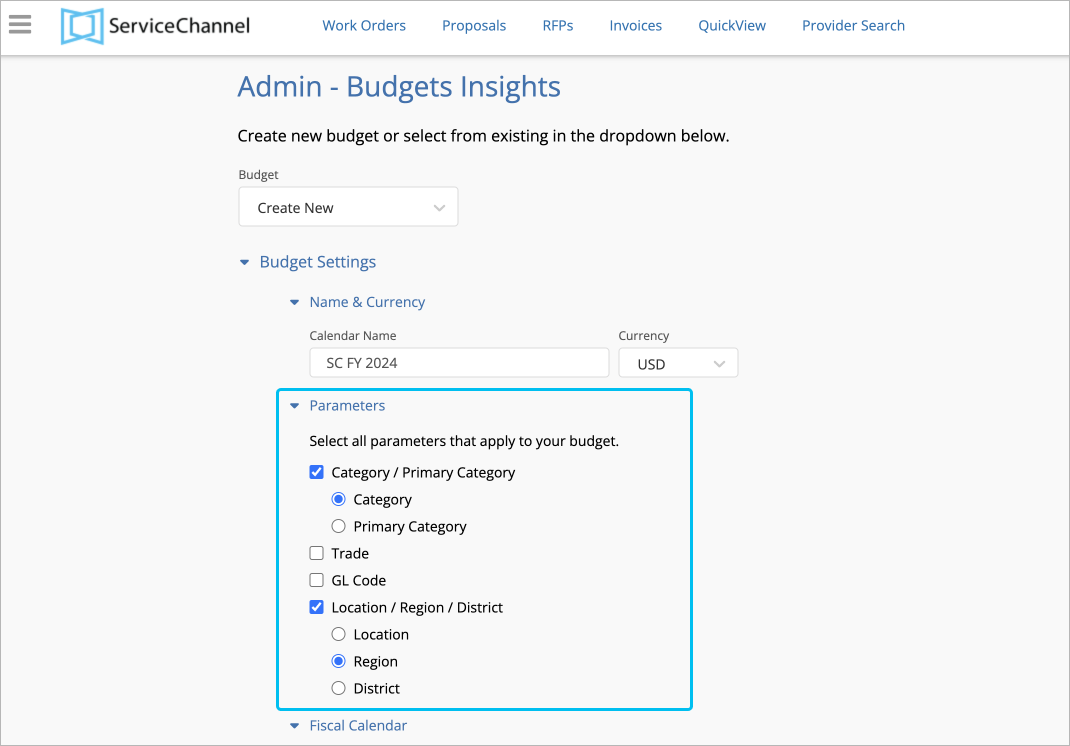
Only select parameters that you allocate budget by. For example, if you allocate the budget by the GL code and Location, do not select the Category and Trade parameters.
- When completing the Budgets Template, you should fill out only selected parameters and leave other columns blank.
In the Fiscal Calendar section, enter the period name, select start and end dates, and the quarter for the period.
The fiscal calendar name will be automatically populated for you, but you can change it if needed.
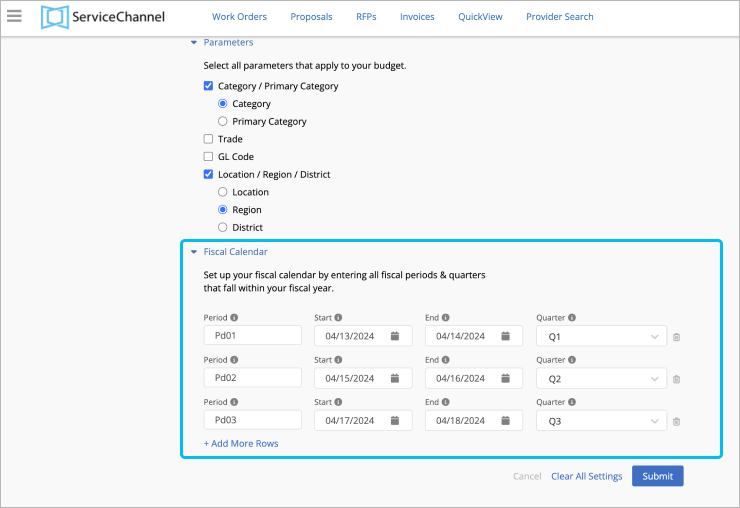
Ensure the fiscal period name you enter matches the Fiscal Period Name in the Budget Template later.
Budget data for a fiscal year that is complete cannot be loaded.
- (Optional) Click the Bin icon to delete the row.
- (Optional) Click the Clear All Settings button to clear all budget information.
- Click Submit.
Uploading Budget Template
This is the second step of Budget Insights configuration, where you fill out and upload the template. In the template, you specify budget amounts for each fiscal period configured in the Budget Settings (Step 1 of budget creation in ServiceChannel).
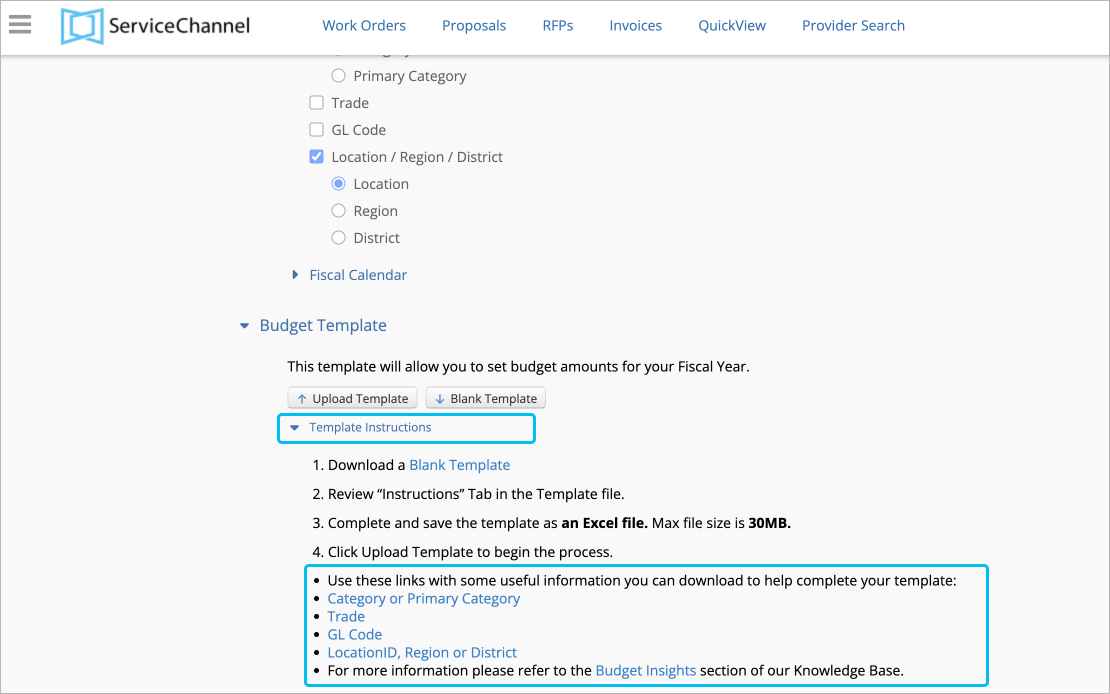
For your convenience, you can download the following retrieved data in the .xlsx format that will help you fill out the template:

- Click the Template Instructions expandable section to view the list of reports available for download:
- Category or Primary Category is a report with the information on the Primary and Custom Categories configured in your ServiceChannel account in the Admin – WO Properties section.
- Trade is a report with the information on the Trades configured in your ServiceChannel account in the Admin – WO Properties section.
- GL Code is a report with the information on the GL codes for each trade and category configured in your ServiceChannel account in the Admin – Accounting section.
- Location ID, Region, and District is a report containing information about your locations specified in the Locations & Assignments module. Use it to fill out your budget template with:
- Subscriber ID
- Location ID
- Region
- District.
You can upload only 1 budget template for 1 fiscal calendar. Other templates within the same budget will override the template data uploaded before.
On the Admin – Budget Insights page, click Budget Template to open the section with the template.
Note that the Budget Template section will appear below the Budget Settings section after you complete the general budget information from step 1 and click Submit.
Click Blank Template to download the Budget Template to your computer.
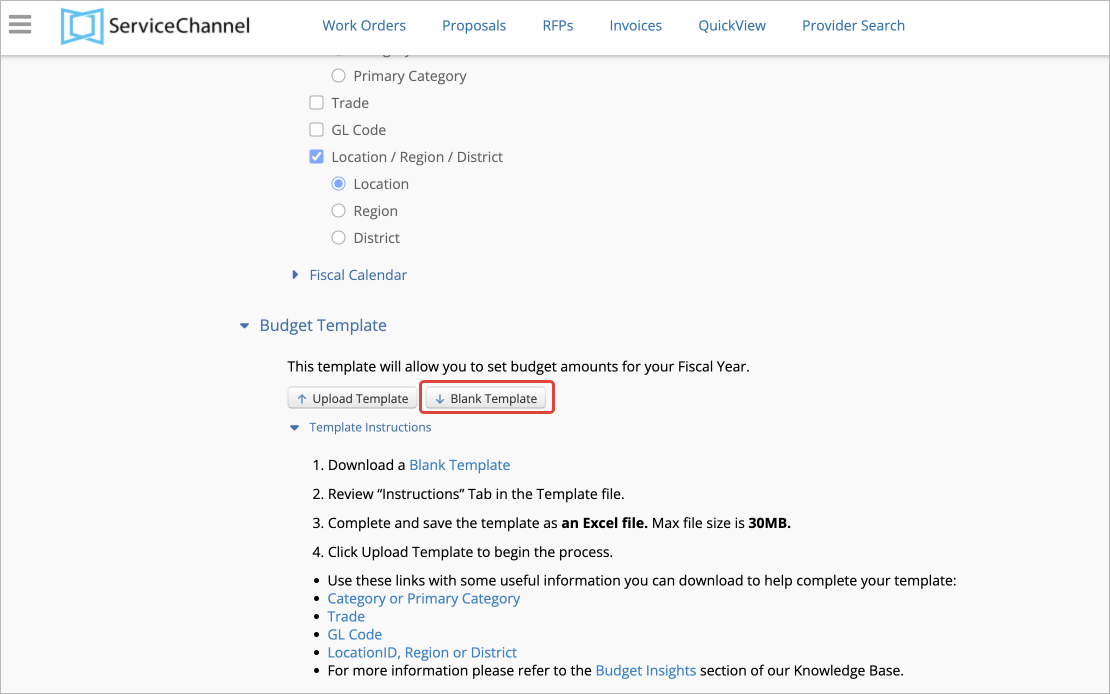
The template has been downloaded.Short instructions on the template completion are in the Instructions tab of the template.
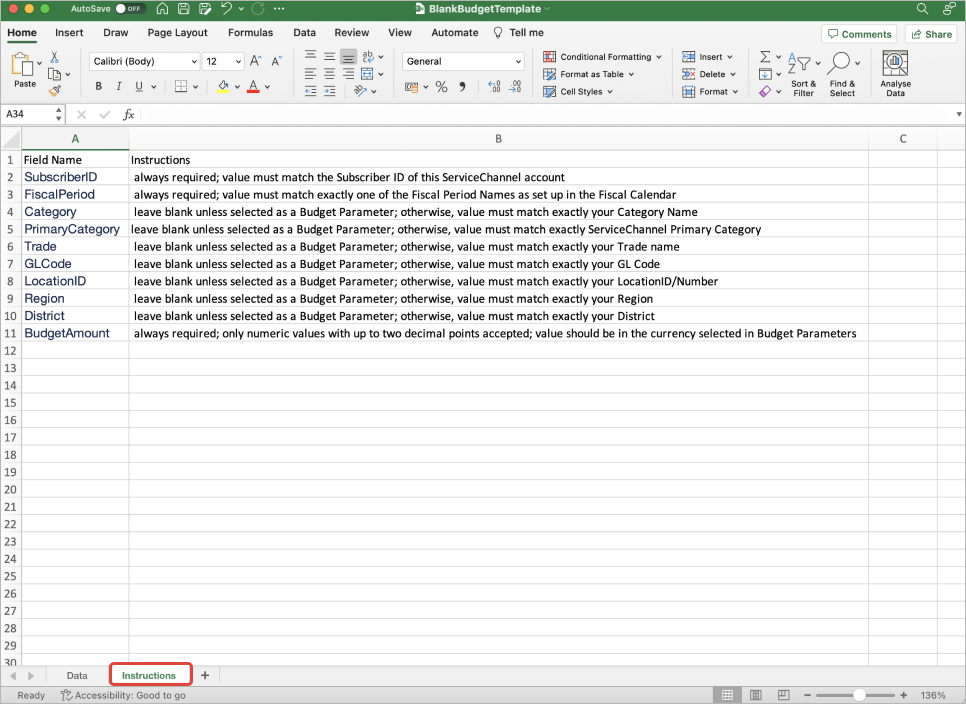
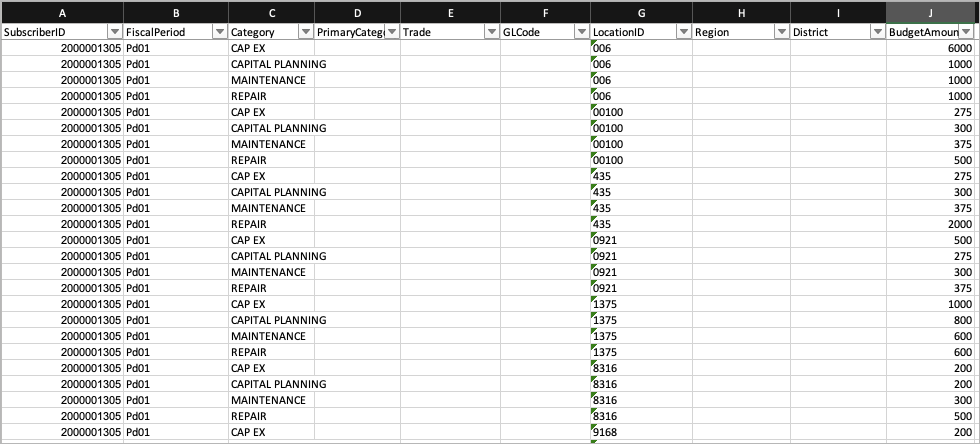
Fill out the following columns:
Note that the following 3 columns are always required for completion:
- Subscriber ID
- Fiscal Period Name
- Budget Amounts
Complete other parameters (Category, Primary Category, Trade, GL Code, Location ID, Region, District) only if you selected any of them in Budget Settings before.
For example, if you selected the Category parameter only, do not complete any other parameters in the template.
- Subscriber ID (Required). Enter the Subscriber ID number for each row. It can be found at the bottom of the page or using the GL Code or LocationID, Region or District reports in the Template Instructions section.
Fiscal Period (Required). Enter the Fiscal Period Name specified in the Fiscal Calendar section. For example, Pd01.
When completing the Fiscal Period Name column, note the following information:
- The Fiscal Period Name entered in the Fiscal Calendar section of Budget Settings must match the name in the template.
- The Fiscal Period Name entered should be equal to the number of locations/districts/regions/trades/categories tied to the budget and fiscal period. Each line should be separate.
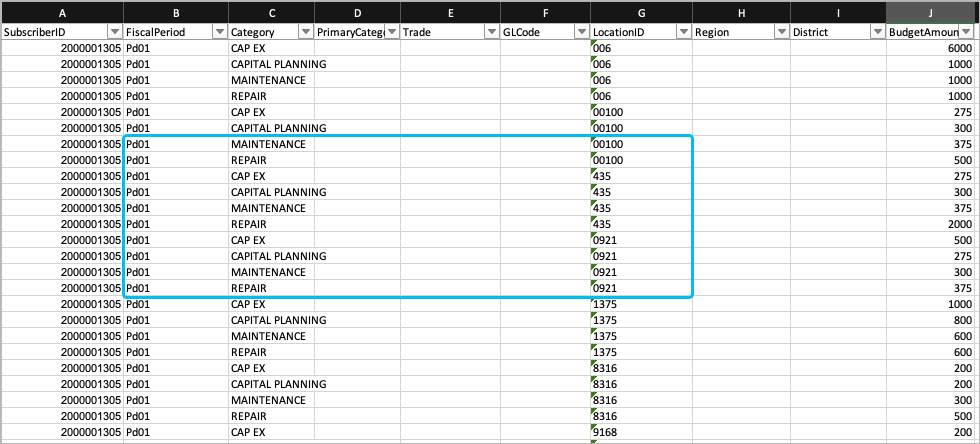
Say you have 3 locations for the same fiscal period (Pd1) and 2 categories with different budgets. Then, your template should look the following way:
- Pd1 – MAINTENANCE – 58473
- Pd1 – MAINTENANCE – 57463
- Pd1 – MAINTENANCE – 67567
- Pd1 – REPAIR – 58473
- Pd1 – REPAIR – 57463
- Pd1 – REPAIR – 67567
- Category (Optional). If you selected the Category as the parameter, enter custom categories specified in the Admin – WO Properties section the budget will be assigned to.
Primary Category (Optional). If you selected the Primary Category as the parameter, enter primary categories from the Admin – WO Properties section the budget will be assigned to.
Download the Category or Primary Category report to get a customized report for your ServiceChannel account.
Trade (Optional). If you selected the Trade as the parameter, enter the trades specified in the Admin – WO Properties section the budget will be assigned to.
Download the Trade report to get a customized report for your ServiceChannel account.
GL Code (Optional). If you selected the GL Code as the parameter, enter GL codes configured in your ServiceChannel account in the Admin – Accounting section the budget will be assigned to.
Download the GL Code report to get a customized report for your ServiceChannel account.
- Location ID (Optional). If you selected the LocationID as the parameter, enter location IDs from the Locations and Provider Assignment module the budget will be assigned to.
- Region (Optional). If you selected the Region as the parameter, enter region(s) from the Locations and Provider Assignment module the budget will be assigned to.
District (Optional). If you selected the District as the parameter, enter district(s) from the Locations and Provider Assignment module the budget will be assigned to.
Download the Location ID, Region, and District report to get a customized report for your ServiceChannel account.
- Budget Amount (Required). Enter the budget amount for each row.
- Save the template to your computer in the .xlsx format.
Click Upload Template and select your file.
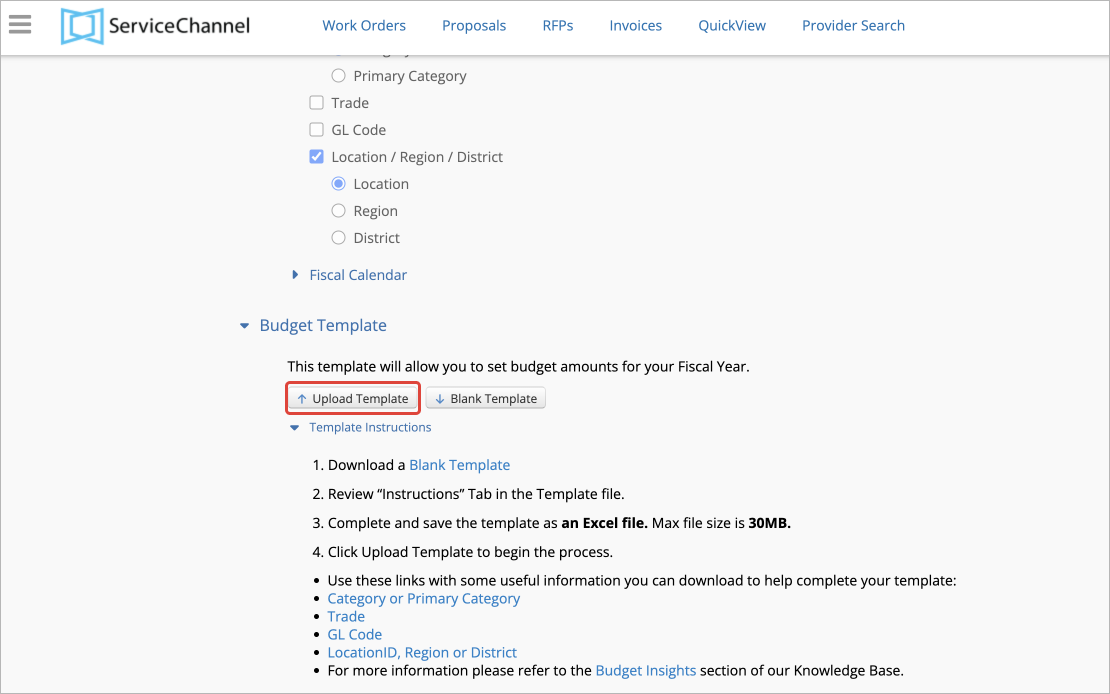
Note that the current file size limit is 30 MB. If your file extends the limit, split up the budget into several files (for example, by fiscal periods 1-6, 7-12 and reach out to ServiceChannel Support for assistance to upload data.
- (Optional) Correct the errors in the template if there are any. The error messages are listed in the last J column.
Once you upload the template, you can track how you are managing the budgets.
You can also delete your budgets or upload new templates to update the existing budget. Read Managing Existing Budgets for more information.
