Configuring Checklists
- Lamont Eddins
- Joseph Yarborough (Unlicensed)
- Veronika Maishutovich
Checklists are used to collect information during a technician's onsite visit. For example, you may ask a lighting technician onsite for a repair or maintenance call to check that other lights are functioning properly and to note whether dark areas are noticed. Another example is for a technician, onsite to clean and disinfect a location, can also check whether any hand sanitizer stations are empty. You can create a Repair or Planned Maintenance Checklist. The Check-in Segment represents questions asked during the check-in process of the work order while the Check-out Segment represents questions asked during the check-out process. Just like configuring a checklist without segments, you will have the “question-types” feature to construct your questions. At any time, you can modify or remove a checklist. When a checklist has check-in segment question(s), they must be answered before the clock starts on a work order.
Checklists differ from Site Planning Manager because that module is geared toward internal facilities teams.

You can create Checklists based on unique Trade/Category combinations. When a Checklist is enabled, all technicians using ServiceChannel Provider Mobile will complete it for every checkout for all locations related to those Trade/Category combinations.
An extended feature allows you to build Checklists for specific Locations. In this case, Checklists are configured based on unique Trade/Category/Location combinations. Contact your ServiceChannel representative to turn on the ability to build Checklists by Locations.
Creating Persistent Questions
Questions can be persistent where responses can remain the same or updated at any time by changing the response. This allows for multiple technicians to update a single question and also allows technicians to update on a subsequent check-in. Questions can also be required where technicians must answer the question each time they check-in and/or check-out of a work order. Lastly, a combination, creating questions that are persistent and required. Any checklist item that is persistent means that the technician will not be forced to re-answer that question on every visit but will always be able to update the response. Creating checklists with segments are still based on category, trade, and location.
You can view Checklist answers on that work orders' Details page — in both Service Automation and SC Mobile — to see the answers and click through the attached photo gallery.
Adding URL Requirement

When creating or modifying a checklist, a chosen URL can be added within an Acknowledgement question type. It becomes associated with the checklist as an activity during check-in and/or check-out segment questions. For instance, when you want technicians to read a specific message or review additional information before and/or after providing service. When View URL is selected, it automatically becomes an Answer Required question. View URL required feature can be used on standard and planned maintenance checklist.
Configuring Repair Checklists
Important
As soon as a Checklist is saved, it is automatically available in ServiceChannel Provider Mobile for technicians when they check into repair work orders. Should you want to test a Checklist before making it available to your service providers, see Checklist Tips, below.
Technicians with access to Travel Time or Admin Time functionality will not see Checklists when they log travel or admin time. They will only see Checklists when they are checking in to start the actual repair work.
Checklists appear when a technician is checking in and/or checking out of a work order in ServiceChannel Provider Mobile. Technicians can answer the questions upon check-in or opt to answer later, upon check-out. Technicians must respond to all questions that you configure as required before they can check out of the work order. Additionally, technicians must upload a photo for all items configured as requiring one.
You can create as many Checklists as needed, with the right Trade/Category (or Trade/Category/Location) combinations. See Checklist Combinations, below, for more information.
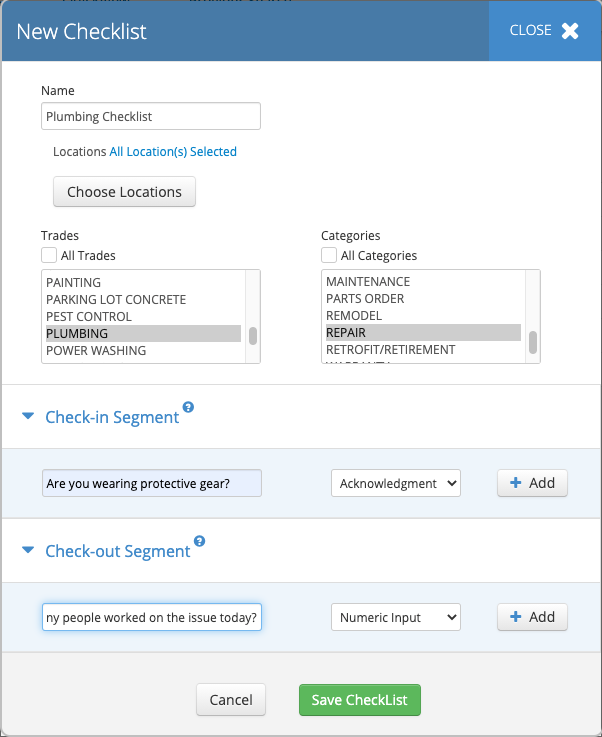
- Click +Add New Checklist. The New Checklist modal appears.
- Give the new checklist a Name.
- (When the Checklist for Locations feature is turned on) Click Choose Locations and check the Locations for which this Checklist should be applied.
- Select the Trade and Category to which the Checklist should be applied.
- To select multiple Trades and Categories, use Control+click (PC) or Command+click (Mac).
- Under Check-in Segment:
- Acknowledgment: functions more like an on/off toggle, it allows technicians to answer by turning the toggle on to answer 'yes' or turning it back off to answer 'no'.
- Optional: Select View URL to add website to checklist
- Optional: Add URL into textbox
- Selector: allows you to create written multiple choices for a technician to choose answers.
- Select Multi-Select to allow multiple answers.
Deselect Multi-Select to allow only one answer.
User Input Response Checkbox is available when you want an explanation to go along with the selected answer. This will require the technician to provide more details.
- Text Entry: allows a technician to enter text to answer the question.
- Numerical: allows a technician to enter numbers in the field when configuring count questions such as, "How many hand sanitizers are on the first floor?"
- Enter the question or statement on the Enter Question textbox that the technician will read to answer.
- On the Question Type drop-down arrow, select the type of response:
- Acknowledgment: functions more like an on/off toggle, it allows technicians to answer by turning the toggle on to answer 'yes' or turning it back off to answer 'no'.
- Select whether you want the question to be Answer Required and/or Answer Persistent by clicking the Checkbox next to the name.
- Under Upload Picture:
- Select Yes, required to stop technicians from moving forward without uploading a photo.
- Select Yes, optional to allow technicians to upload a photo when deemed necessary.
- Select No to disallow uploading photos for that question.
- To add another question, add it in the Enter question text field on the bottom of the Check-in Segment section and repeat the steps then click the + Add button to the right of the Question Type drop-down arrow.
- In cases where you have added too many question slots, click the red line — to the right of the question to remove it.
- Under Check-out Segment:
- Acknowledgment: functions more like an on/off toggle, it allows technicians to answer by turning the toggle on to answer 'yes' or turning it back off to answer 'no'.
- Selector: allows you to create written multiple choices for a technician to choose answers.
- Select Multi-Select to allow multiple answers.
Deselect Multi-Select to allow only one answer.
User Input Response Checkbox is available when you want an explanation to go along with the selected answer. This will require the technician to provide more details.
- Text Entry: allows a technician to enter text to answer the question.
- Numerical: allows a technician to enter numbers in the field when configuring count questions such as, "How many hand sanitizers are on the first floor?"
- Enter the question or statement under the Enter Question textbox that the technician will read to answer.
- On the Question Type drop-down arrow, select the type of response:
- Select whether you want the question to be Answer Required and/or Answer Persistent by clicking the Checkbox next to the name.
- Under Upload Picture:
- Select Yes, required to stop technicians from moving forward without uploading a photo.
- Select Yes, optional to allow technicians to upload a photo when deemed necessary.
- Select No to disallow uploading photos for that question.
- To add another question, add it in the Enter question text field on the bottom of the Check-out Segment section, and repeat the steps then click the + Add button to the right of Question Type.
- In cases where you have added too many question slots, click the red line — to the right of the question to remove it.
- When your Checklist is complete, click Save Checklist. You will see the Checklist listed on the page, and the Checklist is now available to all Service Providers.
There is a 500 character limit except for Free Text which is 250 characters.
Configuring Planned Maintenance Checklists
For maintenance work orders created within the Planned Maintenance Module, you have the ability to a checklist for a specific service. This gives you the option of creating checklists in similar faction as you would a repair work order. The checklist can be used for multiple Planned Maintenance Frequencies. It also includes the ability to establish Segment Questions. Planned Maintenance Checklists can be cloned and used for a different frequency. You can also deactivate a Planned Maintenance Checklist at your convenience.
Planned Maintenance Checklists will be included on the Checklist Dashboard in Analytics.
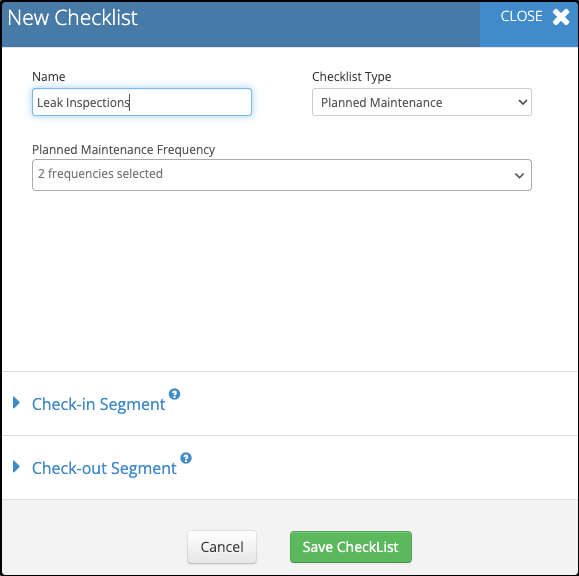
- Click +Add New Checklist. The New Checklist modal appears.
- Use the drop-down arrow under Checklist Type and select Planned Maintenance.

- Create a unique name for the Planned Maintenance Checklist.
- Use the drop-down arrow to select a specific Service & Frequency combination.
- Under Check-in Segment:
- Acknowledgment: functions more like an on/off toggle, it allows technicians to answer by turning the toggle on to answer 'yes' or turning it back off to answer 'no'.
- Optional: Select View URL to add website to checklist
- Optional: Add URL into textbox
- Selector: allows you to create written multiple choices for a technician to choose answers.
- Select Multi-Select to allow multiple answers.
Deselect Multi-Select to allow only one answer.
User Input Response Checkbox is available when you want an explanation to go along with the selected answer. This will require the technician to provide more details.
- Text Entry: allows a technician to enter text to answer the question.
- Numerical: allows a technician to enter numbers in the field when configuring count questions such as, "How many hand sanitizers are on the first floor?"
- Enter the question or statement on the Enter Question textbox that the technician will read to answer.
- On the Question Type drop-down arrow, select the type of response:
- Acknowledgment: functions more like an on/off toggle, it allows technicians to answer by turning the toggle on to answer 'yes' or turning it back off to answer 'no'.
- Select whether you want the question to be Answer Required and/or Answer Persistent by clicking the Checkbox next to the name.
- Under Upload Picture:
- Select Yes, required to stop technicians from moving forward without uploading a photo.
- Select Yes, optional to allow technicians to upload a photo when deemed necessary.
- Select No to disallow uploading photos for that question.
- To add another question, add it in the Enter question text field on the bottom of the Check-in Segment section and repeat the steps then click the + Add button to the right of the Question Type drop-down arrow.
- In cases where you have added too many question slots, click the red line — to the right of the question to remove it.
- Under Check-out Segment:
- Acknowledgment: functions more like an on/off toggle, it allows technicians to answer by turning the toggle on to answer 'yes' or turning it back off to answer 'no'.
- Selector: allows you to create written multiple choices for a technician to choose answers.
- Select Multi-Select to allow multiple answers.
Deselect Multi-Select to allow only one answer.
User Input Response Checkbox is available when you want an explanation to go along with the selected answer. This will require the technician to provide more details.
- Text Entry: allows a technician to enter text to answer the question.
- Numerical: allows a technician to enter numbers in the field when configuring count questions such as, "How many hand sanitizers are on the first floor?"
- Enter the question or statement under the Enter Question textbox that the technician will read to answer.
- On the Question Type drop-down arrow, select the type of response:
- Select whether you want the question to be Answer Required and/or Answer Persistent by clicking the Checkbox next to the name.
- Under Upload Picture:
- Select Yes, required to stop technicians from moving forward without uploading a photo.
- Select Yes, optional to allow technicians to upload a photo when deemed necessary.
- Select No to disallow uploading photos for that question.
- To add another question, add it in the Enter question text field on the bottom of the Check-out Segment section, and repeat the steps then click the + Add button to the right of Question Type.
- In cases where you have added too many question slots, click the red line — to the right of the question to remove it.
- When your Checklist is complete, click Save Checklist. You will see the Checklist listed on the page, and the Checklist is now available to all Service Providers.
Checklist Combinations
When configuring Checklists it is handy to know how the unique Trade/Category combinations work. Let's assume we are building 4 Checklists:
| Checklist # | Unique Trade | Unique Category | Result |
|---|---|---|---|
| 1 | Janitorial | Repair | ✅ Checklist is good. |
| 2 | Janitorial | Maintenance | ✅ Checklist is good. |
| 3 | Janitorial | Repair Maintenance | ❌. Given that Checklists #1 and #2 exist, this is not a unique trade/category combination. The system will not save this Checklist. |
| 4 | Lighting | Repair | ✅. This is a different Trade/Category combination. Checklist is good. |
Now let's take similar examples and add the ability to configure Checklists using unique Trade/Category/Location combinations. The results differ as so:
| Checklist # | Unique Trade | Unique Category | Unique Location* | Result |
|---|---|---|---|---|
| 1 | Janitorial | Repair | All Locations | ✅. Checklist is good. |
| 2 | Janitorial | Maintenance | Location 001 | ✅. Checklist is good. |
| 3 | Janitorial | Repair Maintenance | All Locations | ❌. Given that Checklists #1 and #2 exist, this is not a unique trade/category combination. The system will not save this Checklist. |
| 4 | Janitorial | Maintenance | Location 003, 005 | ✅. Given that Checklist #3 did not save, and Checklist #2 is only configured for Location 001, this Checklist is good. |
| 5 | Janitorial | Repair | Location 002 | ❌. Given that Checklists #1 exists, this is not a unique trade/category/location combination. The system will not save this Checklist. |
Checklist Tips
It is a good idea to test your Checklist before dispatching it to your service providers or technicians. Since the Checklist is turned on as soon as you save it, there are some ways to test it before dispatching it.
- When configuring a Checklist, use a Trade and/or Category your providers are not using. Should you have an internal Trade or Category, map it to one of those first.
- Users that have the option to configure Checklists by Location, turn it on for a Training or Test location only. Usually, ServiceChannel configures a Training location during the implementation process. Should you still have that Location, try changing the address to your physical location first so you can check in and out of the work order and see the Checklist.
- When everything is to your liking, modify the checklist to point to the correct Trades/Categories/Locations for your providers and technicians. It is a good idea to send a note to your providers and technicians to let them know that they will see this Checklist going forward.
- Once a checklist is created, it can be cloned and turned into its own unique checklist.
- Double check URL before adding onto the checklist.