Configuring Invoice Auto-Approval
In the configuration, you decide what invoices should be auto-approved depending on their date range, providers, invoice amount, and other conditions.
Before you setting up the invoice auto-approval, select the Enable auto-approval checkbox in the top-left corner.

You can disable it at any time without losing your configuration.
Troubleshooting Checklist
When the wrong invoice has been approved, or the needed invoices have not been approved, use this checklist to ensure the auto-approval configuration works correctly.
The invoice auto-approval configuration is divided into 3 steps:
- In the first step, you specify general conditions which will affect specific invoices.
- In the second step, you configure conditions to narrow down the number of affected invoices.
- (Optional) The third step allows you to send the auto-approval configuration reports to emails.
Configuring the First Step of Invoice Auto-Approval
In the first step, you configure the dates and ages of the invoices that the auto-approval process will impact.
- Next to When invoice, select the Posted Date or the Invoice Date.
- The Posted Date is the automatically generated date when the invoice is submitted.
- The Invoice Date is the date which the provider selects when creating the invoice.
- Next to is after, select the desired date from the date picker, or enter the date.
- Next to and invoices older than, enter the minimum age of invoices in days to be considered for auto-approval.
- Next to and work orders are newer than, select the maximum age of the work orders to be included, in months.

You can only select one date range for all invoices per auto-approval.
Configuring the Second Step of Invoice Auto-Approval
In step 2, you add the conditions under which ServiceChannel will sort the needed invoices and send them to auto-approve.
For example, only invoices under the following conditions will be approved:
- Invoices have at least 1 WO attachment.
- The agreed rate is less than the invoice rate.
- The minimum time difference between the Invoice time and WO check in/out time is less than 0.25 hrs (15 min).
You can set up the conditions in 2 ways:
- Set up conditions that will apply to all selected providers.
- Create multiple rules with conditions for different provider sets.
It is not necessary to select all checkboxes during the second step configuration. Select only those you need.
- Click + Add Condition.

- Select Include or Exclude from Auto-Approval invoices that meet the conditions you specify.
- Select the Has Approved Proposal checkbox for invoices required to have at least one proposal that was approved.
- Select the Has WO Attachment checkbox for invoices required to have at least one attachment.
Select the Include non-compliant hours in check in/out time checkbox for invoices with non-compliant check-in/out hours.
Enter the miles within which invoices will be included or excluded from auto-approval.
Select if a non-compliant invoice check-in/out should be >= or <= the miles you specified.
The compliance status depends on if technicians’ check-ins/outs are within the allowed radius that you configured in the Site Access Rules module.
- If you include this rule (Step 1 of this instruction), invoices with non-compliant check-in hours will be auto approved.
- If you exclude this rule (Step 2 of this instruction), invoices with non-compliant check-in hours will not be auto approved.
Contact your ServiceChannel manager to be able to view compliant and non-compliant check-in hours.
- Select the Has Provider Invoice checkbox for invoices required to have a digital copy of provider’s original invoice attached.
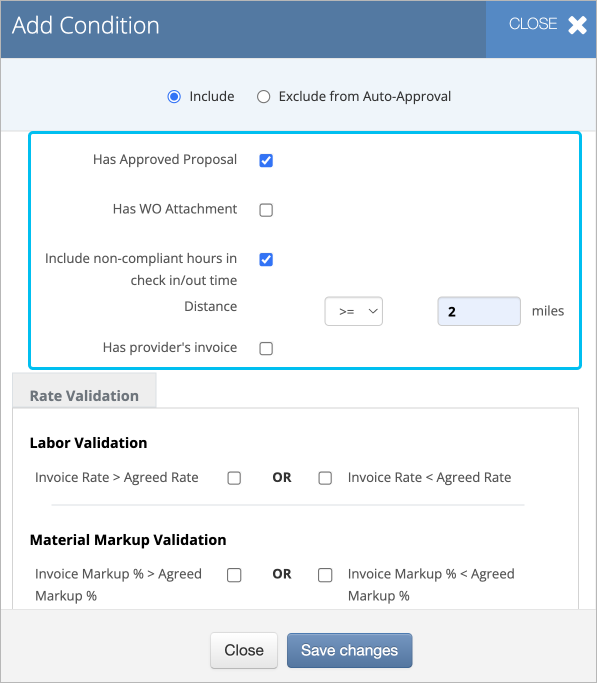
Configure conditions in the Rate Validation section.
About the Rate Validation Section
Rate validation ensures that the charges on invoices align with the agreed-upon prices. It helps prevent overcharging or billing discrepancies, allowing for effective cost control and expense management.
Contact your ServiceChannel manager to have the Rate Validation, Material Markup Validation, Time Mismatch Validation, and/or Negotiated Price List settings.
- Select a Category and Trade or select All to capture all categories and/or trades.
In the Total Amount field, enter the maximum amount the invoice should be charged for auto-approval.
Should you need to change the decimal point (.) to decimal comma (,) on monetary amounts, contact your ServiceChannel representative.

For example, to auto-approve invoices for a maximum of USD 500, enter 500 in this field. Invoices for USD 500.01 and above will not be considered for approval.Click Save changes. A new condition has been added.
You can add as many conditions as needed but be cautious and double-check that the conditions do not contradict each other.
Add the provider(s) to include or exclude in the auto-approval process:
- Select All to include invoices from all providers in the auto-approval process.
- Select Only these to include specific providers.
You can also type the provider’s name for a faster search and selection. - Select All, with the exception of these to exclude specific providers.
You can also type the provider’s name for a faster search and selection.

Multi-Rule Mode
Contact your ServiceChannel manager to turn on the Multi Rule mode.
The multi-rule mode allows you to create different rules with conditions for different provider sets. Each rule is independent and filters all invoices. For auto-approval, it selects only those invoices which meet the conditions specified in this rule.
If an invoice was excluded from the first rule, it could be included for auto-approval in the next rule. To prevent it, check if the providers mentioned in each rule set do not intersect. Have a look at the INCORRECT example below.

In this case, both rules include all providers. It means that some invoices that are not allowed to be auto-approved based on the conditions of Rule 1, may be auto-approved later when ServiceChannel starts filtering them through Rule 2.
We recommend that only one ruleset will have the All option selected.
Configuring the Third Step of Invoice Auto-Approval
In step 3, you can add email addresses to which you send the auto-approval report.

- Select the Send auto-approve report to checkbox.
- Enter the email address of the recipient.
- To enter multiple emails, separate each email address with a semicolon.
- Click Save.
A green box appears confirming that all invoice date ranges, attributes, providers, and report recipients are saved.