Starting a New Audit and Viewing the Details of the Audit Pages

At the start of an audit, you want to ensure you have the right location, audit type, and checklists. When starting a new audit, you have pre-configured areas and checklists that are set up by your Site Planning Manager configurator. During the audit, you may modify the checklists and checklist items available.

You can start a new audit in SC Mobile at any time as long as at least one audit type and one location are configured and available in the app. You can have up to 10 audits in Open or In Progress at a time across all locations. When conducting multiple audits at one location, different templates must be used for each audit.

⦿ How to Start a New Audit
  1. On the Site Audits page, tap New Audit +. The list of locations appears.
  2. Locate and tap the desired location. The list of available audit types appears.

    Should you not see a list of audit types, speak with your ServiceChannel system administrator.

  3. Tap the desired audit type. The audit appears listing the areas and checklists to inspect.

From here, you may begin conducting an audit.

Details of an Audit

Site Planning Manager has three main pages to assist you with conducting an audit.

PageDescription

Audit: List of the area(s) that need to be audited, along with its corresponding checklist(s).

  • Number of checklist items. To the left of each checklist is a number that reflects the number of checklist items to audit. As you rate each item, this list will count down to zero.
  • Upload. When you complete your audit, you may upload it to Service Automation. While uploading an audit, SC Mobile reads the checklists to determine if all items are rated. When all items are not rated, the system prompts you to rate all items.
  • Send Audit To. You can also send your audit to the specified email addresses. Some locations and audit types may have a pre-configured email list, but you can also add additional emails.

Rating checklist items in the Site Planning module of ServiceChannel Mobile

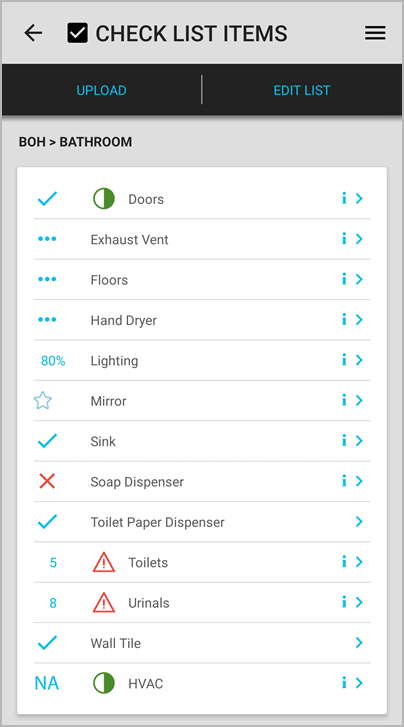
Check List Items: Lists all checklist items within the current checklist in an area.

To go to the Check List Items page, tap the desired checklist.

Rating. To the left of each checklist item are 3 blue dots. These dots indicate that the item has not been rated. In the image on the left, Exhaust Vent, Floors, and Hand Dryer have not been rated. Tap the blue dots to activate and cycle through the rating system. Find out more about the available rating systems.

Depending on the rating system configured for each checklist item, you may see the following ratings:

  • Pass/Fail. A blue checkmark means that the item has passed the inspection, while a red cross X indicates that it has not. In the image on the left, DoorsSoap Dispenser, and Toilet Paper Dispenser are items that use the Pass/Fail rating system.
  • Numeric. This system implies providing a numeric score for an item. Select one of the available numeric values, and tap Save to confirm. In the image on the left, Toilets and Urinals are items to which the Numeric system is assigned.
  • Weighted. In this system, you can rate items as Great, Good, or Fail. A star next to Mirror indicates that the item was rated as Great. The condition of Sink and Wall Tile was evaluated as Good, so a blue checkmark is displayed next to them. Items that were rated as Fail rating are indicated by a red cross X,  just like in the Pass or Fail system.
  • Percentage. In the image on the left, Lighting is the item that uses the Percentage rating system. When conducting an audit, enter a percentage value between 0 and 100% to rate the item condition.

    For items with the Numeric, Weighted, and Percentage rating systems assigned, whether or not the item has passed the audit depends on the Pass Threshold value provided in the audit configuration for each item. If you rate the item as Good in the Weighted rating system, it doesn't mean that the item has passed the audit. Similarly, a score of 95% in the Percentage system may be insufficient to assign the pass flag to the item.


  • N/A. Use N/A to note that you are not rating that checklist item. Some situations to use N/A are when the item is not available or is being repaired at the time of your audit. In the image on the left, HVAC is marked as N/A.

Check List Item impact. Some checklist items may have different importance. A warning sign means this is a Veto item that has the highest impact on the audit score. A semi-filled circle marks an Ignore item that is ignored when the audit score is calculated. In the image on the left, Toilet and Urinal are Veto items, while Air Conditioner is an Ignore item.

Instructions. To the right of some checklist items, you may see a blue "i". This indicates that this item contains instructions that may guide you towards auditing the item correctly. Instructions are listed on the Audit page.

Checklist: Contains the rating, instructions, previous audit data, and other inspection options.

To go to the Audit page, tap the blue arrow next to the desired checklist item.

  • Rating system. On the top, you can see the three dots (no rating), options for evaluating the item that differ depending on the rating system, and the N/A option.
  • Instructions (where available). Tap this area to display further inspection guidance, as set up by your Site Planning Manager configurator.

  • Current and past ratings. The middle of the page lists all audits of this item and how it was rated in the past (when applicable). In this depiction, this item was rated Pass on May 17. In this area, you can also see comments and media files from the last audit when the last auditor turns on the feature to do so.
  • Add Comments. For each necessary item, you can note your findings. You can also indicate if you want to see your note when you conduct the next audit. You can also add a photo or video to support your comments and ratings.
  • Add Attachments. Either take a photo/video or choose an existing photo/video from your device to support your rating. You can also record a video, but its duration should not exceed 15 seconds.
  • Add WO. When you see an issue, you can enter a work order to the item. This is handy as there is a record of work orders associated with items during audits.
  • Add Quantity. Indicate either how many items you are inspecting (such as 8 tables) or the cost in dollars (such as a $500 lighting fixture or $250 to replace an item). You and your organization can determine how to use Quantity and Dollars that works best for your needs.