Manage Your Business Profile
Maria Tarnopolskaya (Unlicensed)
Chellie Esters
Anastasia Medovkina (Deactivated)

Your Profile page is your portfolio that helps your company provide comprehensive information about your services and attract more customers to your growing client network. That is why it is important to keep it fully completed and up to date.
Accessing Your Business Profile
On the top navigation bar, click Profile.
The Profile page appears.
Viewing Your Business Profile
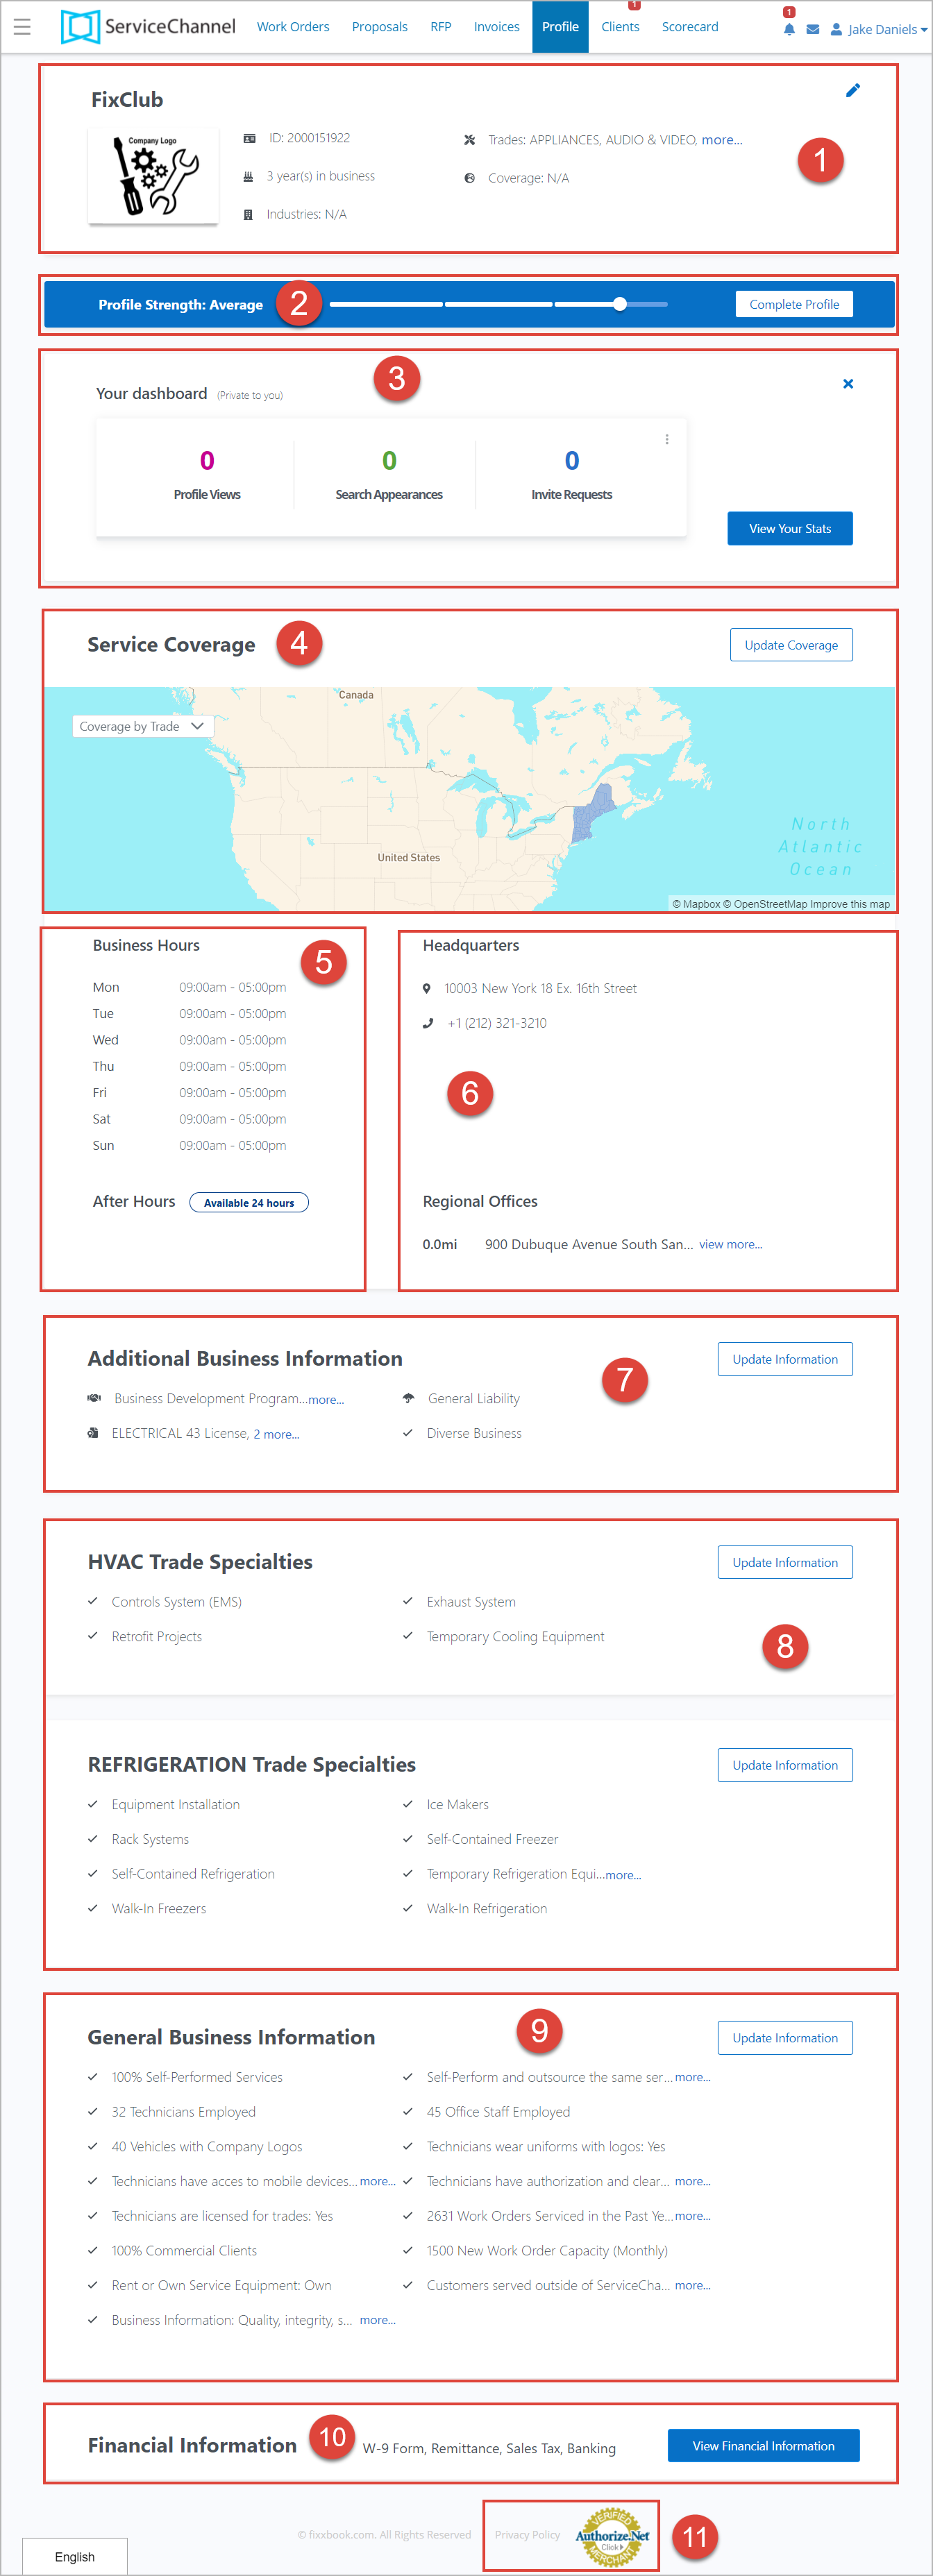
On the Profile page, your company information is broken down into 11 sections:
- Business Information that includes:
- Company name
- Company logo
- Company ID
- Years in business
- Industries
- Trades
- Coverage
Profile Strength progress bar: shows how complete your profile is.
The more complete information about your company you provide, the easier it is for potential clients to find you.
Your Dashboard: displays statistics on how many times your profile was viewed, how many times you appeared in clients’ search results, and how many invitations you have received within the past 6 months.
Click View Your Stats to see the detailed visualized report on your Search statistics, Top Markets, Quality and Speed Scores, etc.
- Service Coverage: lists and shows on the map the areas where you provide services.
- Business Hours.
- Headquarters and Regional Offices.
- Additional Business Information displays:
 Business Diversity Certifications
 Trade Licenses and Certifications
 Insurances
 - Trades Specialties: shows which specific services you provide for the most popular trades.
- General Business Information: displays details about your company.
- Financial Information: contains information about your W-9 Form, Remittance, Sales Tax, and Banking.
- ServiceChannel Privacy Policy and Authorized.Net links.
Maintaining Your Business Profile
We strongly encourage you to complete every section of your Business Profile. The more information you enter, the more clients will get a better understanding of your business and potentially help you grow it.
By keeping your profile complete and up to date, you ensure your company is more likely to come up in a client's search for providers.
To faster navigate to the page with outdated information to update it, the Progress bar that appears on most of your profile pages is clickable. For example, click 🖉 on your profile page to open the Business Information page, where the Progress bar is located on the right-hand side.
You can easily update expired documents and add new coverage, trade specialties, and photos by clicking the corresponding point on the Progress bar. The points are:
Overview. Corresponds to the Business Information page and opens when you click 🖉 in the upper-right corner of your profile.
Coverage. Leads you to Regional offices & Trade coverage. To update your coverage, click Continue.
Licenses. Opens the Trade Licenses and Certifications page.
Insurance. Opens the Review Insurance page.
Details. Leads you to the Trades Specialties page, where you can specify the services you provide for the selected trades.
Photos. Opens the page where you can add or update your company photos.
Business Information
Here you can review and edit basic information about your company.
- Click 🖉 in the upper-right corner to review and edit your business information.

You land on the Business Information page. Edit the information that needs to be updated:
- Year Founded.
Address. Start typing the address, then select your address from the drop-down list that appears.
Country, City, Zip/Postal Code, and State will be filled automatically after you enter the Address.
- New Business Contact. Type in the full name of the person who your prospective clients can contact.
- New Business E-mail. Enter the contact email address to which new client inquiries should be sent.
- (Strongly encouraged) New Business Mobile Number. Enter the phone number that you wish to receive new business inquiries to (text message). This is highly encouraged as it gives you more opportunities to find new clients and grow your business.
- (Optional) Business Logo. Upload your company logo.
- (Optional) Website URL. Add a link to your company website.
- Type of Charter. Select the desired option from the drop-down list.
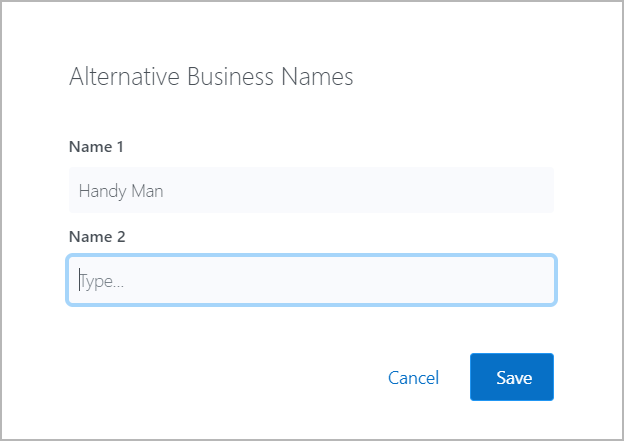
- (Optional) Click the add dba link to add up to two alternative trade names your business operates under.
- In the overlay that opens, enter Name 1. When the first name is specified, the Name 2 field appears. Leave it blank if not applicable.
- Click Save.
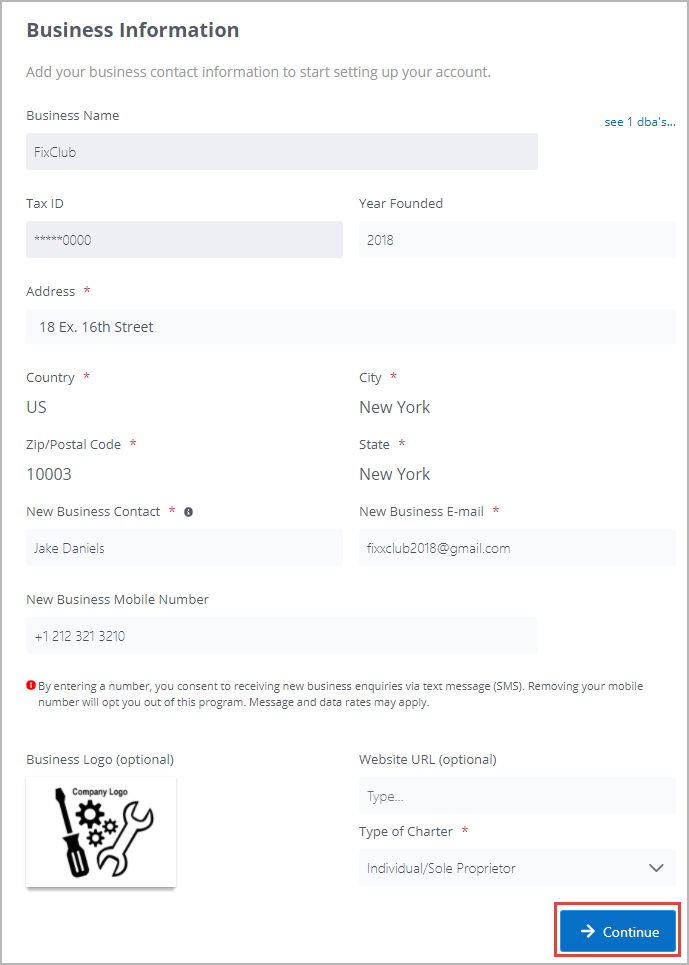
Once you are accepted into at least one client network, your Business Name and Tax ID cannot be edited through this method. You must contact our Support team to edit this information.
- Click Continue to save changes when ready.
Profile Strength
The Profile Strength progress bar shows how strong, meaning complete, your profile is. The more detailed information your business profile offers to clients, the more business opportunities you may get.

Your Dashboard
Your Dashboard displays statistics for the past six months on:
- how many times your profile has been viewed
- how many times you have appeared in clients’ search results
- how many invitations you have received.
You can drill down into the statistics reports and get data on your Search statistics, Top Markets, Quality and Speed Scores, etc. in a more detailed and visualized way.
Click View Your Stats to open the dashboard.

If you want to hide Your Dashboard, click ✖.
Update Coverage
Make sure you have specified all the trades in all the areas in which you provide your services. This is very important because it tells potential clients where you operate. The more detailed and accurate information you give, the easier it will be to find new clients.
Adding Coverage
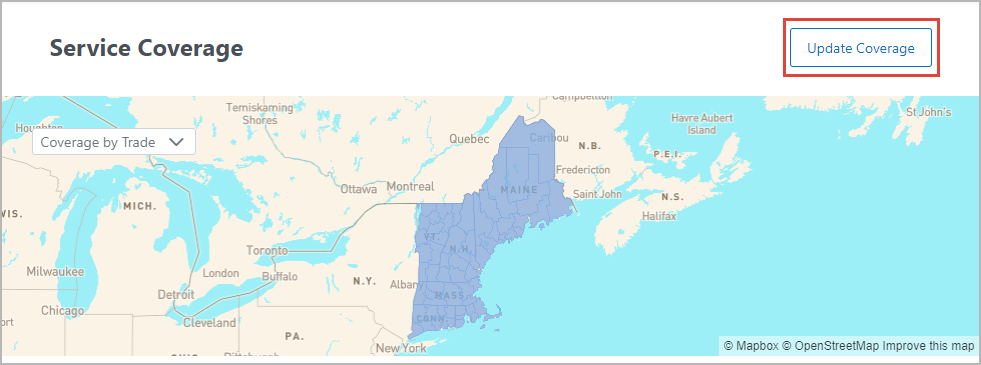
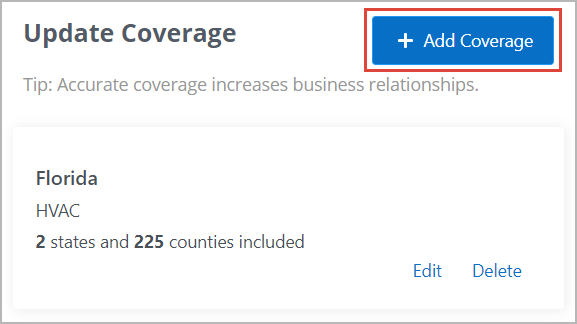
- On the Service Coverage tile, click Update Coverage.
- Click Add Coverage.
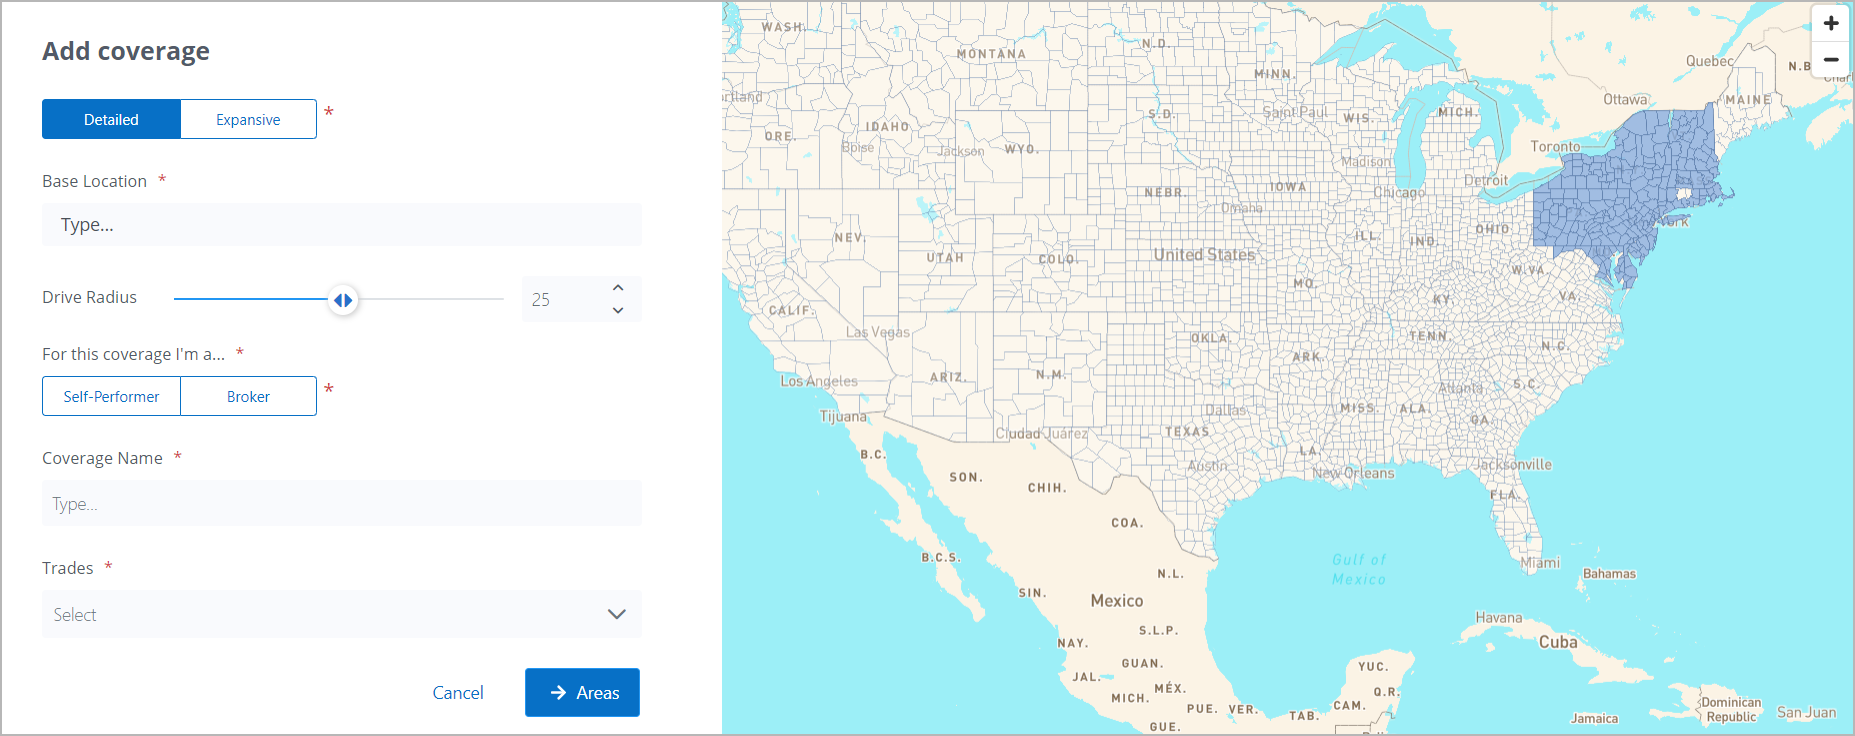
- Select either Detailed or Expansive flow.
The Detailed flow is selected by default. It offers you a possibility to specify the Base Location and then adjust the Drive Radius to specify the areas you cover. In the next step, you have the possibility to add or exclude the areas that are outside your coverage.
Expand to follow the Detailed flow.- Start entering the Base Location city name or address. The dropdown appears with the suggestions. Select the desired one. The location is marked on the map.
Specify the Drive Radius by moving the slider to the right to increase the radius or to the left to decrease it. The selected radius is displayed on the map.
If you do not see the map, enable the full-screen mode of your browser.
- In the For this coverage I’m a… section, specify whether you are a Self-Performer or a Broker.
- Enter the Coverage Name that you wish to use.
- Select the Trades you provide services in for the specified areas.
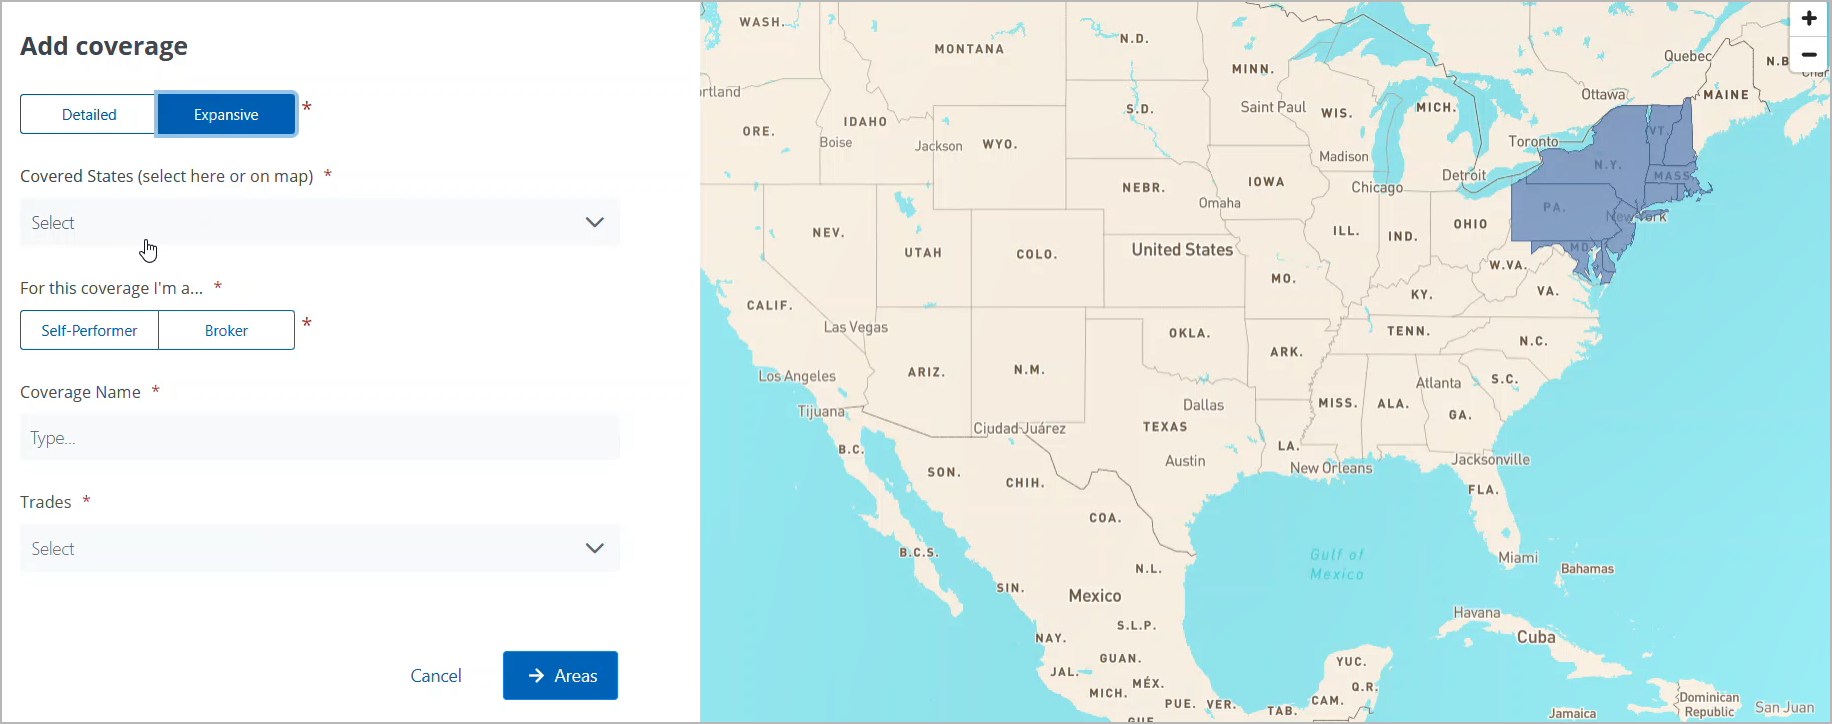
The Expansive flow allows you to select entire states and then exclude the individual counties outside your coverage. It’s ideal for larger coverage areas.
Expand to follow the Expansive flow.Select the Covered States from the drop-down list. The selected states are added to the list and to the map.
Alternatively, click on the state on the map — the state is selected and added to the list.If you do not see the map, enable the full-screen mode of your browser.
- In the For this coverage I’m a… section, specify whether you are a Self-Performer or a Broker.
- Enter the Coverage Name that you wish to use.
- Select the Trades you provide services in for the specified areas.
(Optional) Click Areas to review and adjust the coverage areas. The Adjust Coverage screen opens.
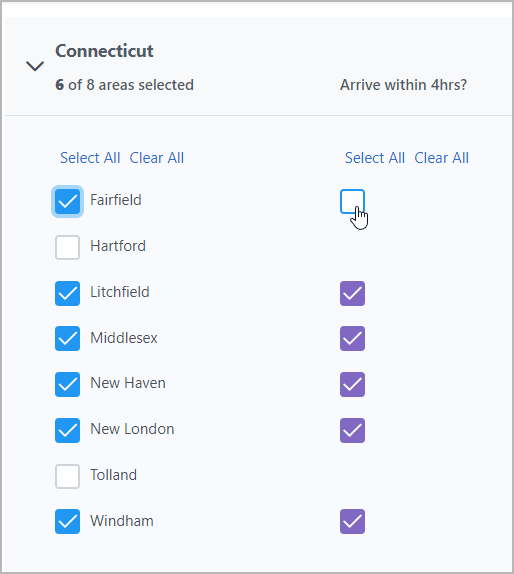
In the example below, is the list of selected states with the counties they include.- Click the state where you want to exclude the counties outside your service coverage. You can click the state on the list or on the map.
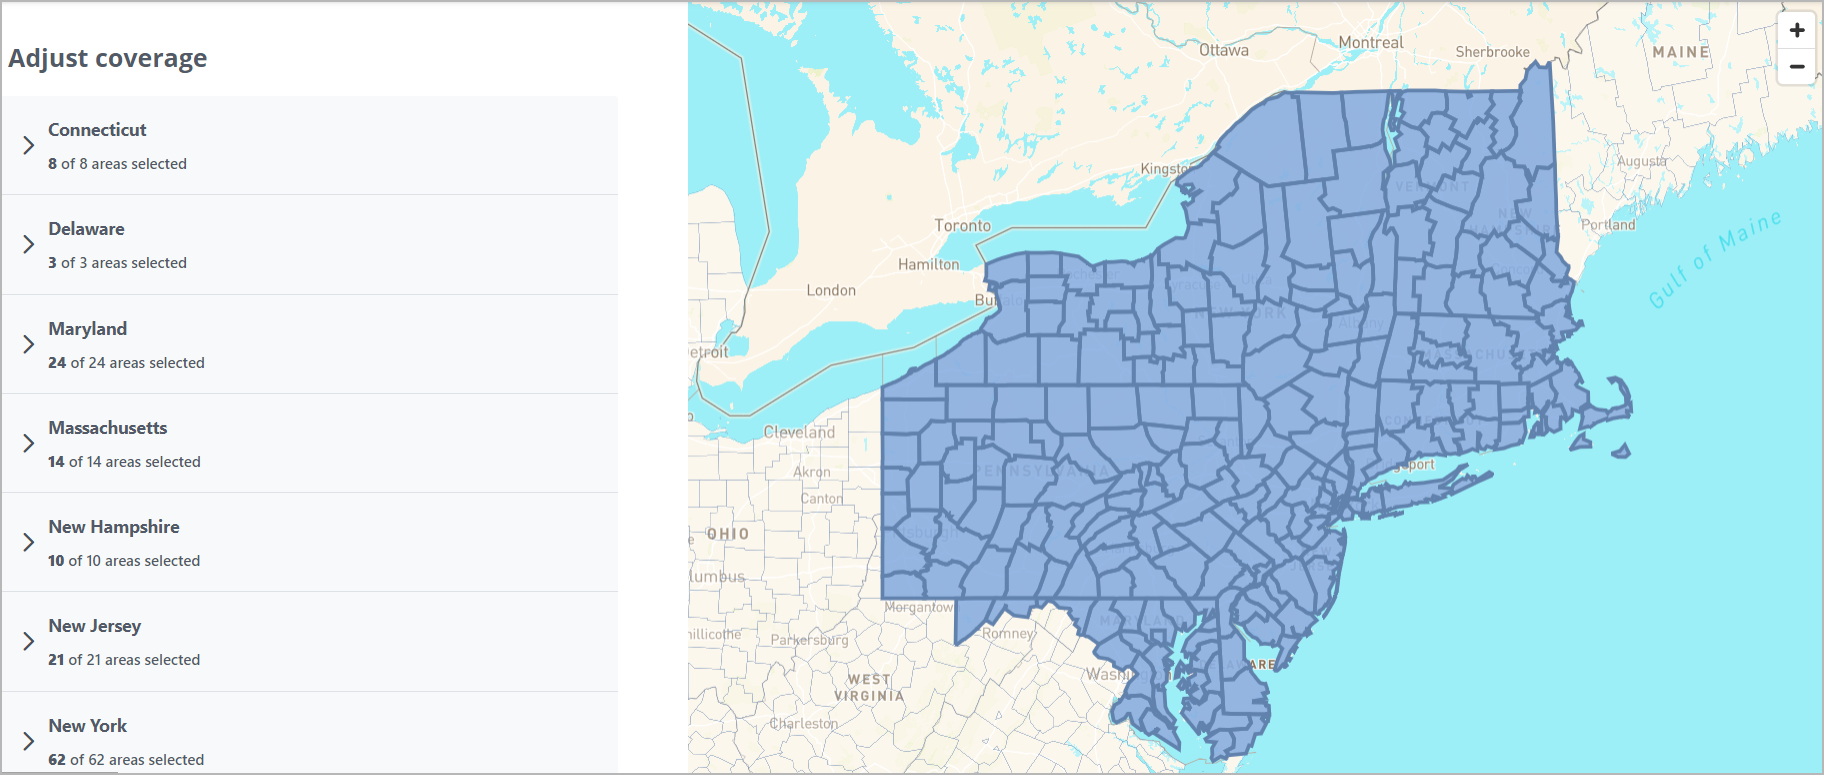
- All counties are selected by default. Clear the checkboxes next to the counties you want to exclude from the coverage.
In the Arrive within 4hrs column, clear the checkboxes for the counties you need more than 4 hours to get to.
You can update your coverage anytime by clicking Edit.
In the Edit Coverage screen, all the information can be changed except for the Detailed or Expansive flow you specified when adding coverage.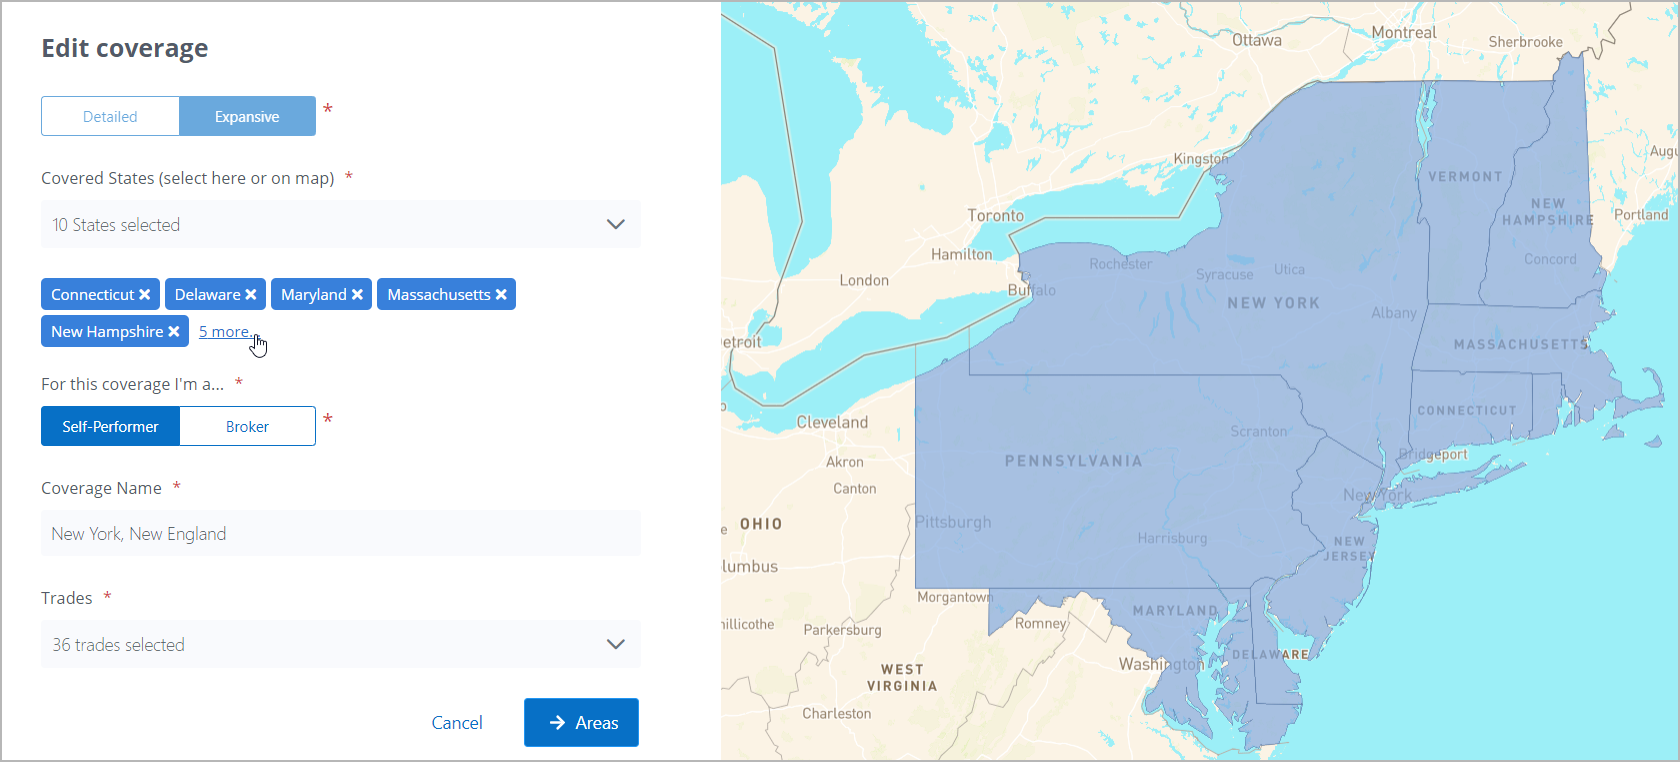
To remove the coverage, click Delete and confirm your action in the overlay that appears.
- Click the state where you want to exclude the counties outside your service coverage. You can click the state on the list or on the map.
- Click Continue to save changes.
Editing Coverage
- On the Service Coverage tile, click Update Coverage.
- Click Edit next to the area you want to update.
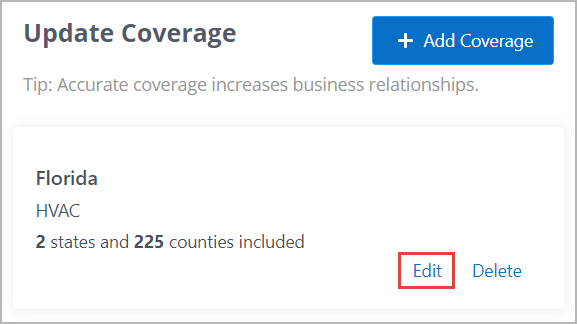
- Click Areas to review and adjust the coverage areas.
- (Optional) On the Adjust Coverage screen,
- Click the state where you want to exclude the counties outside your service coverage. You can click the state on the list or on the map.

- All counties are selected by default. Clear the checkboxes next to the counties you want to exclude from the coverage.
- In the Arrive within 4hrs column, clear the checkboxes for the counties you need more than 4 hours to get to.
- Click the state where you want to exclude the counties outside your service coverage. You can click the state on the list or on the map.
- Click Save Coverage.
Deleting Coverage
- On the Service Coverage tile, click Update Coverage.
- Click Delete next to the area you want to update.
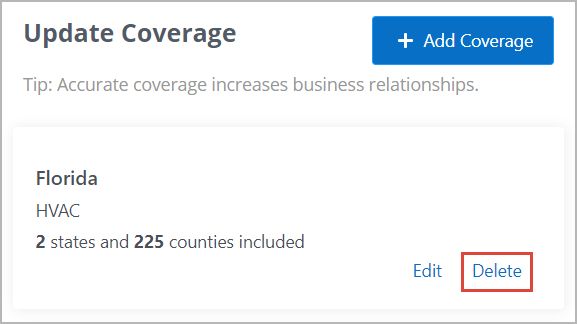
- On the overlay that appears, click Delete.
The area is deleted from the list and from the map.
Business Hours
- Click 🖉 in the upper-right corner.

You will land on the Business Information page. - Click Continue. The Business Hours page opens.
Edit the information that needs an update:
Select your time zone from the drop-down list.
(Optional) Select We respond to service requests 24 hours a day if this applies to your company.
When you select the We respond to service requests 24 hours a day checkbox, you need to provide your After Hours Phone Number without any special characters like a + plus, (brackets), or –dashes–.
Specify your Regular Business Hours.
When you select Monday, the default time 09:00 AM to 05:00 PM appears. You can edit it by clicking the time. To copy the same business hours to all weekdays in the Regular Business Hours section, click Copy time to all.
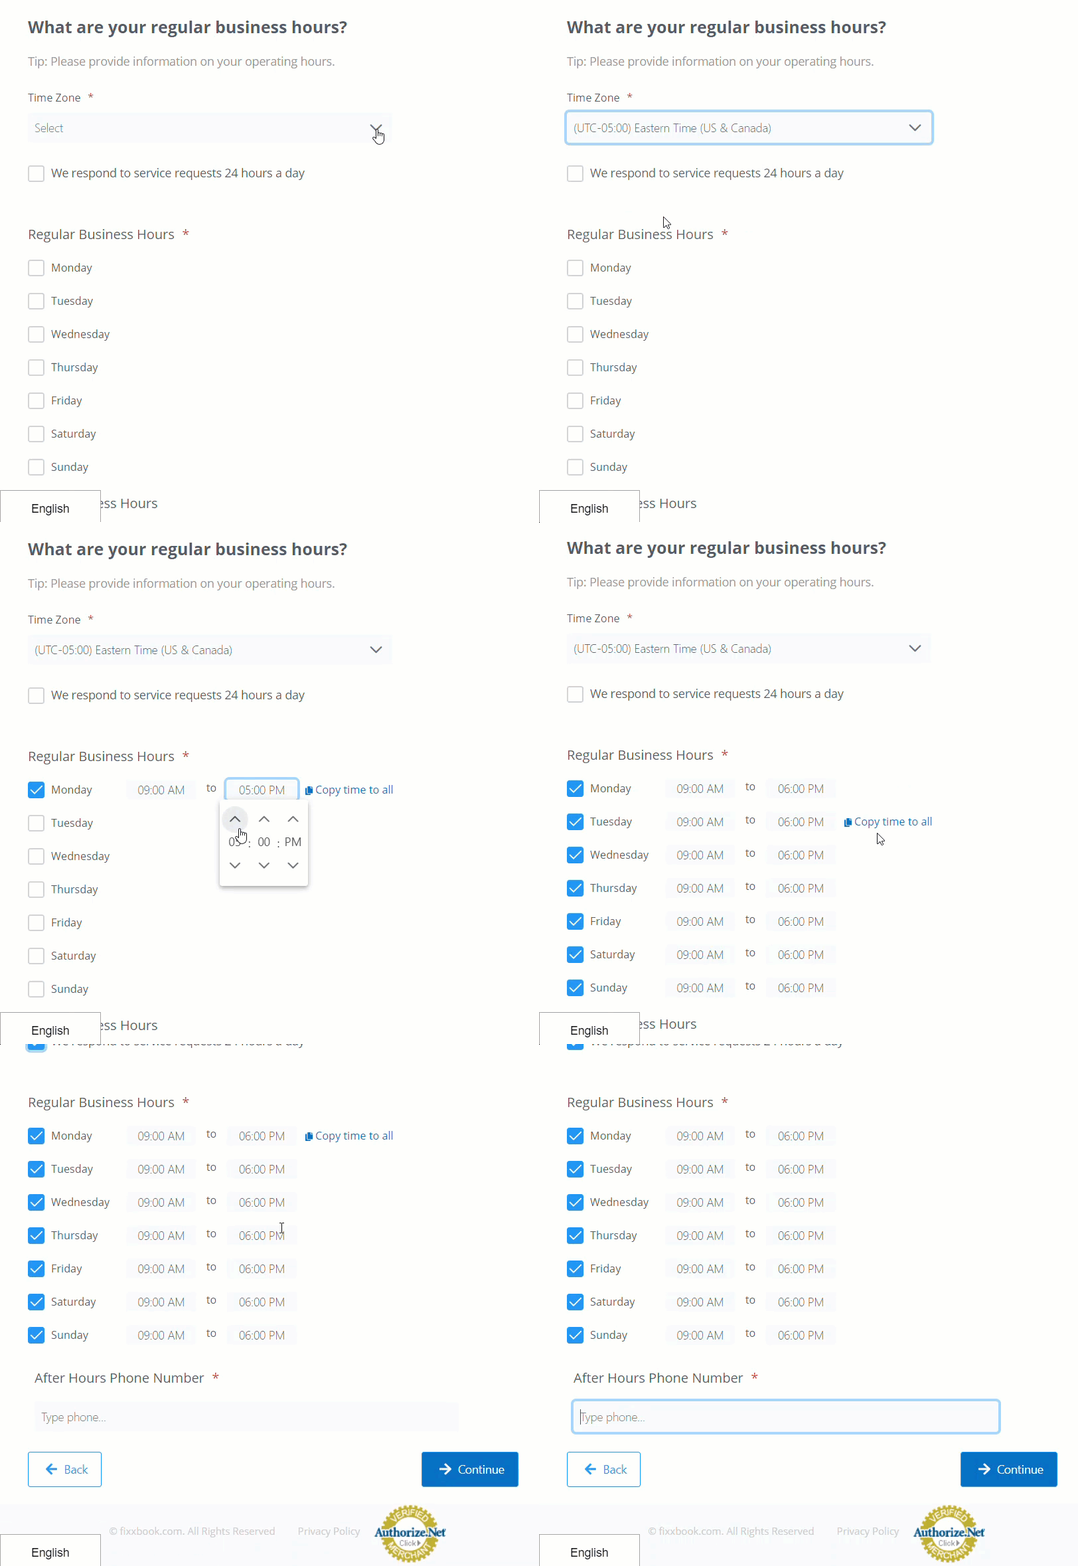
- Specify your After Business Hours.
If you have not selected the We respond to service requests 24 hours a day checkbox, you can specify your after business hours as in step 3. - Provide your After Hours Phone Number without any special characters if your company operates after hours.
Otherwise, you can leave the After Hours Phone Number field blank.
Press Continue to save changes.
Review Your Regional Offices
On the Review Regional Offices page, you can add, edit, and delete regional offices. Headquarters can be edited but not deleted. If you try to delete the headquarters, you will see an error message stating that the head office cannot be removed.
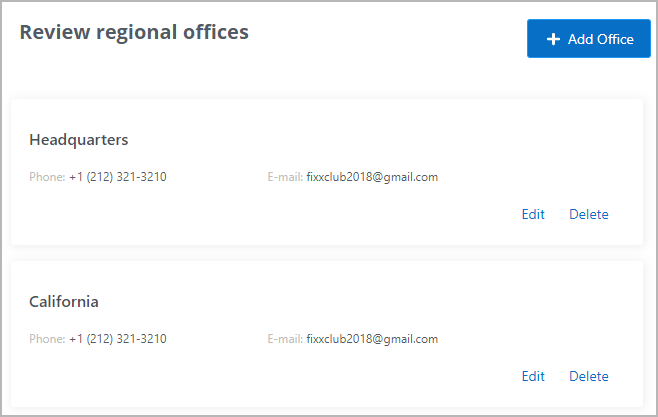
Adding Regional Offices
- On the Service Coverage tile, click Update Coverage.
- Click Back on the Update Coverage page that opens. You land on the Review Regional Offices page.
- Click Add Office. The Add Office page opens.
- Fill out the new regional Office Name.
Provide the new office Phone Number.
Mind that you should enter only numbers without any special characters like (brackets), –dashes–, or a + plus.
- Type in your E-mail address.
- Enter the Address of your regional office.
- Start entering the street and building number of your office — available options appear in the drop-down list.
Click the required option. The associated Country, City, Zip/Postal Code, and State fields will be auto-filled.
The added office is marked on the map to the right.If you do not see the map, enable the full-screen mode of your browser.
- Click Save Office.
The office is added to your Regional Offices list.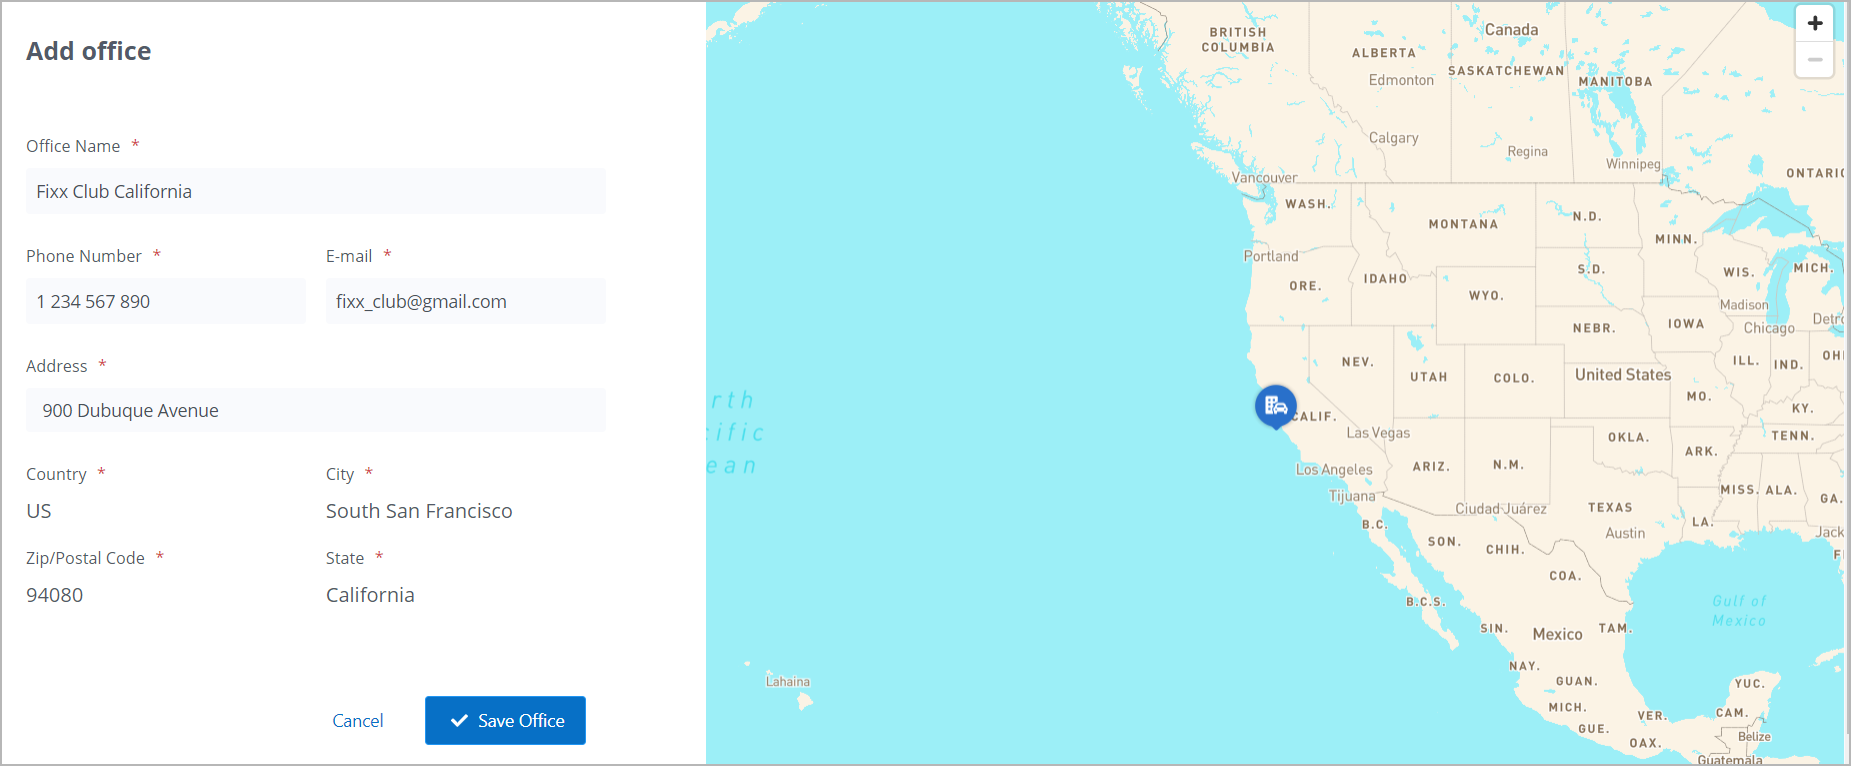
Editing Regional Offices
- On the Service Coverage tile, click Update Coverage.
- Click Back on the Update Coverage page that opens. You land on the Review Regional Offices page.
- Click Edit next to the office you want to update.
- Make necessary changes.
- Click Save Office.
The office information is successfully updated.
Deleting Regional Offices
- On the Service Coverage tile, click Update Coverage.
- Click Back on the Update Coverage page that opens. You land on the Review Regional Offices page.
- Click Delete next to the office you want to remove.
- Confirm your action by clicking Delete.
The office is deleted from the Regional Offices list and from the map.
Additional Business Information
To give your prospective clients a better understanding of what your company does, select the options that best describe your business and services.

This section includes:
![]() Business Diversity Certifications
Business Diversity Certifications
![]() Trade Licenses and Certifications
Trade Licenses and Certifications![]() Insurances
Insurances
From here, you can specify that you are a diverse business, manage your certifications, licenses, and insurances.
- On the Additional Business Information tile, click Update Information. The Which of these apply to you? page opens.
- Select the checkboxes that best describe your company.
- Click Continue to review and/or update the second page of Which of these apply to you? This information is displayed in the General Business Information section.
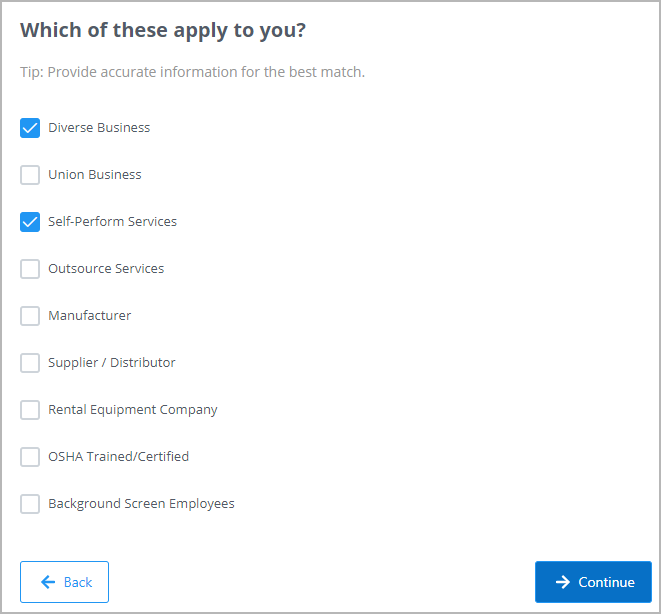
- Click Continue to proceed to the Trade Certifications and Licenses page.
- Press Continue to add or edit Review Business Diversity Certifications in case you have selected the Diverse Business checkbox.
- Click Continue to review and manage Insurances.
Trade Certifications and Licenses
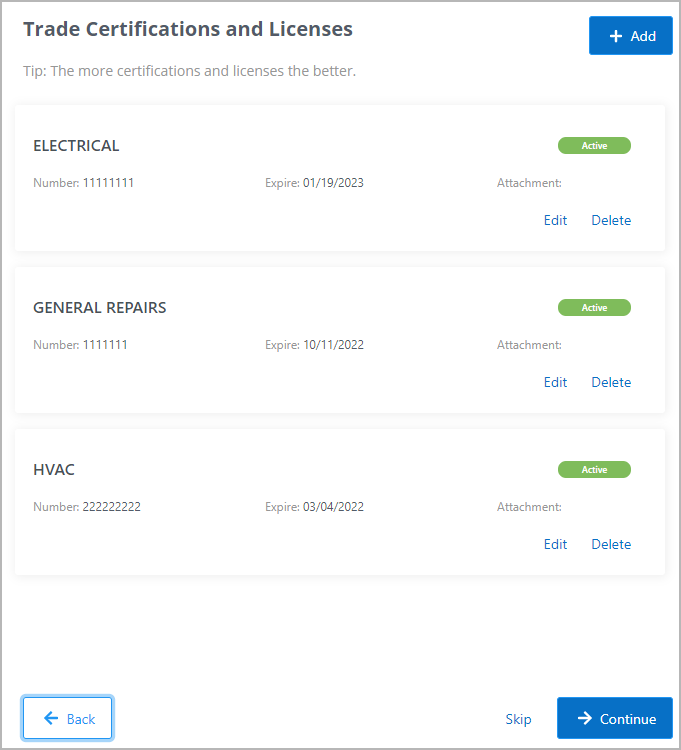
- In the upper-right corner of your profile page, click 🖉. The Business Information page opens.
- On the Progress Bar, click Licenses.

The Trade Certifications and Licenses page opens. - Click Add.
- Select either License or Certification, depending on the type of document you are adding.
- Select the trade from the drop-down list.
- Enter the License / Certification Number.
- Pick the Expiration Date of the document.
- (Optional) Provide the description.
- (Optional) Upload the file to the Attachment section. You can drag and drop one file in the Attachment field or click the browse link to select and upload the file from your device.
- Click Save.
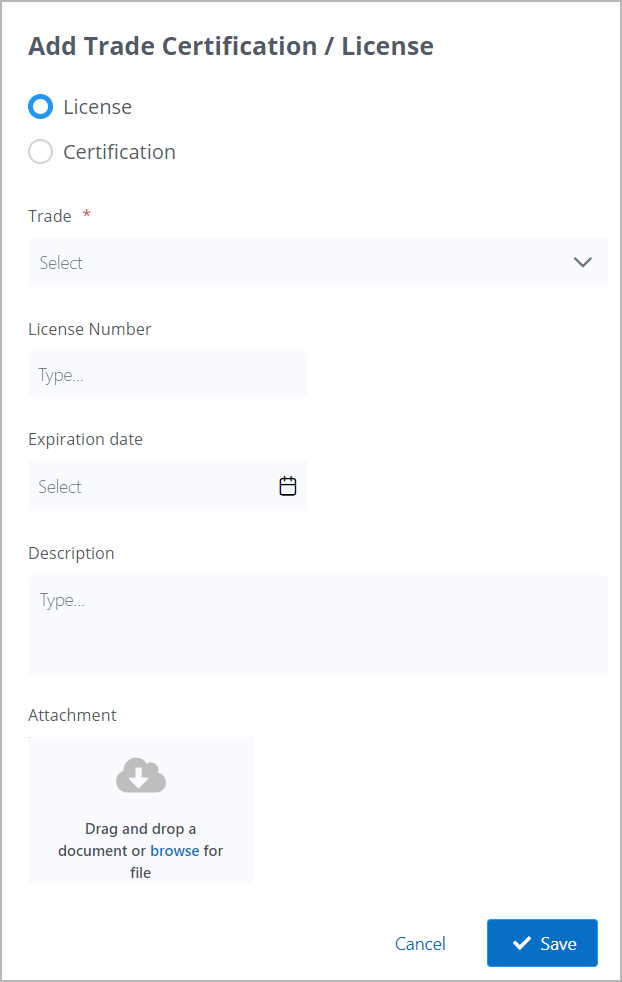
To add more Trade Certifications and Licenses, repeat steps 3–11.
Refrigeration Certifications
- Click Add.
- Select Certification.
- Select the trade Refrigeration from the drop-down list.
Start entering the name of the technician who has the certification and select it from the drop-down list that appears.
If you cannot find the name of the technician in the drop-down list, you need to register them in User Management.
- Enter the Certificate Number.
- Select the date of the certification.
- (Optional) Select the date the certification expires.
- (Optional) Provide the certificate description.
- Upload a copy of the technician’s certificate.
- Click Save.
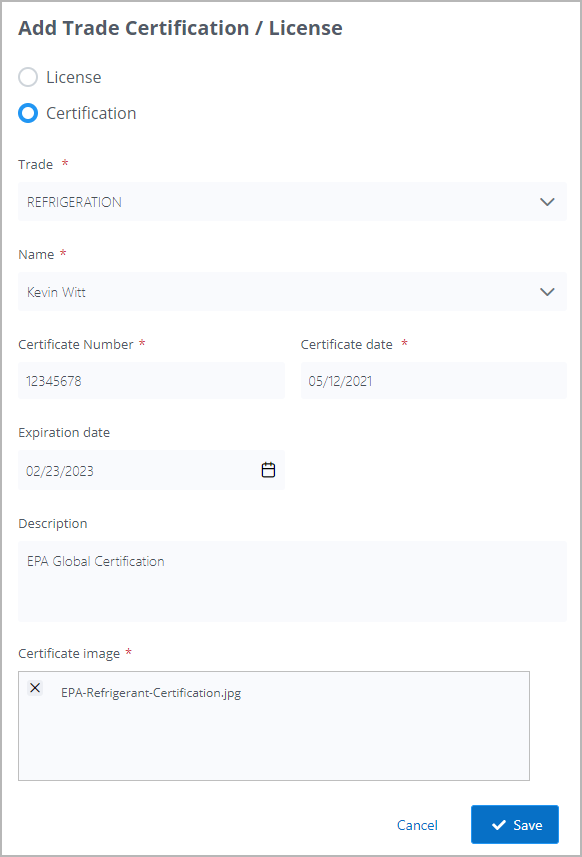
The Certification appears on the Trade Certifications and Licenses page.

To add more Refrigeration Certifications, repeat steps 1–10.
- In the upper-right corner of your profile page, click 🖉. The Business Information page opens.
- On the Progress Bar, click Licenses.

The Trade Certifications and Licenses page opens. - Click Edit next to the license or certification you want to update.

- Make necessary changes.
- Click Save.
The license or certification is successfully updated.
- In the upper-right corner of your profile page, click 🖉. The Business Information page opens.
- On the Progress Bar, click Licenses.

The Trade Certifications and Licenses page opens. - Click Delete next to the license or certification you want to remove.

- On the overlay that appears, confirm your action by clicking Delete.
The license or certification is deleted from the list.
Business Diversity Certification
Adding Business Diversity Certification is an optional step that appears only for those who selected Diverse Business when completing company details.
- On the Additional Business Information tile, click Update Information. The Which of these apply to you? page opens.
- Click Continue to get to the second page of Which of these apply to you?
- Click Continue to proceed to the Trade Certifications and Licenses page.
- Press Continue to add or edit Review Business Diversity Certifications.
- Click Add.
- Fill out all the required* fields.
- Click Save.
Business Diversity Certification can be edited or deleted within the same flow as in Trade Certifications and Licenses.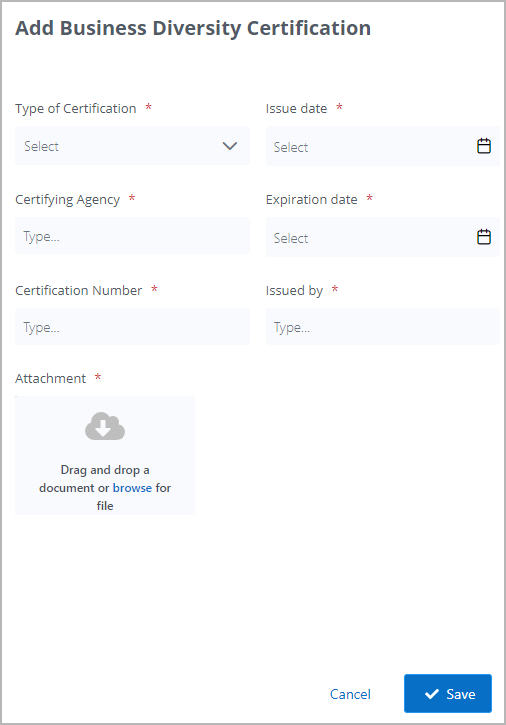
Insurance
In the insurance section of your profile, provide basic information about the insurance policies you carry. Make sure you add all the different insurance policies you have and keep the information up to date.
As soon as the insurance policies expire, you will receive alerts reminding you to update your insurance information when a noted insurance is set to expire.
Note that most clients will have specific insurance requirements. See Managing Insurance Documents and Requirements for more information.
- In the upper-right corner of your profile page, click 🖉. The Business Information page opens.
- On the Progress Bar, click Insurance.

The Review Insurance page opens. - Click Add Insurance.
- Select the type of insurance you want to add from the drop-down list.
- General Liability
- Automobile Liability
- Umbrella / Excess Liability
- Workers Compensation
- Other Liability Insurance type
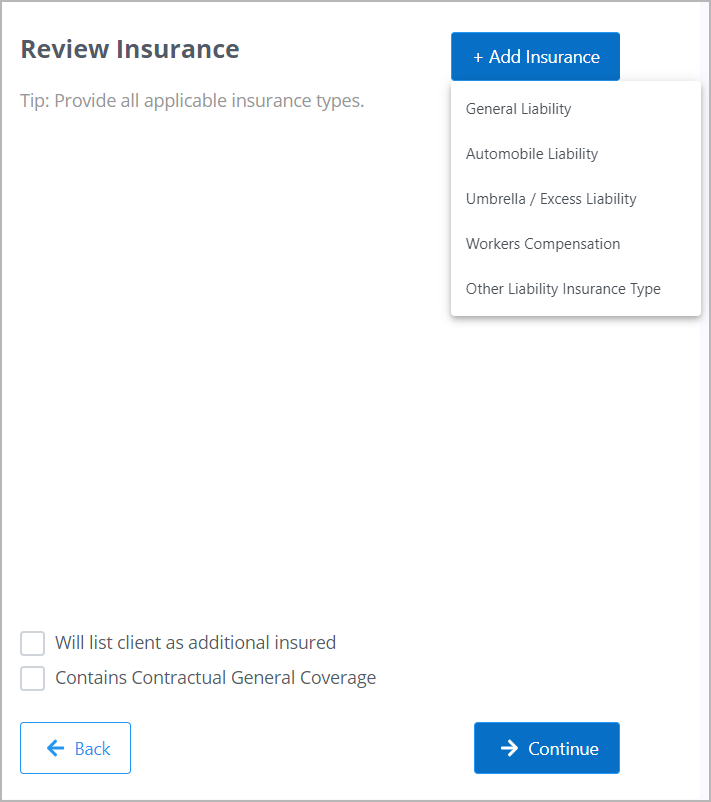
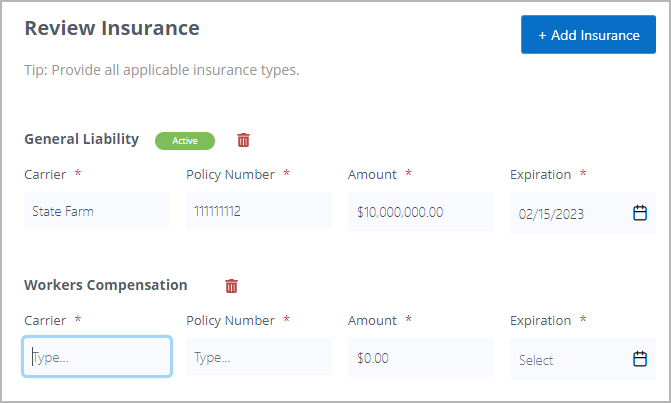
- Enter the Carrier (the company that provides your insurance coverage).
- Enter the Policy Number.
- Enter the Amount (the insurance sum in US dollars).
- Select the Expiration date in the calendar.
- (Optional) Select the Will list client as additional insured checkbox.
- (Optional) Select the Contains Contractual General Coverage checkbox.
Click Continue to save changes.
The Insurance is successfully added.Until the expiration date, the insurance has a green Active label. When it expires, it gets red, and you get notified that you need to update it.
- In the upper-right corner of your profile page, click 🖉. The Business Information page opens.
- On the Progress Bar, click Insurance.

The Review Insurance page opens. - Click the field that should be updated, and enter the new information.
- Click Continue to save changes.
The insurance is successfully updated.
- In the upper-right corner of your profile page, click 🖉. The Business Information page opens.
- On the Progress Bar, click Insurance.

The Review Insurance page opens. - Click
 next to the insurance you want to delete.
 - On the overlay that appears, confirm your action by clicking Delete.
The insurance is deleted from the list.
Trades Specialties
Trades Specialties allow you to specify specialties within the most popular trades that your company services.
These questions are optional, but we recommend that you specify the services you provide for the selected trades — it will optimize the search process and help you find new clients faster.
- In the upper-right corner of your profile page, click 🖉. The Business Information page opens.
- On the Progress Bar, click Details.

The Trades Specialties page opens. - Select the checkboxes next to the specialties your company works with. If your company does not work with these specialties anymore, clear the checkboxes.
- Click Continue to save changes and proceed to the following Trade Specialty page.
- Make all necessary changes, and click Continue.
In the example, the options for HVAC are shown.
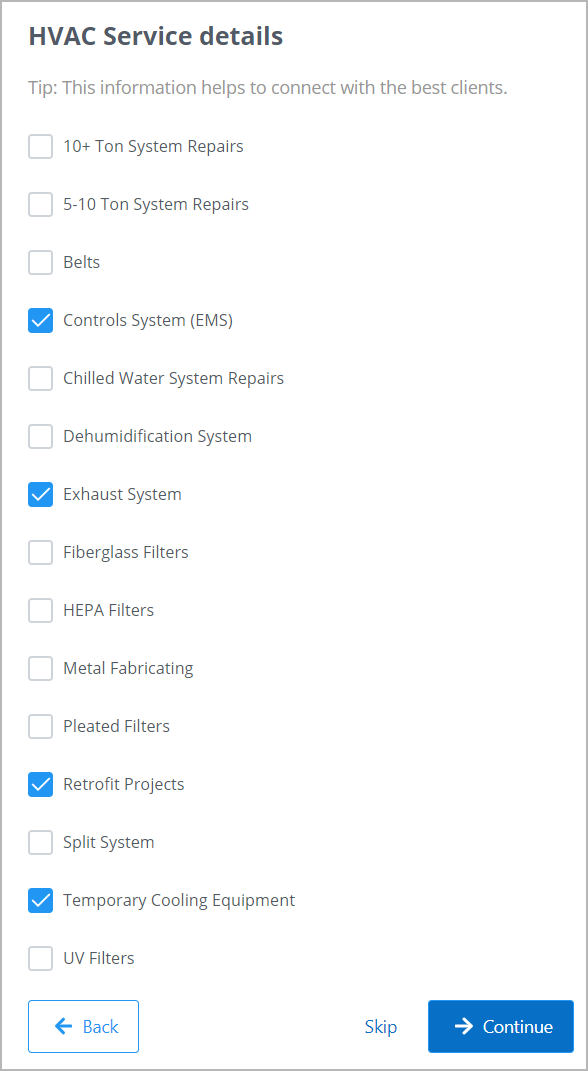
Select the specialties that your company works with. We recommend that you specify the services you provide for the selected trades — it will optimize the search process and help you find new clients faster.
Do not forget to click Continue to save changes.
General Business Information
The General Business Information helps you describe your company and business based on short questions.
We recommend that you provide accurate answers to all of the questions — it will help you grow your client network and get better opportunities.
It will take 5–7 minutes: in most questions, you need to select the option from the drop-down list or enter a number.
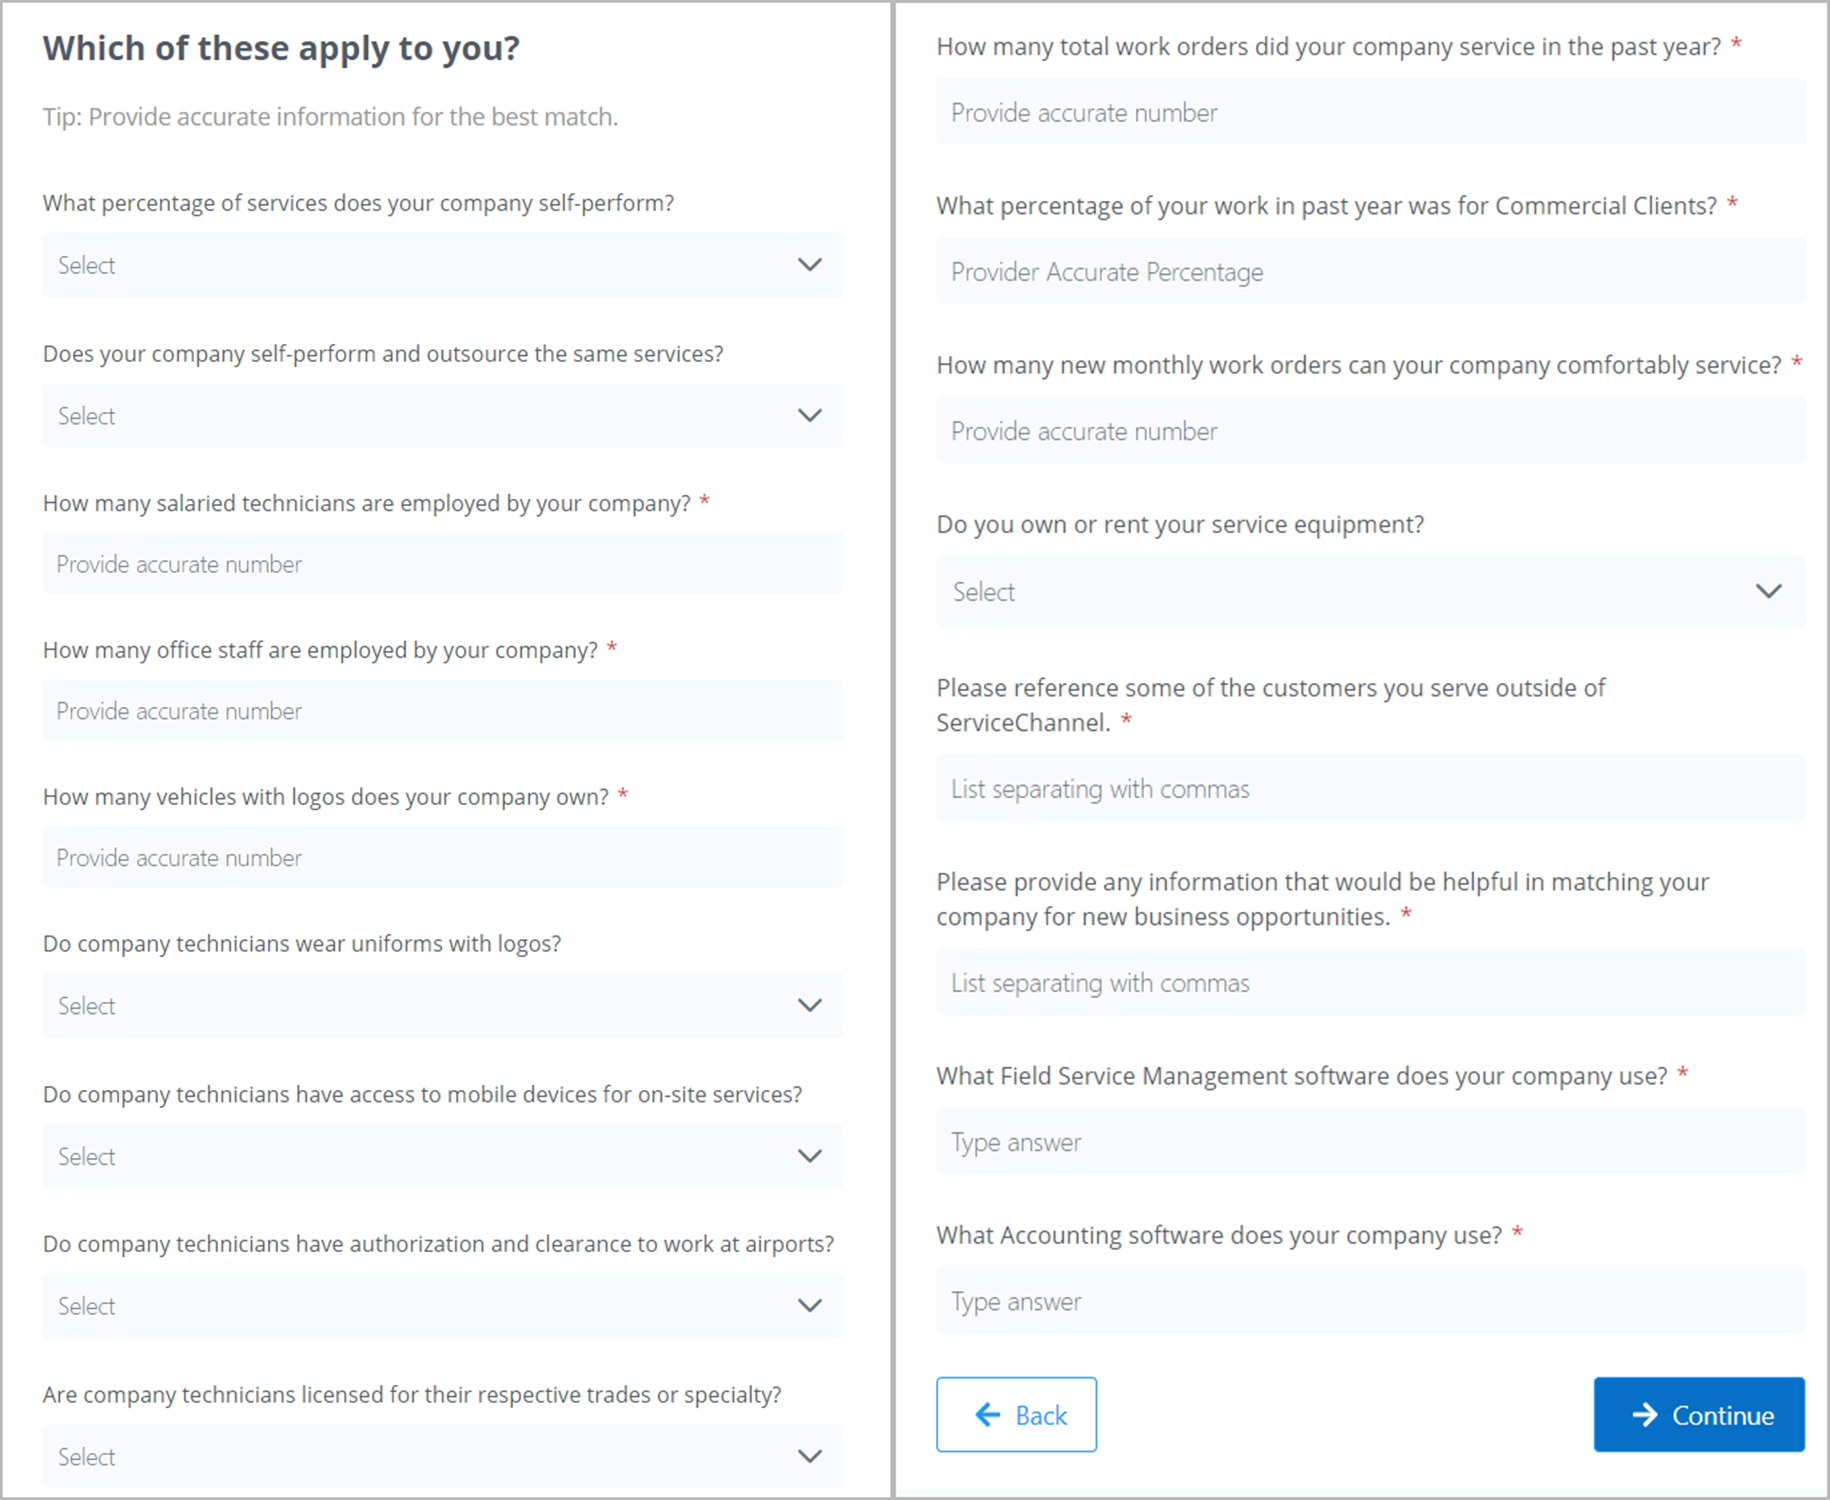
Provide your answers, and click Continue to save changes.
Financial Information
Keeping your Financial Information up to date ensures that you can do business with ServiceChannel clients. Here you can manage the financial information that clients need for operational purposes, and that makes invoicing and collecting payment faster and easier.
Click View Financial Information to open the Financial Info section.

Here you can manage the W-9 Form, Remittance for invoicing, Sales Tax registration, and Banking.
For more information on how to complete and update the financial section, view Manage Financial Information.
-
Page:
-
Page:
-
Page:
-
Page:
-
Page:
-
Page:
-
Page:
-
Page:
