Reviewing Work Orders in the Work Order List

When a work order is assigned to your company, it will appear in Provider Automation on the Work Orders List. Understanding the details of a work order can help you manage your work orders effectively.

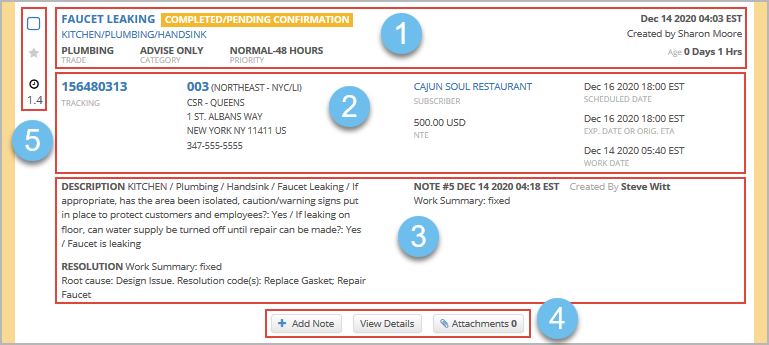
Let's review how a work order displays on the Work Orders List, divided into the following sections:

Sections of a work order

  • Section 1 (Issues & Status) displays the problem code, status, description, trade, category, priority as well as the date when a work order was created, the caller name, and the work order age.
  • Section 2 (WO Details) contains the work order tracking number, location details, subscriber, NTE amount as well as scheduled date, expiration date, and work date. If a proposal or invoice also exists for a work order, they appear in this section — right under the NTE amount.

    Should you need to change the decimal point (.) to decimal comma (,) on monetary amounts, contact your ServiceChannel representative. 

  • Section 3 (Notes & Descriptions) shows the problem description, the last added note, and the resolution (for Completed and Invoiced work orders) which may include resolution and root cause codes. If a work order has an associated RFP or asset, they also appear here.
  • Section 4 (Work Order Actions) provides options for adding notes and attachments, viewing work order details, and creating proposals and invoices.
  • Section 5 (Links and Bulk Actions) depicts icons indicating starred work orders or recalls, the total time spent by a technician on-site, and a checkbox to select this work order for bulk actions or downloads.

Sections of a Work Order

Click and expand each section below to drill down into the information on each work order.
 Section 1: Issues & Status

In this top section you can view:

  • Problem Code and Status/Extended Status, highlighted with the color matching the status of the work order. In this example, the problem code is Faucet Leaking, and the status is Completed/Pending Confirmation.
    Click the status/problem code area to open a detailed view of the work order.

  • Area where the issue occurred, Problem Type, and AssetIn this example, this is depicted as Kitchen/Plumbing/Handsink.
  • Trade,  Category, and Priority. This work order belongs to the Plumbing trade, with the Advise Only category, and the Normal priority that equals 48 hours. 

    Trades, priorities, and categories may differ between your clients.

    In case the problem code, area, problem type, and asset details are not available for a work order, for example, when you create a classic service request, only the problem description appears.

 Section 2: WO Details

Information is arranged in the following columns:

  • Column 1: Work order identification details, including the tracking number (in this example, 156480313), work order number, and purchase order number — if they differ from the tracking number. Clicking any of these numbers opens a detailed view of the work order.
  • Column 2: Location information, which includes the location ID, name, and address where the work order was open. In this case, the location is 003, CSR-Queens.
  • Column 3: Name of the subscriber, work order NTE amount, proposal and invoice numbers.
    • Proposal and invoice, if they exist for a work order, appear as links here too. Hover over the links to view a short overview of other details such as the number, date, and status of the related proposal or invoice. Click the links to open the corresponding details pages in a new browser tab.
  • Column 4: The last updated scheduled date for the work order, the original ETA or expiration date/time for maintenance work orders, and the last date/time when work was performed on the work order.
    • When no technicians have checked into a work order by the Scheduled Date, the date lists in red.
 Section 3: Notes & Description

On the left, the problem description and resolution (if available) appear.

  • A resolution may contain resolution and root cause codes, if applicable.
  • If a resolution appears cut off, hover over the resolution to view it in full in a tooltip.

On the right, the information about the last added note appears. It includes:

  • The note number, date and time the note was added, the actual note text, and the username of the person who added it.
  • In this section, you can see an RFP linked to a work order (if any).
  • If an asset is associated with a work order, the asset tag ID and asset tag also appear here.
 Section 4: Work Order Actions

The actionable buttons in this section allow you to:

  • Add Note: Opens the Note pop-up where you may add a note to the work order and also perform other actions such as adding an attachment, rescheduling the work order, or updating its status.
  • View Details: Opens the detailed view of the work order.
  • Attachments: Displays the number of attachments; clicking the button opens the Attachments & Notes tab in the detailed view of the work order, where you may view or add/delete attachments.
  • Enter Refrigerant Usage: For work orders involving refrigerants, you may add the details on refrigerants used to service a work order — on condition you have a specific feature enabled for that. Read more on how to manage refrigerant work orders in Provider Automation.
  • Create Proposal: Allows you to create a proposal linked to the selected work order. See Creating Proposals for more information.
  • Create Invoice: Allows you to create an invoice from a work order in the Completed and Completed/Confirmed statuses. See Creating an Invoice for more information.
 Section 5: Links and Bulk Actions

Along the left of each work order are icons to help you further monitor your issues.

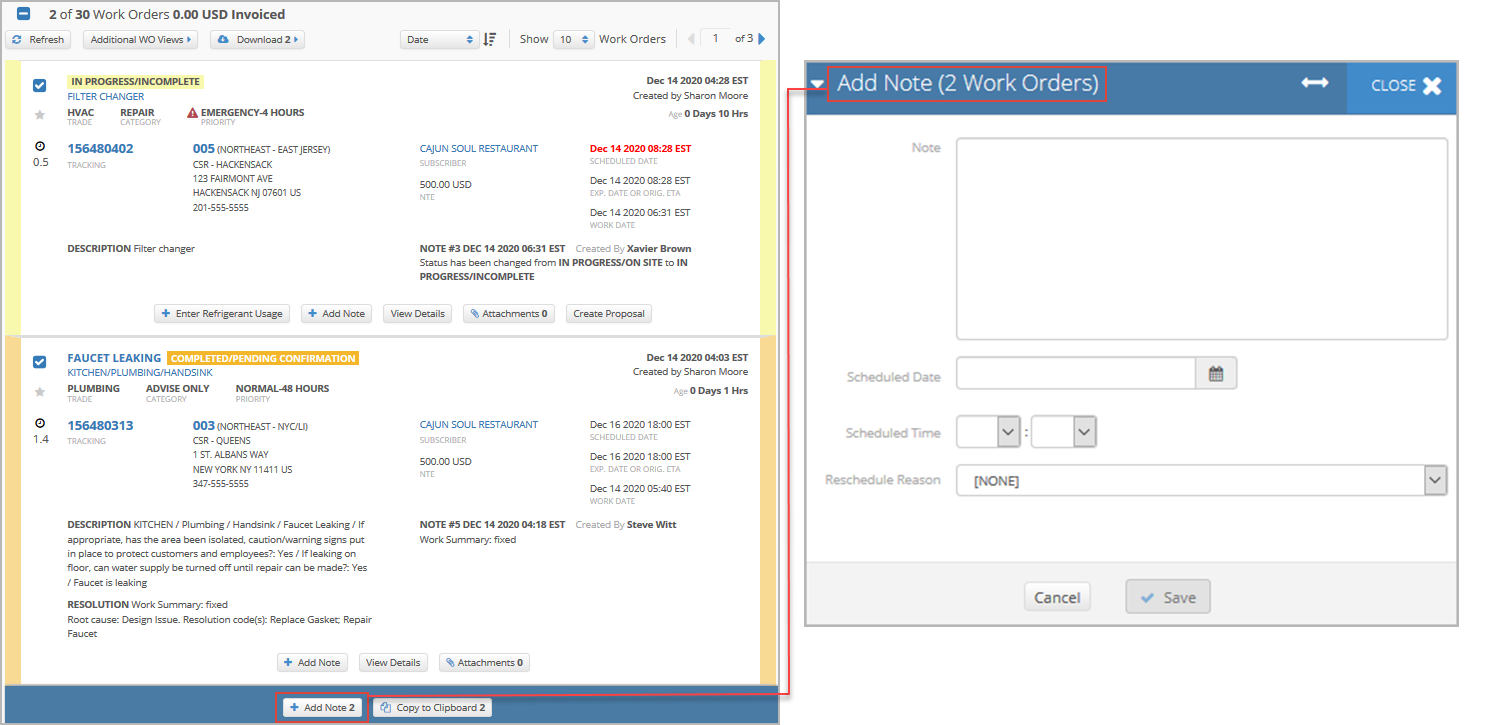
  1. Selecting work orders by checking two or more boxes allows you to add a note or change the scheduled date in bulk as well as to copy the selected work orders to the clipboard or download an Excel report on these work orders.
    Bulk adding a note to multiple work orders
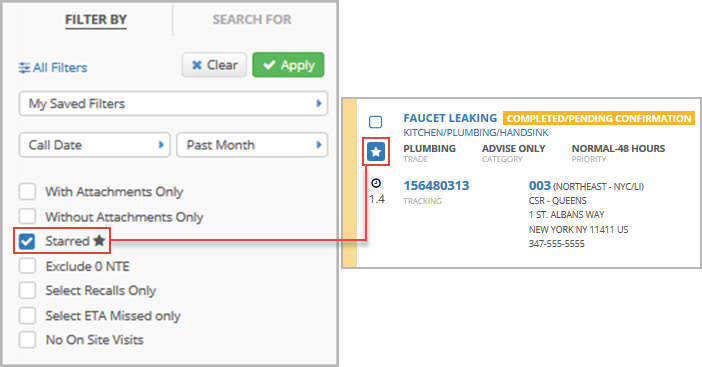
  2. Click the star icon to mark the work order as one to 'follow'. Use filters to only see these starred work orders.
    Star icon on a work order
  3. A recall icon indicates that the work order was entered on an asset that was addressed within the past 30 days.
    Recall icon on a work order
  4. The chain icon reflects if a work order has any linked service request.
    Chain icon on a work order
  5. The clock icon shows the total number of hours a technician spent on-site to service a work order.
    Clock icon on a work order