Creating a Work Order in Dashboard 1.0
Uma Srinivasan (Unlicensed)
Natalia Larina (Unlicensed)
Anastasiya Dashuk (Unlicensed)
Depending on your permissions, this may be the first page you see after you login.

The selections available to you are determined by your ServiceChannel administrator, and your system configuration may vary.
Important: Selecting and confirming the appropriate service dictates which service provider arrives at which location to fix which problem. Read the information on this page carefully to avoid submitting a service request to the wrong service provider or the wrong location.
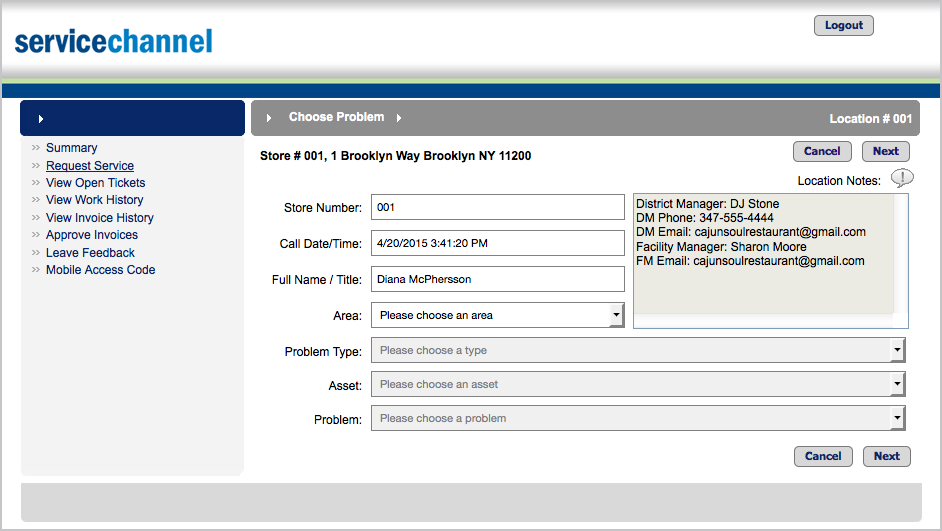
- Click Request Service on the left navigation panel.
- Confirm the following information:
- Store Number: This field is automatically populated.
- Call Date/Time: This field is automatically populated.
- Full Name/Title: This field should automatically populate; if not, enter your First and Last name.
- Choose the appropriate Area, Problem Type, Asset, and Problem where the problem is occurring.
- Review your selections carefully, and then click Next.
- For Equipment Manager clients: Choose the Asset for which you are reporting the problem. See Reporting Problems on Assets, below.
- Important: At this point, the system will check if a similar problem either already has an open ticket (called a Duplicate Work Order) or was fixed within the past 30 days (called a Repeated Issue). The system will prompt you to review the existing work order before proceeding. See Resolving Duplicate Work Orders and Repeated Issues in Dashboard 1.0 for more information.
- Describe or troubleshoot the problem:
To describe the problem: Enter the relevant information in the text box. Fully describe the problem so the service provider is as knowledgeable about your request as possible.
There is a 4,000 character limit for the Description field. Should you enter more than 4,000 characters, the Dashboard will display an error on the Confirmation page, and you will not be able to submit the request until the Description is edited to no more than 4,000 characters.
To troubleshoot the problem: Answer the questions to determine if the problem still persists after you tried to resolve it yourself. (See Interactive Troubleshooting Questions and Messages in Dashboard 1.0 for more information.)
Warning
If you have resolved the problem, STOP HERE and Cancel the service request.
- Messages and Alternate Solutions: Some problems may display a Message, detailing alternate actions to take for certain selected problems (such as displaying a person to contact or specific actions to take instead). In this case, follow the alternate solution and Cancel the request. See Interactive Troubleshooting Questions and Messages in Dashboard 1.0 for more information.
- Click Next after either describing the problem or determining the problem still persists.
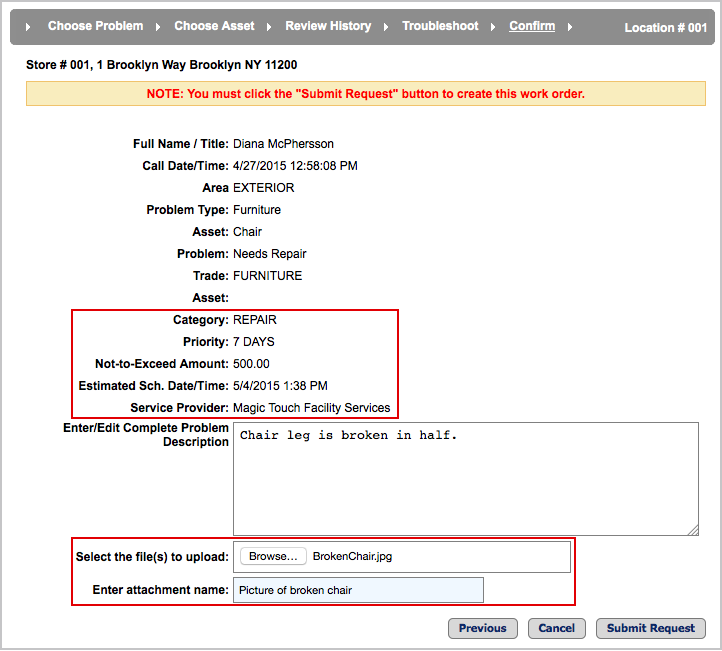
- Review the service request for accuracy, and note the Category, Priority, Not-to-Exceed Amount, Estimated Scheduled Date/Time and Service Provider. See Reviewing Work Order Requests Before Submitting, below.
- Select a file(s) to upload a picture of the requested problem (if available and applicable).
- Click Submit Request. The confirmation page will appear with the generated Work Order, and the Work Order will dispatch to the service provider. See Reviewing the Confirmation Page, below.
Reporting Problems on Assets
ServiceChannel administrators who use the Assets Module need to manage work orders for each location’s assets (such as ovens, racks, computers, registers, and more). After you choose a problem, a page will appear which will require you to choose the appropriate asset for the problem you just submitted. After choosing an asset, you will then continue to the troubleshooting section.
Reviewing Work Order Requests Before Submitting
Each service request allows you to review or edit the following information for accuracy and to attach photos or video, if permissioned and applicable:

- Category: The overall classification of a work order (for example: Maintenance, Repair, or CapEx). Most work orders generated in the Dashboard will fall under the Repair category.
- Priority: The number of days from the Call Date the service provider should complete the requested work.
- Not-to-Exceed Amount: The maximum amount the service provider may charge for the service listed on the work order.
- Estimated Sch. Date/Time: The approximate date and time the service provider should arrive at your location.
- Service Provider: The company assigned the work order.
- Select file(s) to upload: The area where you can attach a picture related to the work order.
- Recommended file extensions are .jpg, .png, .bmp., .gif, and .pdf.
- The maximum file size of each upload is 50 megabytes (50MB).
- Enter attachment name: Provide a brief title or description of the attachment.
- The maximum number of characters is 50.
Reviewing the Confirmation Page

The confirmation page displays pertinent information about your work order:
- Contractor: The service provider assigned to your work order. This provider may need to use your location’s telephone in order to check-in and check-out. (See About On Site Service Provider Check-ins and Check-outs in Dashboard 1.0 for more information.)
- Tracking #: Every work order is assigned a unique number for tracking and reporting purposes.
