- Created by Chellie Esters , last modified on Oct 14, 2020
You are viewing an old version of this content. View the current version.
Compare with Current View Version History
« Previous Version 31 Next »
Dashboard 2.0 is a faster, more interactive experience for store employees. With this upgrade your team can:
- enter work orders faster using Keyword Search and find work orders faster with Work Order Search.
- get to the root of the problem with Guided Troubleshooting and save on costs for minor issues using Problem Solved and Analytics.
- review providers while rating their work with Star Ratings and get richer provider feedback with Custom Feedback Questions.
This page will help you understand these better so you can work with your Customer Success Manager to upgrade your locations' work order creation experience.
Getting Started with Your Upgrade
Dashboard 2.0 gives users a smoother, faster interface to enter and find work orders. Below, see how basic navigation works, and how to brand your dashboard with your own logos, images, and colors.
Basic Navigation

- Use either the top menu icon or the tabs to access various pages.
- The new tabs allow users to quickly visualize how many counts are in each section (for example: number of open work orders or number of pending confirmations waiting for review).
- The main content display area shows the tab the user clicked.
- Bell icon shows/hides messages such as landlord information or store information.
- Easy drop-down switch to different Dashboards while logged into the same location (for users with access to multiple Dashboards),
- Easy drop-down switch to a different location's Dashboard (for users with access to multiple dashboards).
- Quick X to logout of Dashboard 2.0.
Branding Your Dashboard
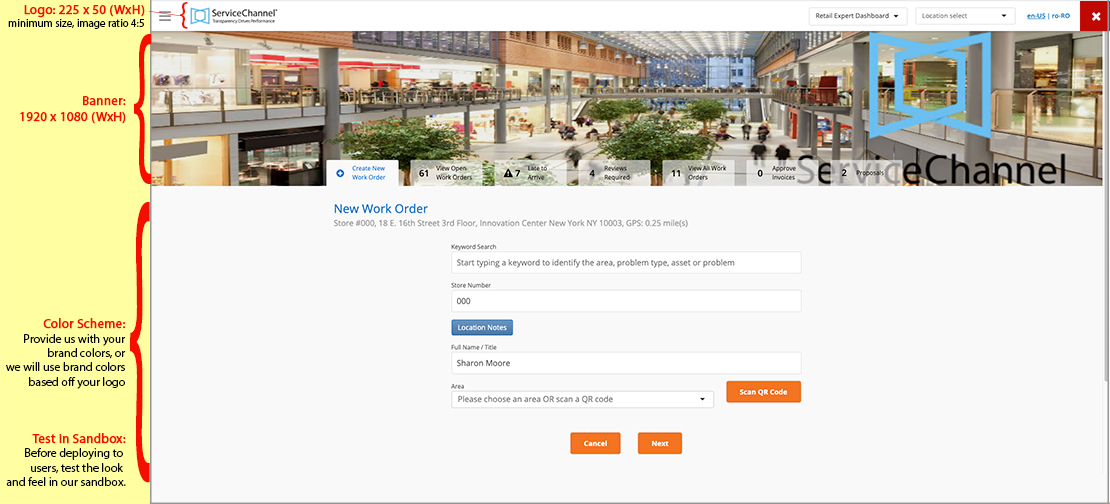
We can brand Dashboard 2.0 to show your logo and location images. This image is an example of the layout with notes on the components. Here is what we'll need from you:
- Your Company Logo. The minimum size is 225 x 50 (width x height). Logos should have a 4:5 ratio.
- Your Banner Image. Dashboards look better with an image than with plain color. The image size accepted is 1920 x 1080.
- Your Brand Colors (Optional). If you have brand colors we will take them. If not, we will use the colors from your logo to brand the Dashboard.
Once we brand your Dashboard, we will proof it with you in our sandbox. Let us know any tweaks you want. When the color scheme is ready and you're ready to roll it out to your locations, we will move it to the main (production) site.

Converting Your Issue List
We will take your existing Issue List and convert it into the new Issue List with Guided Troubleshooting template. Your fields will remain the same, but it will now have the flexibility to add more interactive questions, decision trees, and rich media. Your Customer Success Manager will help you with this task.
Key Features in Dashboard 2.0
Let's take a look at some of the features that are in Dashboard 2.0:
Keyword Search: Enter work orders faster

- Use Keyword Search to assist in work order creation.
- All issues with matching keyword will appear
- Make a selection and all remaining fields will automatically fill the 4 drop-down menus
- Users can still create requests using those drop-down menus
.
.
.
.
.
.
.
.
.
.
.
Work Order Search: Find work orders faster

- Search for work orders from the past 36 months (instead of past 24 months on Dashboard 1.0)
- Filter results by status, priority, trade, category, and label, and include future work orders generated by the Planned Maintenance module
- Use the Search field to lookup individual work orders by tracking number
Guided Troubleshooting: Get to the root of the problem

Set up interactive questions with media to guide users to drill down to the issue
Add more details to areas within the location
blah
🎥 Watch Guided Troubleshooting in action (in progress)
🎓 Learn more in ServiceChannel University
.
.
.
.
.
.
.
.
.
.
.
Problem Solved and Analytics: Save on costs for minor issues

Set up interactive questions, messages, or pictures for work orders that require self-troubleshooting first, before submitting a work order
- This can help resolve specific issues onsite, sometimes without the need for a service provider.
- “Problem Solved” button allows user to cancel out request and can be tracked in analytics to track cost avoidance.
Star Ratings: Quality and timelines of service

- blah
- blah
- more blah
.
.
.
.
.
.
.
.
.
.
.
Custom Feedback Questions: Get richer provider feedback
- blah
- blah
- more blah
What's Next?
Gather your logo and branded image, and contact your Customer Success Manager to etch out a customized upgrade plan.
-
Page:
-
Page:
-
Page:
-
Page:
-
Page:
-
Page:
-
Page:
-
Page:
- No labels
