- Created by Jing Tong (Unlicensed) , last modified on Dec 14, 2018
You are viewing an old version of this content. View the current version.
Compare with Current View Version History
« Previous Version 6 Next »
During your audit, you may need to modify checklists and checklist items to capture all necessary information about a location. Your Site Planning Manager configurator will have preloaded checklists and checklist items for each area for all locations; however, you may also add or remove checklists and checklist items to better reflect the assets at individual locations.
In Site Planning Manager you may:
- rename a checklist;
- add a preexisting checklist or checklist item;
- create a new checklist or checklist item; and
- remove a checklist or checklist item.
You cannot rename a checklist item. Also, checklist and checklist item names must be unique.
Here is an example. In an FM Quarterly Audit, there is a Baby Changing Station checklist item that is configured for the Bathroom checklist. You are running an audit for 10 locations; however only Location 005 does not have a baby changing station. You can remove the Baby Changing Stationitem from Location 005's audit only, without impacting checklists for other locations.
When you upload the current audit, the system will remember the adjustments made to the audit type for that location only and retrieve the same checklists and checklist items as in the last audit. Using the above example, a Baby Changing Station will not appear when you audit Location 005 in the future but will appear for all other locations.
Note
Should a checklist or checklist item need to be removed for all locations, speak with your Site Planning Manager configurator.
Checklists

How to Rename a Checklist
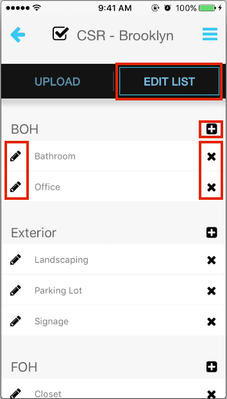
- On the Areas and Checklists page, tap Edit List. The edit controls appear.
- Located the desired checklist and tap the pencil icon to the left. A field appears displaying the name of the selected field.
- Enter a new name, and then tap Done. The checklist appears with the new name.
- Tap Edit List to turn off the edit controls.
- On the Areas and Checklists page, tap Edit List. The edit controls appear.
- Locate the desired area, and then tap the plus icon on the right side of the page. The Checklist page appears.
- Add a preexisting checklist or create a new checklist.
To add a preexisting checklist:- Tap each checklist that you wish to add. A check mark appears next to each selected checklist.
- Tap Add To List on the bottom of the page. The selected checklists are added to the Areas and Checklists page.
- Tap Create New + on the top of the screen. The Create Checklist modal appears.
- Enter a checklist name and tap Add. The checklist is added to the Areas and Checklists page.
- Tap Edit List to turn off the edit controls.
- On the Areas and Checklists page, tap Edit List. The edit controls appear.
- Located the desired checklist and tap the X icon to the right. A confirmation modal appears.
- Tap Proceed. The checklist is removed from the list.
- Tap Edit List to turn off the edit controls.
Checklist Items
How to Add a Checklist
How to Remove a Check

You cannot rename a checklist item.
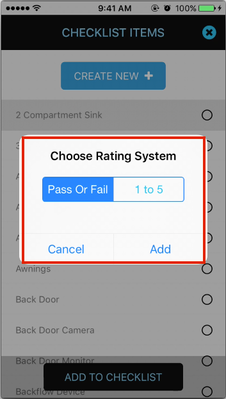
While adding a checklist item, you can also configure the rating system, or how you will rate that particular item during an audit. Ratings are either Pass/Fail or numeric (1-5). Note that you cannot change a rating system once you have added a checklist item to your list.

How to Add a Checklist Item
- On the Areas and Checklists page, locate the desired checklist and tap it. The Checklist Itemspage appears.
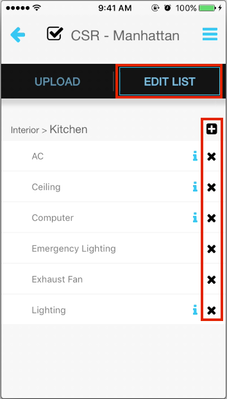
- Tap Edit List. The edit controls appear.
- Tap the plus icon. The Checklist Items page appears.
- Add a preexisting checklist item or create a new checklist item.
To add a preexisting checklist item:- Locate and tap the desired checklist item. The Choose Rating System modal appears.
- Tap the appropriate rating system.
- Tap Add. A check mark appears next to the selected checklist item.
- When finished adding all checklist items, tap Add To Checklist on the bottom of the screen. The selected checklist items are added to the Checklist Items page.
- Tap Create New + on the top of the screen. The Add Checklist Item modal appears.
- Enter a checklist item name, tap the appropriate rating system, and then tap Add. The checklist item is added to the Checklist Items page.
- Tap Edit List to turn off the edit controls.
-
Page:
-
Page:
-
Page:
-
Page:
-
Page:
-
Page:
-
Page:
-
Page:
- No labels