- Created by Uma Srinivasan , last modified by Chellie Esters on Jun 26, 2021
You are viewing an old version of this content. View the current version.
Compare with Current View Version History
« Previous Version 8 Current »
Please contact your ServiceChannel representative to enable this feature.
When a payment is made using other methods besides ServiceChannel's payment automation tools, you can mark the invoice as paid to change the invoice status in Service Automation. This is beneficial when you need to find invoice payment details when not using accounting systems.
You can mark one or many approved invoices, either in the Invoices module or by using the Invoice Payment Template.
Users with the Invoice Admin secondary role can mark invoices as paid.
Marking a Single Invoice as Paid
On the Invoices page, click the Approved tab. The list of all approved invoices display.
Invoices marked with partial payments appear in the Paid tab. To mark the balance amount as Paid for an invoice, you will need to open the invoice from the Paid tab.
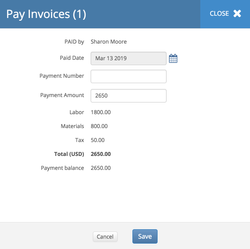
- In the desired invoice listing, click Actions > Pay. Alternately, open the desired invoice by clicking the invoice number, and click Pay at the bottom of the detailed view. The Pay Invoices pop-up appears, with the Username, Paid Date, Payment Amount, invoice details by charge type, and the Payment Balance auto-filled.

(Optional) Select the Paid Date.
Paid Date cannot be earlier than the invoice date or the invoiced approved date.
- Enter Payment Number.
- (Optional) Modify the payment amount should the paid amount be different from the Payment Balance.
- Click Save. A confirmation message appears. The invoice status changes to Paid, and you can view the invoice in the Paid tab. A note gets added to the work order indicating the status change and the name of the user who made the change.
Using the Payment Template to Mark Invoices as Paid
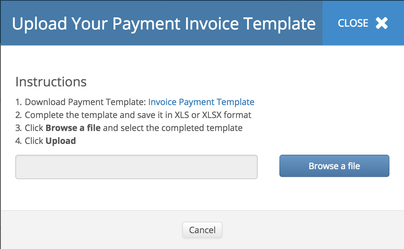
- On the Invoices page, click the Download/Upload button in the top of the page, and select Payment Invoice Template. The Upload Your Payment Invoice Template pop-up appears.

- In step 1, click Invoice Payment Template. The template downloads to your device.
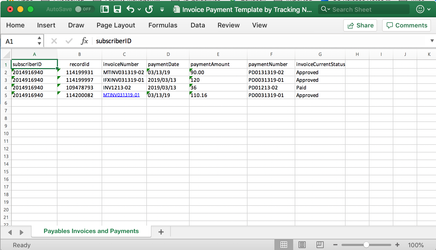
- Enter Subscriber ID, RecordID (tracking number of the work order), Invoice Number, Payment Date, Payment Amount, Payment Number, and Invoice Current Status in the template for all desired invoices.

- Save the template as xls or xlsx file.
- In your Service Automation account, in the Upload Your Payment Invoice Template pop-up, click Browse a File, and select the saved file.
- Click Upload. Depending on whether there were errors in your template, one of the following pop-up windows appear:
- Template Uploaded pop-up appears if all the invoices were processed successfully. All invoices are marked as Paid, and appear in the Paid tab of the Invoices page. A note gets added to the work orders indicating the status change and the name of the user who made the change.
- (Optional) Click Download in the Template Uploaded pop-up to download the results file containing the result for each invoice in the uploaded template.
- Validation Failed pop-up appears if there are one or more errors in the template.
- Click the Download button to download the InvoiceResults file, which contains the result (success/fail) for each invoice and the error description.
- Correct the errors, remove the successful invoice entries, and reupload the template.
See Correcting Payment Invoice Template Errors below for more information on error codes and how to correct them.
Correcting Payment Invoice Template Errors
The Error Description column in the Results file indicates the description of the error. These are usually self-explanatory. Once you fix these errors in the template, you will need to upload the file again. While uploading again, make sure to remove the invoices that have been successfully marked as paid.
Below is a list of common errors you may encounter when uploading a template and their descriptions.
Error Codes | Description |
Missing subscriber id | No subscriber ID provided |
Invalid subscriber id | Subscriber ID is incorrect |
Invalid Payment Date | Payment Date is incorrect |
Invalid Payment Amount | Payment Amount is 0 |
Invalid Invoice Number | Invoice Number is wrong |
Invalid invoice status | Invoice status is not either Paid or Approved |
Invoice for work order not found | Invoice number does not match the work order |
Payment Date precedes Invoice Date | Payment date is earlier than the Invoice date |
Payment Date precedes Post Date | Payment date is earlier than the invoice posted date |
Payment Date precedes Approval Date | Payment date is earlier than the date the invoice was approved |
Possible Duplicate Payment (Balance <= 0.00) | There is no payment balance for the invoice |
Possible Duplicate Payment (Payment already exists) | Similar entry with the same Payment Number, Amount, and Payment Date already exists |
Invoice is already paid | Invoice balance is 0 |
Payment Amounts exceeds the actual amount | Payment amount or the total of partial payments is greater than the invoice amount |
Can't run this process for easypay clients | Invoice payment is through the easy pay process |
Ambiguous payment records found | Unable to update payment date/ number because there is more than one payment for the same amount for that invoice |
-
Page:
-
Page:
-
Page:
-
Page:
-
Page:
-
Page:
-
Page:
-
Page:
- No labels