From the Attachments & Notes tab, you can:
Adding Notes and Changing the Scheduled Date
To communicate with your clients about work orders, we recommend using Notes. This is beneficial so your clients are clear on exactly what is happening with each work order, and so your clients can also communicate with you on any issues that may delay your activities onsite.
You can also update the Scheduled Date when you cannot make it onsite by the original date set on the work order. Note that work orders that are not rescheduled will appear in red on both your list and your client's list.
| Warning |
|---|
|
| When you do not adjust the Scheduled Date to reflect the actual time your company will arrive onsite, it will be marked negatively in your Contractor Scorecard. See Contractor Scorecard for more information. |
Adding Notes
| HTML Comment |
|---|
|
LOCALIZABLE PART STARTS HERE |
| Panel |
|---|
| bgColor | #F9F9F9 |
|---|
| titleColor | #0e3367 |
|---|
| titleBGColor | #EAEAEA |
|---|
| borderStyle | none |
|---|
| title | ⦿ How to Add a Note to a Work Order from the Work Order List |
|---|
|
From the Work Orders list screen, located the desired work order, and then click Add Notes. In the Notes text box, enter the details of the note. (Optional) Check the Action Required box to alert recipients to take further action on a work order. (Optional) Inside the Add Addressee(s) box, type or select the name(s) of the people you wish to copy to the note. - (Optional) Click the Select a File button, to add, up to 5 attachments with brief descriptions.
- Click Save and Send Note to complete the process.
|
| HTML Comment |
|---|
|
LOCALIZABLE PART ENDS HERE |
| Panel |
|---|
| bgColor | #F9F9F9 |
|---|
| titleColor | #0e3367 |
|---|
| titleBGColor | #EAEAEA |
|---|
| borderStyle | none |
|---|
| title | ⦿ How to Add a Note to a Work Order from the Detailed View |
|---|
|
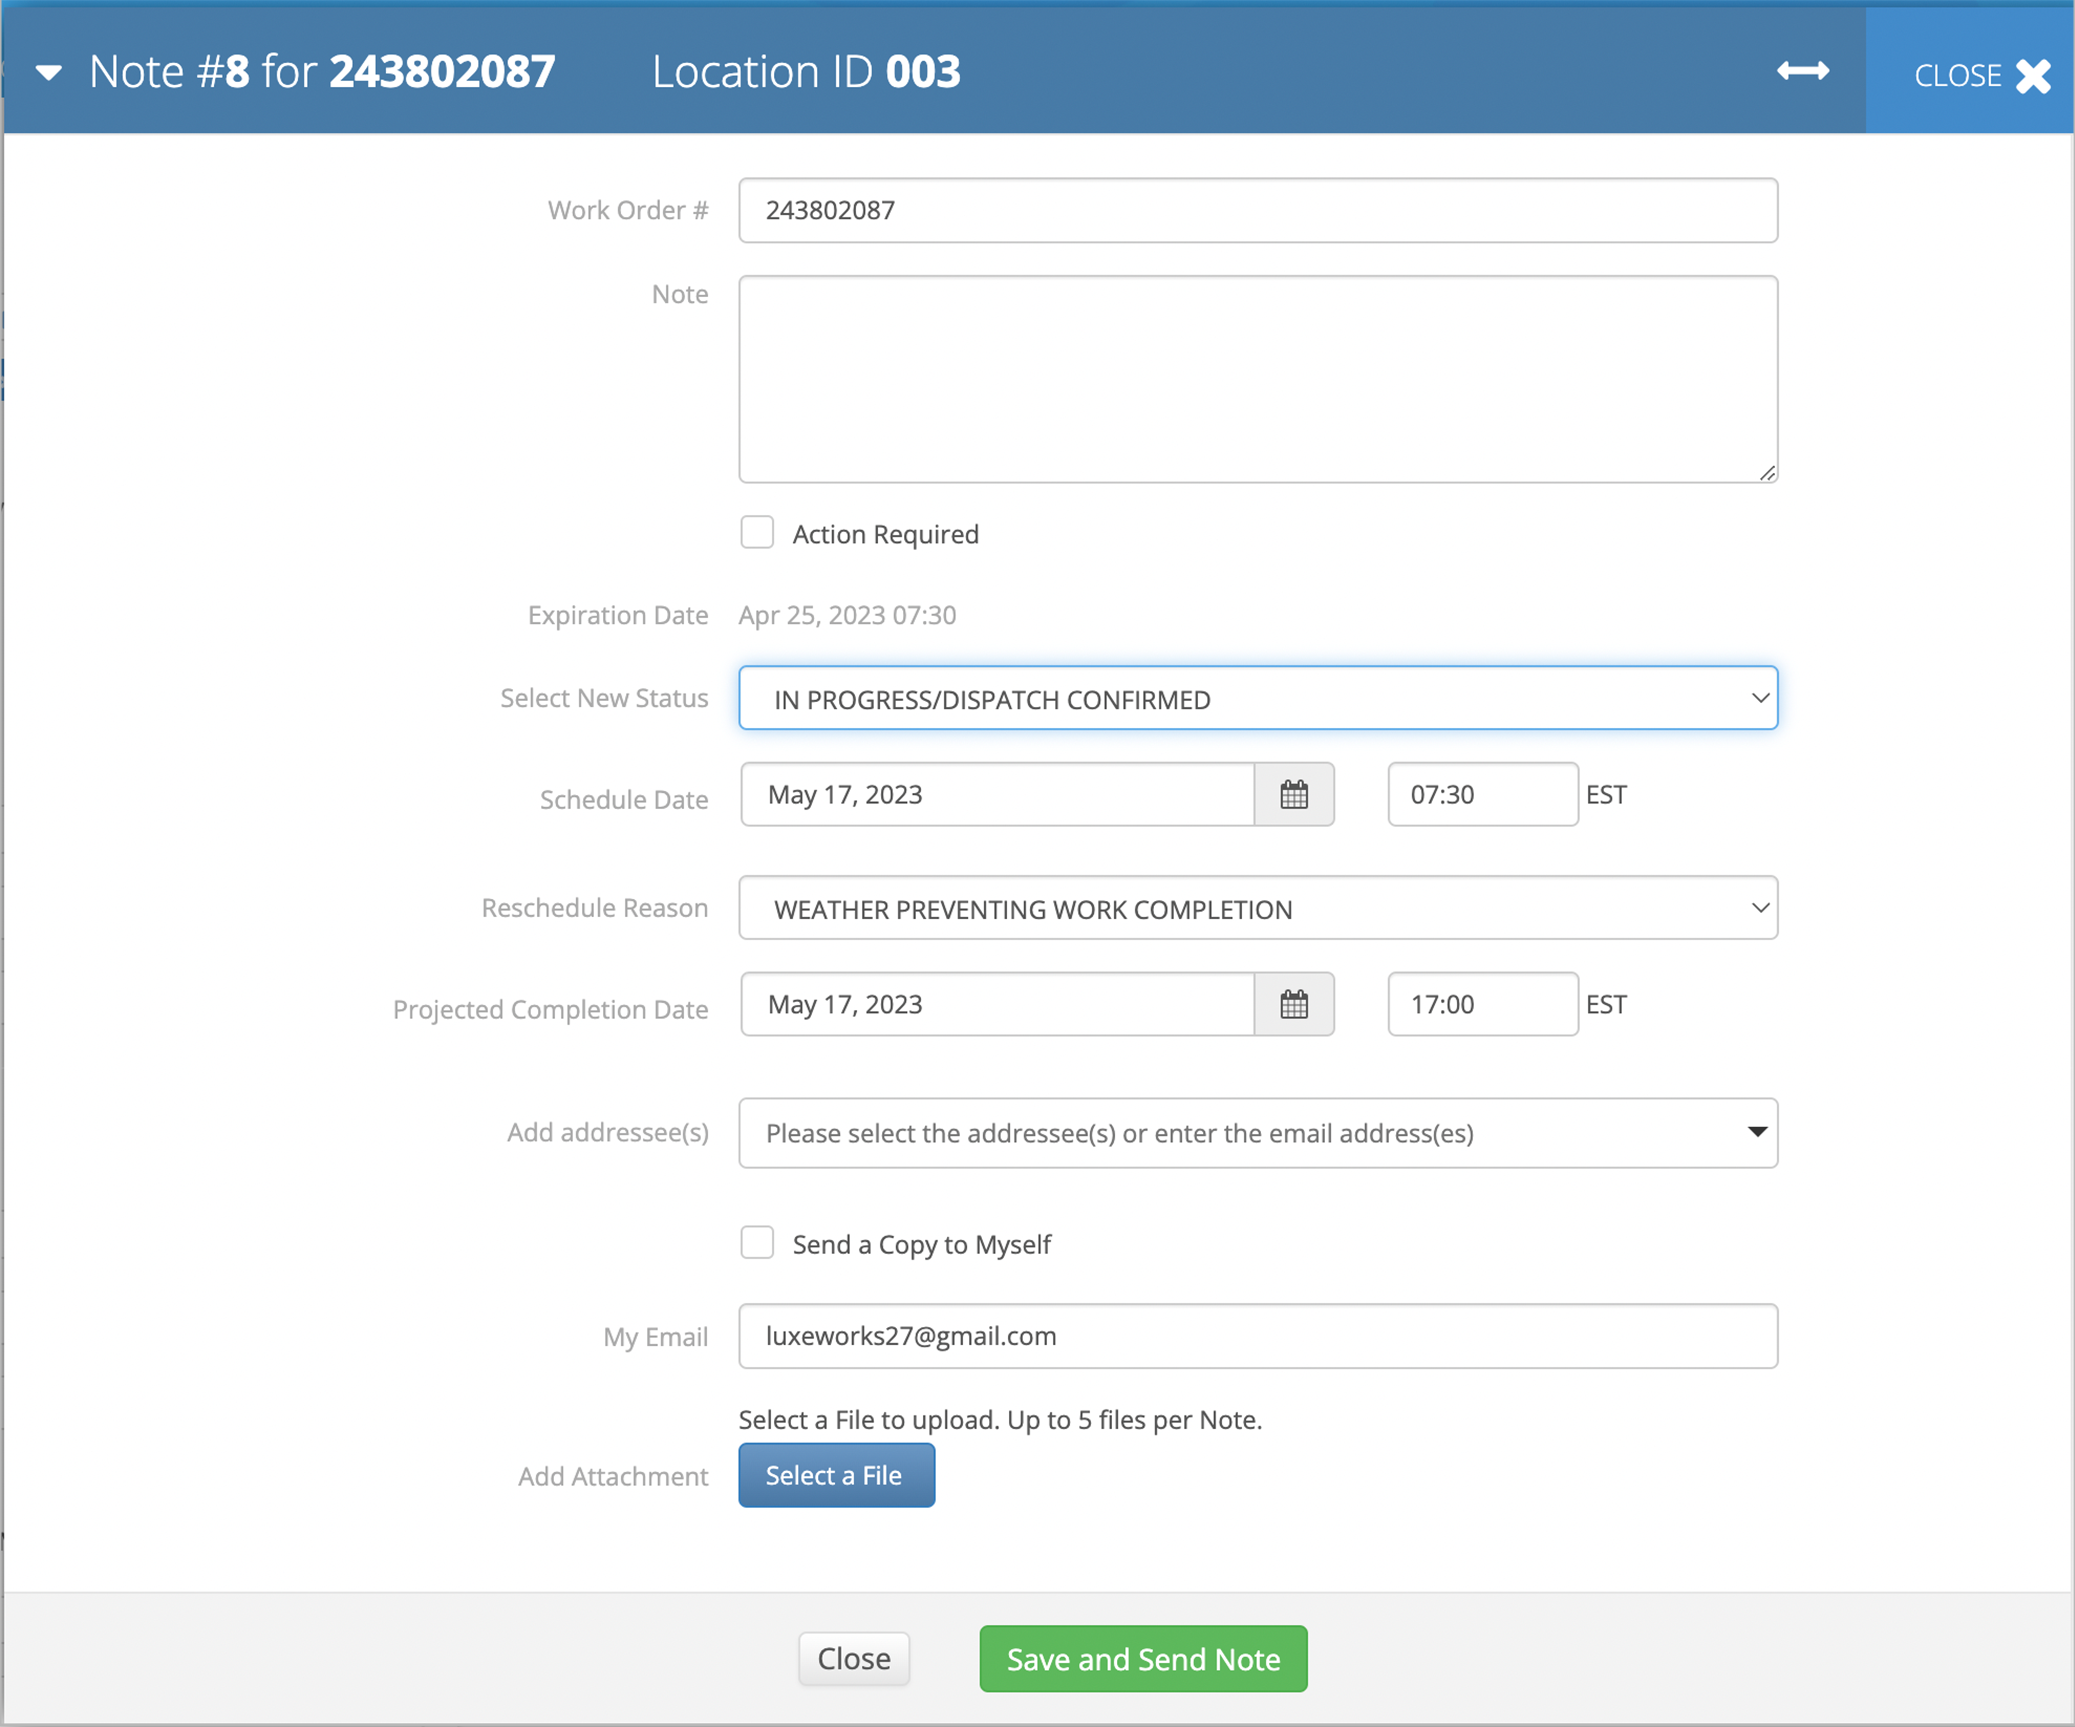
- In the detailed view of the desired work order, under the Attachments & Notes tab, click Add Note/Update Schedule Date. The Note <#> for <WO #> window opens.
- Enter your notes in the Notes text box.
- (Optional) Check the Action Required box.
- (Optional) Inside the Add Addressee(s) box, type or select the name(s) of the people you wish to copy to the note.
- (Optional) Check the Send a Copy to Myself box, and (when not available) enter desired email in the My Email box.
- (Optional) Add an attachment:
- In the bottom of the Note <#> for <WO #> window, in the Add Attachment section, click Select a File.
- Browse to the location of the desired file, and click Choose. The selected file appears in the Notes window.
- Enter a brief description about the attachment.
- Repeat steps 7a - 7c to add up to 5 files.
- Click Save and Send Note. The note details display in the Attachments & Notes tab. The selected recipients receive email notifications.
|
| Tip |
|---|
When you receive an email notification about a note added to a work order, you can add a new note from the email. In the email, you can see the last and the last but one added note (if any). | Expand |
|---|
| title | Click here to find out how to create a note from an email alert about a new note. |
|---|
|
| Panel |
|---|
| bgColor | #F9F9F9 |
|---|
| titleColor | #0e3367 |
|---|
| titleBGColor | #EAEAEA |
|---|
| borderStyle | none |
|---|
| title | ⦿ How to Add a Note to a Work Order from an Email Alert about a New Note |
|---|
| - Click Create New Note in the email. You are prompted to log in to Provider Automation if you are not logged in.
 - You land on the Work Orders List where you can add a new note to the service request.
---OR---
- Reply to the email, and type your note in the reply.
Send the email.
| Note |
|---|
Ensure the original message is included in the reply. |
The client gets an email notification about a new note added to the work order. |
|
|
| Anchor |
|---|
| UpdateSchedDate |
|---|
| UpdateSchedDate |
|---|
|
Updating Scheduled Dates
Updating the Scheduled Date on work orders is imperative for communication with your clients. By doing so, your clients know when they should expect you onsite to repair the issue, in line with your current service level agreements. Should you need to reschedule — say, due to weather, material shortage, technician shortage, or other reasons — you may do so on the work order within Provider Automation.
Projected Completion Date
In addition to scheduled date for a work order, some clients may also require you to enter a projected completion date for the work order, which is the date/time when you expect the work to be complete. When you are required to enter this information, Projected Completion Date field will appear when updating a work order.
| Warning |
|---|
|
| When you do not adjust the Scheduled Date to reflect the actual time your company will arrive onsite, it will be marked negatively in your Contractor Scorecard. See Contractor Scorecard for more information. |
| Note |
|---|
Some clients may have a limit on the maximum number of times a work order can be rescheduled to a later date. Should one or more of your clients have this setting, when you have rescheduled a work order the maximum number of times, you will get a warning message. Should you try to reschedule the work order after this, the status changes to Open/Declined, and the work order is automatically reassigned to a different service provider. |
| HTML Comment |
|---|
|
LOCALIZABLE PART STARTS HERE |
| Panel |
|---|
| bgColor | #F9F9F9 |
|---|
| titleColor | #0e3367 |
|---|
| titleBGColor | #EAEAEA |
|---|
| borderStyle | none |
|---|
| title | ⦿ How to Change the Scheduled Date on Work Orders from the Work Order List |
|---|
|
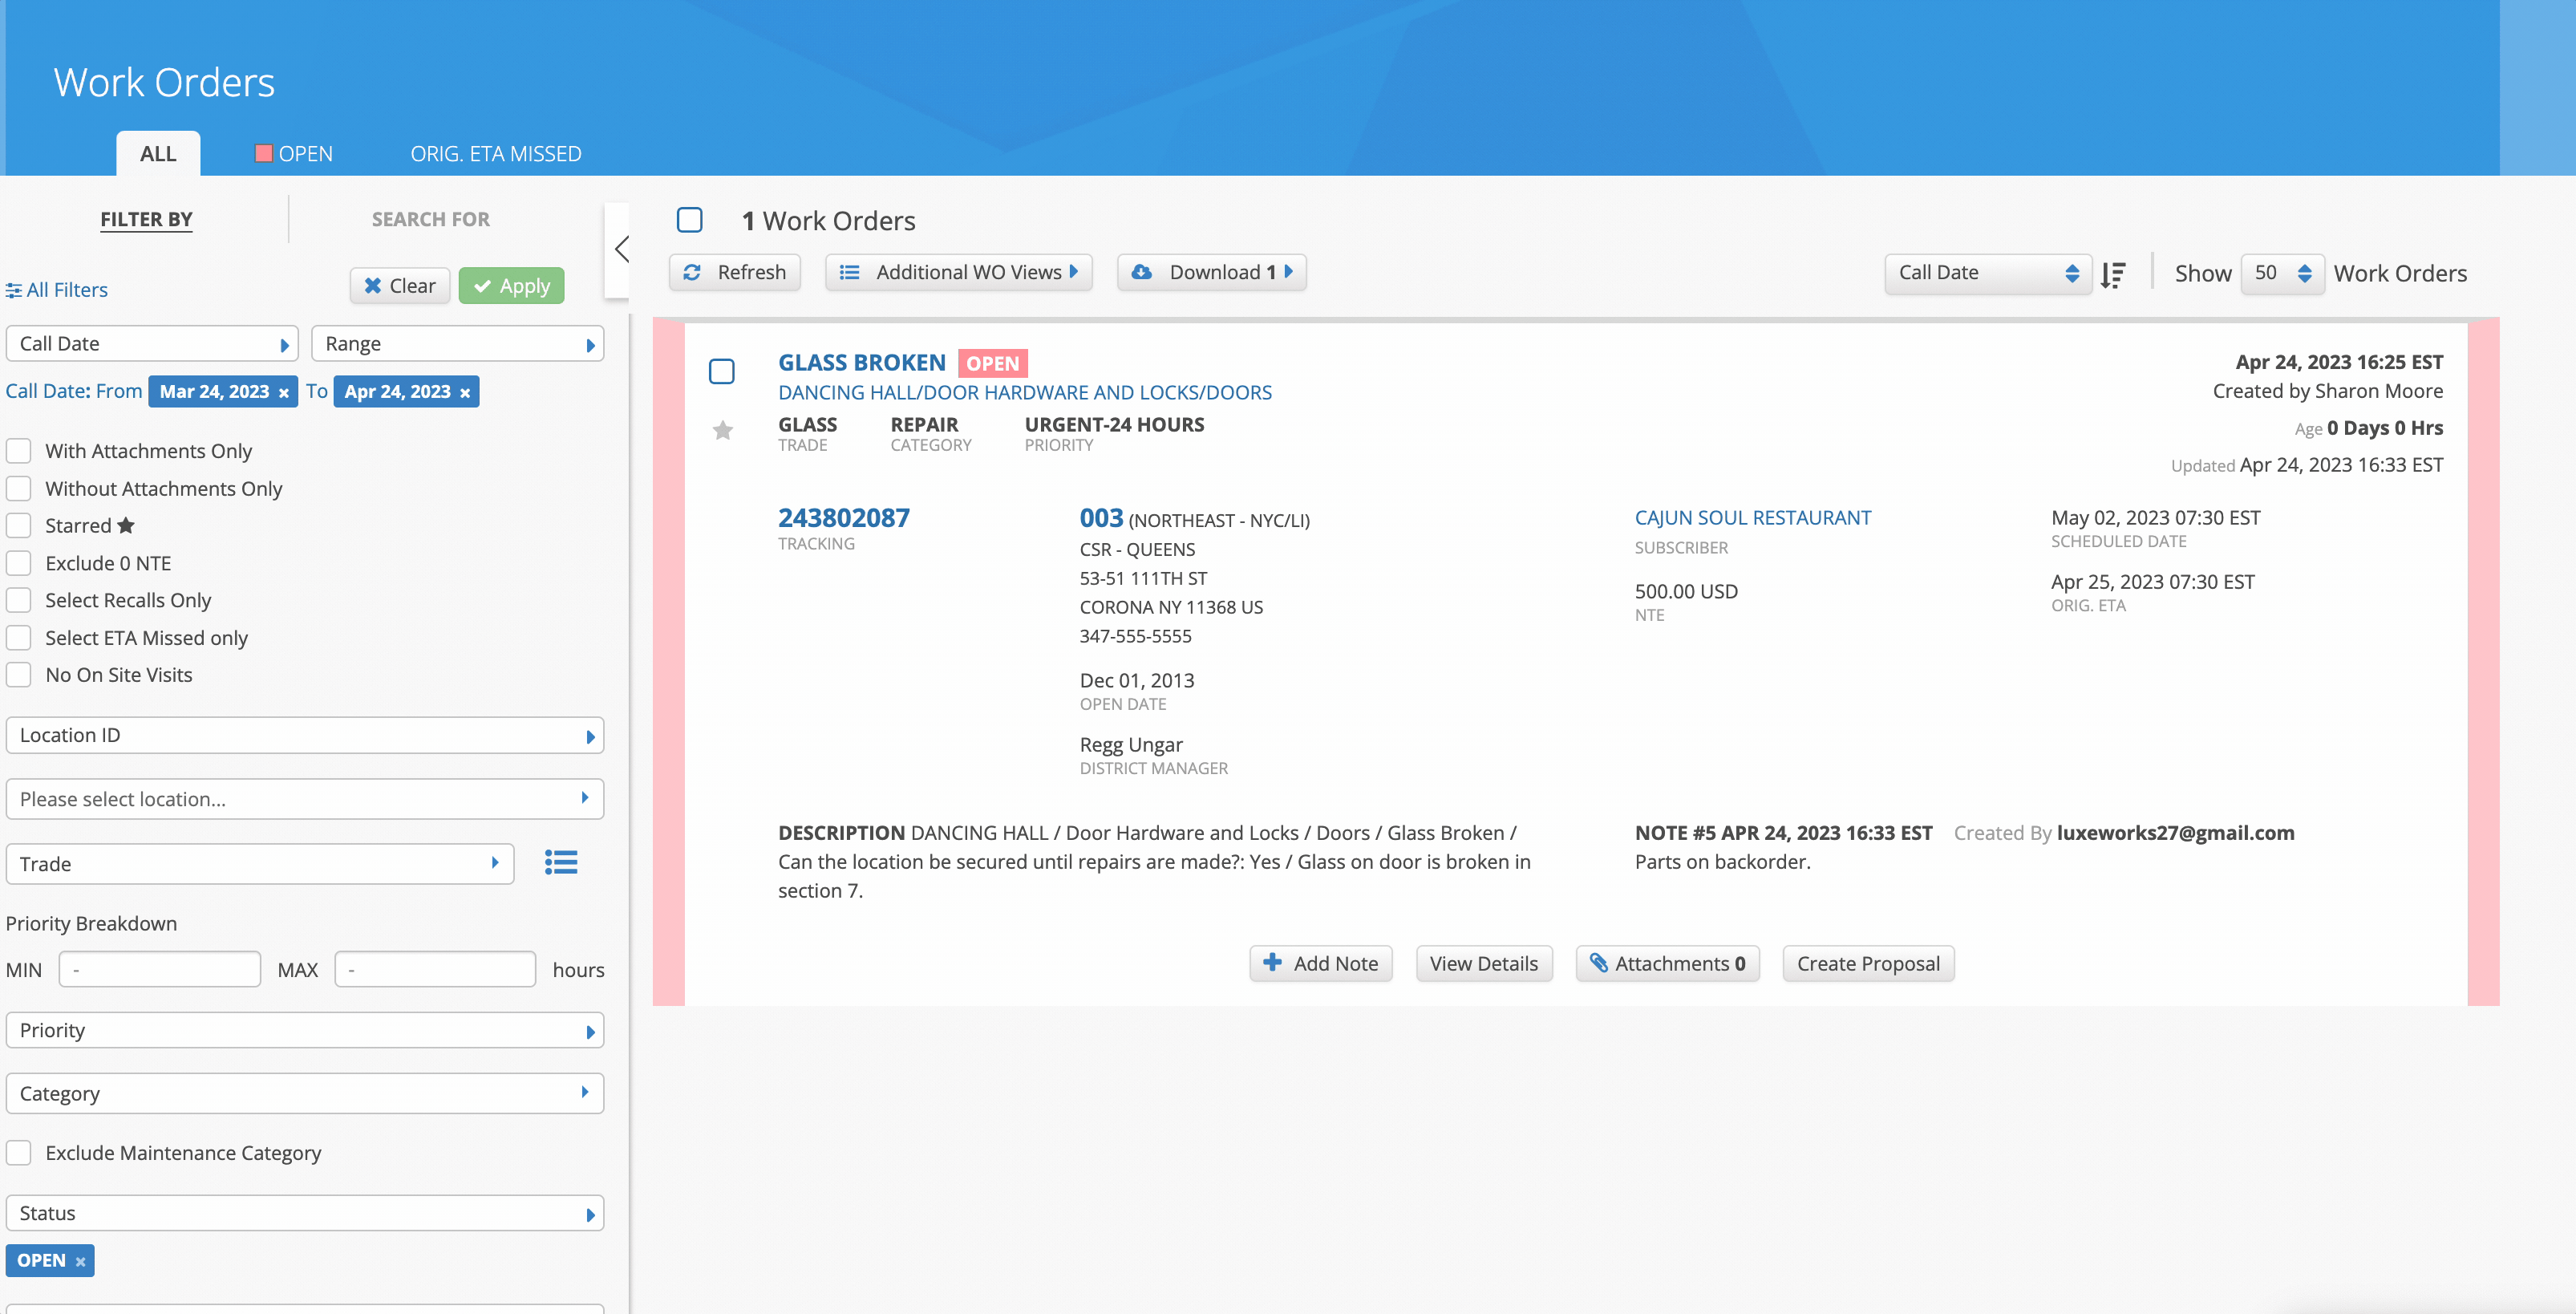
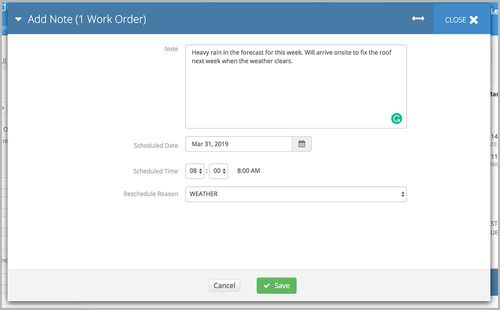
- On the desired work order on the Work Orders List, click Add Note. The Note (x) for (Tracking Number x) modal appears.
- Enter a Note explaining why you are rescheduling.
- Choose a new Scheduled Date using the calendar picker, and enter a new time (in military time).
Choose the appropriate Reschedule Reason, such as Weather, Store Manager Requested, Provider Scheduling Conflict, etc. - (When requested by your Client) Enter the Projected Completion Date indicating the estimated date and time when the work will be complete.
- (Optional) Select the desired recipient(s) in the To Send Email Select Addressee(s) list.
- (Optional) Check the Send a Copy to Myself box.
Click Save and Send Note. The note updates on each work order selected.
|
| HTML Comment |
|---|
|
LOCALIZABLE PART ENDS HERE |
| Anchor |
|---|
| AddNotesInBatch |
|---|
| AddNotesInBatch |
|---|
|
Adding Notes and Changing the Scheduled Date in Batch| Note |
|---|
Note: You may process up to 200 work orders in a batch. |
| Panel |
|---|
| bgColor | #F9F9F9 |
|---|
| titleColor | #0e3367 |
|---|
| titleBGColor | #EAEAEA |
|---|
| borderStyle | none |
|---|
| title | ⦿ How to Add a Note to Work Orders in Batch from the Work Order List |
|---|
|
- On the Work Orders List, check the boxes next to 2 or more desired work orders.
- On the bottom of the work order list, click Add Note. The Add Note (x Work Orders) page appears.
Enter the desired comments in the Note text field. Click Save. The note updates on each work order selected.
|
| Panel |
|---|
| bgColor | #F9F9F9 |
|---|
| titleColor | #0e3367 |
|---|
| titleBGColor | #EAEAEA |
|---|
| borderStyle | none |
|---|
| title | ⦿ How to Change the Scheduled Date on Work Orders in Batch from the Work Order List |
|---|
|
- On the Work Orders List, check the boxes next to 2 or more desired work orders.
- On the bottom of the work order list, click Add Note. The Add Note (x Work Orders) modal appears.
- Enter a Note explaining why you are rescheduling.
- Choose a new Scheduled Date using the calendar picker, and select a new Scheduled Time (listed in military time).
Choose the appropriate Reschedule Reason, such as Weather, Vendor Requested, or Material Shortage. Click Save. The note updates on each work order selected.
|
| Anchor |
|---|
| AddAttachment |
|---|
| AddAttachment |
|---|
|
Adding Attachments
You may add up to 5 files to a work order at a time.
| Tip |
|---|
You may also add an attachment to a work order through email by sending an email with the attachment to attachments@servicechannel.net with the tracking number of the work order in the email subject. |
| Panel |
|---|
| bgColor | #F9F9F9 |
|---|
| titleColor | #0e3367 |
|---|
| titleBGColor | #EAEAEA |
|---|
| borderStyle | none |
|---|
| title | ⦿ How to Add a Single Attachment |
|---|
|
- In the detailed view of the desired work order, under the Attachments & Notes tab, click Add Attachment on the left side of the panel. The Upload Attachment modal opens.
- Click Browse a file, browse to the location of the desired file, and then click Choose.
- Enter a brief description of the attachment.
- Click Upload. The new attachment displays in the left section of the page.
|
| Panel |
|---|
| bgColor | #F9F9F9 |
|---|
| titleColor | #0e3367 |
|---|
| titleBGColor | #EAEAEA |
|---|
| borderStyle | none |
|---|
| title | ⦿ How to Add Multiple Attachments |
|---|
|
- In the detailed view of the desired work order, under the Attachments & Notes tab, click Add Note/Update Schedule Date. The Note <#> for <WO #> window opens.
- Enter your notes in the Notes text box.
- In the bottom of the Note <#> for <WO #> window, in the Add Attachment section, click Select a File.
- Browse to the location of the desired file, and click Choose. The selected file appears in the Notes window.
- Enter a brief description of the attachment.
Repeat steps 3 - 5 to add more files. | Note |
|---|
You may add up to 5 attachments at a time. |
- Click Save and Send Note. The attachments display under the Attachments & Notes tab, and a note appears with the details of the attachments
|
| Anchor |
|---|
| DeleteAttachment |
|---|
| DeleteAttachment |
|---|
|
Deleting an Attachment
In case an attachment is not required, you may also delete it from the Attachments & Notes tab. Note that attachments added can be deleted only by the user who added them.
| Panel |
|---|
| bgColor | #F9F9F9 |
|---|
| titleColor | #0e3367 |
|---|
| titleBGColor | #EAEAEA |
|---|
| borderStyle | none |
|---|
| title | ⦿ How to Delete an Attachment |
|---|
|
In the detailed view of the work order, under the Attachments & Notes tab, click the Delete icon next to the desired attachment. The attachment is removed, and note displays indicating the attachment was deleted. | Note |
|---|
In case an attachment was added through the Invoice module, only the user who added the attachment can delete it. The Delete icon next to a file added through the Invoice module is greyed out for all other users. |
|
| Anchor |
|---|
| NoteSplittingSystemNotes |
|---|
| NoteSplittingSystemNotes |
|---|
|
Splitting Notes for User vs System Notes
Note Splitting for System Notes occurs when a user makes a manual and system note change on a specific work order simultaneously. For example, creating a manual note and changing the work order status, the notes are split into Manual or System. Note Splitting for System Notes also occurs when clients make manual and system note changes at the same time on a specific work order.
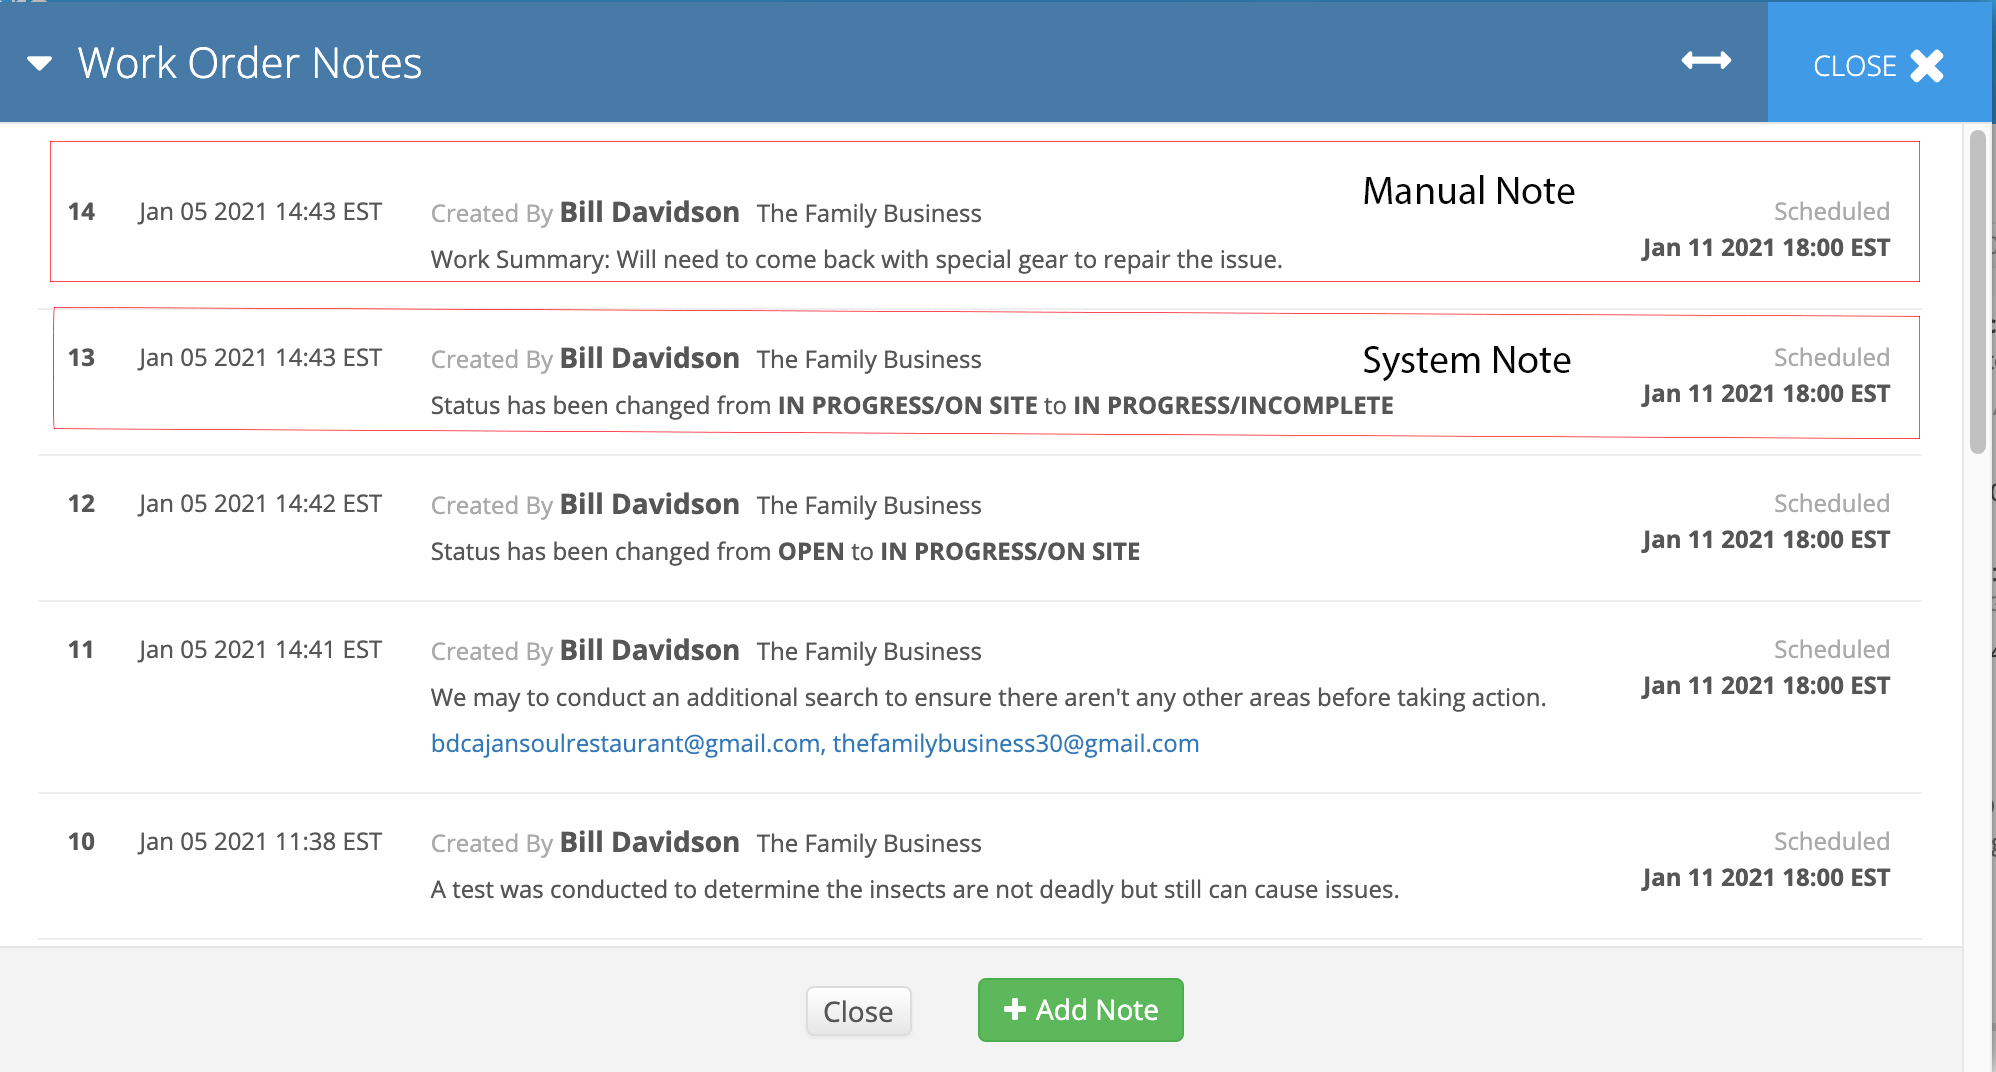 Image Removed
The default filter selection is the All Notes tab which shows both system and user created notes. Click on the System Created tab to only view notes that were system created. Click on User Created to only view notes your users have created.
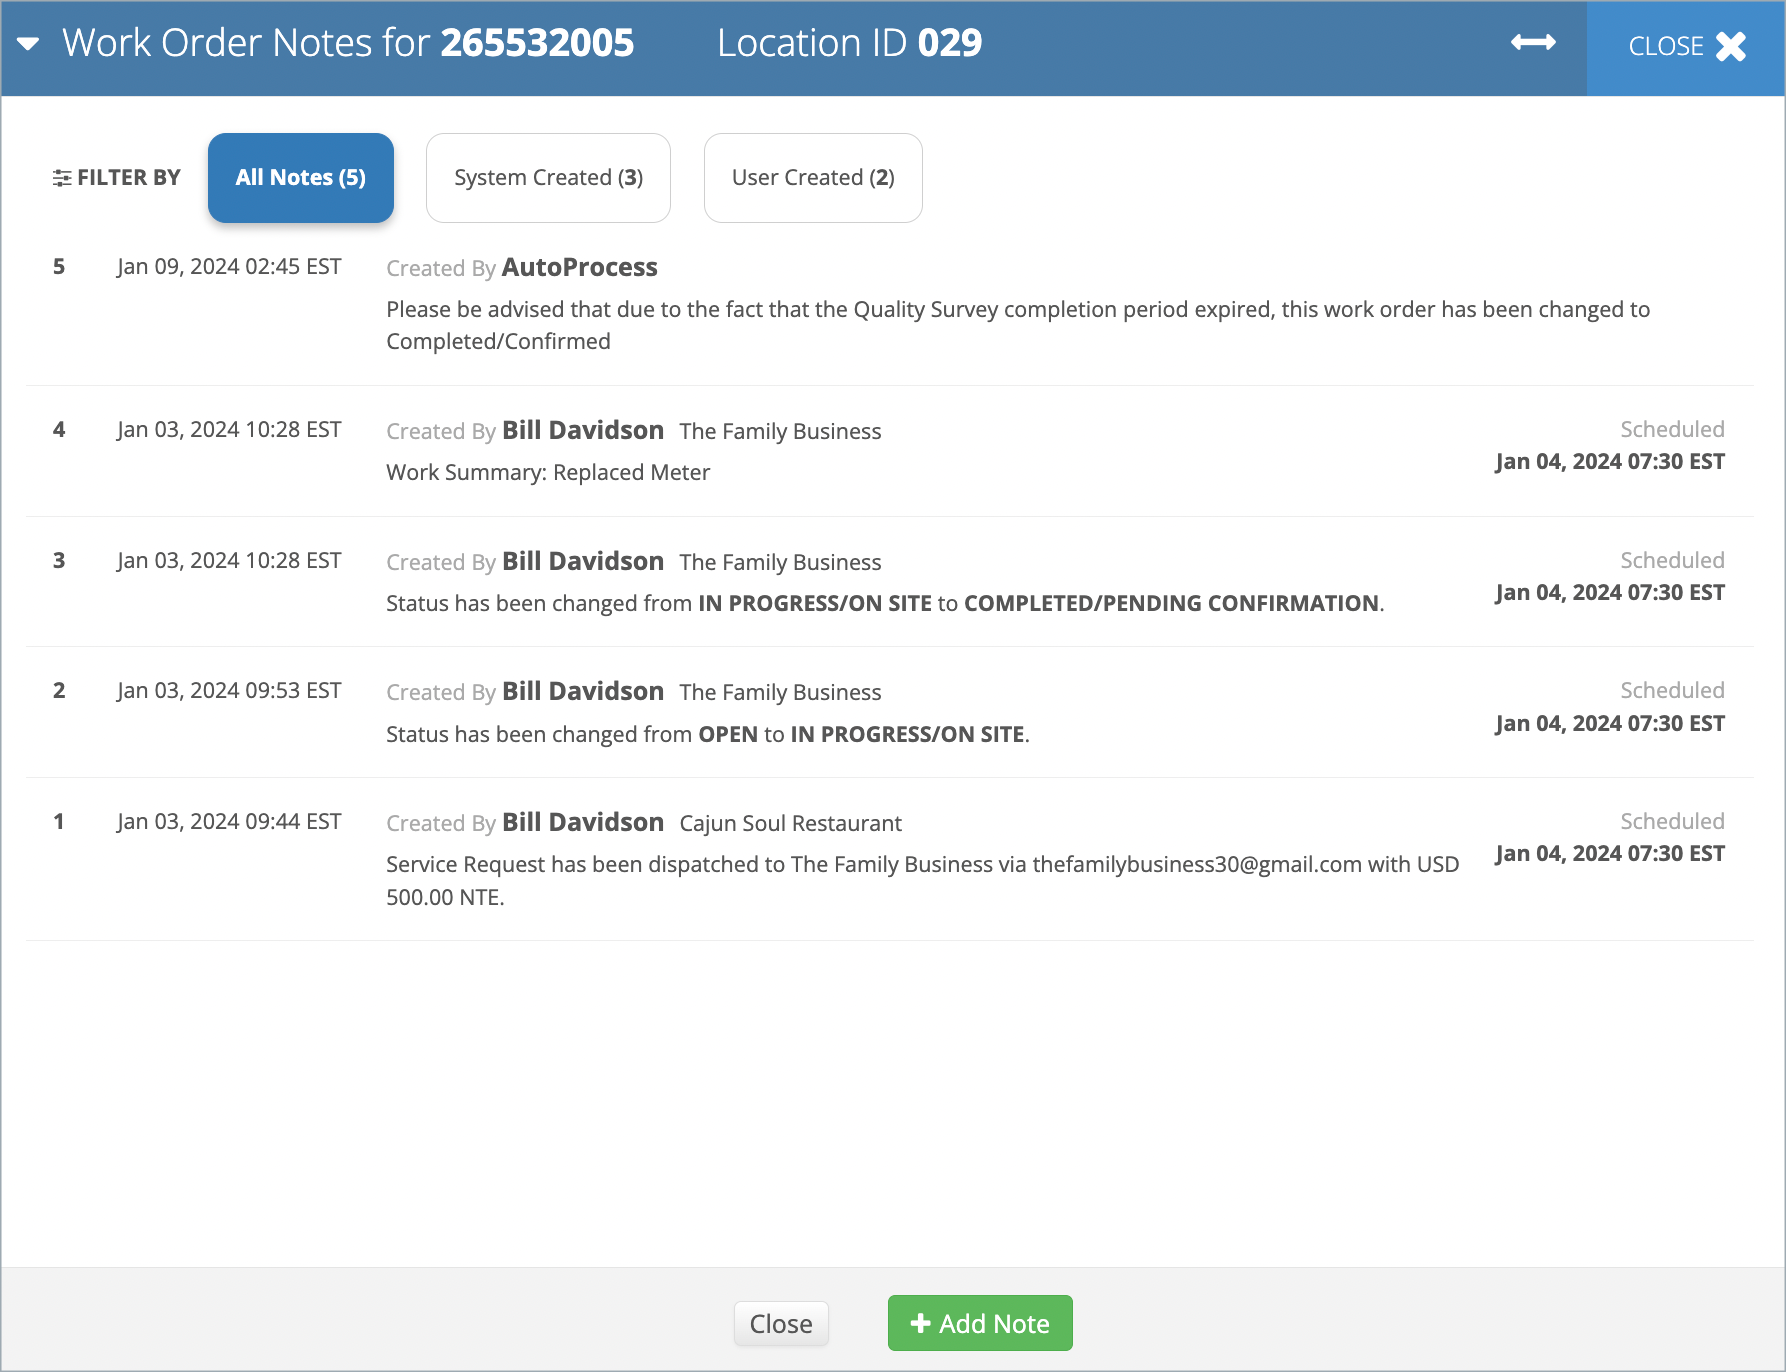 Image Added