Versions Compared

Key

  • This line was added.
  • This line was removed.
  • Formatting was changed.

On the Parts Catalog page, use the Download button to export one of the following:

  • Parts catalog. The downloaded file contains detailed information on your parts.
  • Parts catalog template. This is a blank template for uploading multiple parts to your catalog.
  • Inventory transfer template. Use this blank template to transfer parts from one location to another.

Button for downloading the parts catalog, parts catalog template, or inventory transfer template

Use the Upload button to do the following:

Parts catalog in Inventory ManagerImage Modified

Anchor
partsimport
partsimport
Uploading Parts to Your Catalog

Tips and Best Practices

Before you start building your parts catalog in Inventory Manager, study the tips and best practices we (tick) we have collected for you.

Click the section plus icon to expand its the section content.

Section


Column
width40%


Rw ui expands macro

Rw expand
titleKeep the names for your part types and groups simple!

Tip

Try to simplify the names for your part types and part groups before you upload them into to Inventory Manager.

  • For part types, use more generalized terms, for example, Standard Tools, Refrigerant, etc.
  • For part groups, use more specific terms that would define your items within a part type, for example, Power Tools and Hand Tools for the Standard Tools part type and R-448A (N40) for the Refrigerant part type.


Column
width40%


Rw ui expands macro

Rw expand
titleIdentify part numbers.

Tip

Parts usually have 3 different numbers:

  • Manufacturer part number
  • Supplier part number
  • Part number assigned to a part by your company

When you upload new parts to your catalog, remember that you can use any of these numbers. This number within the ServiceChannel Inventory module is going to be used by your organization's employees and providers only.


Section


Column
width40%


Rw ui expands macro

Rw expand
titleSpecify scan codes correctly.

Tip

You can add up to 3 scan codes for a single part. This number comes from the fact that a part may have the following scan codes:

  • a scan code from the manufacturer
  • a scan code from the supplier
  • a scan code from your organization's internal inventory team

Adding all the 3 decoded scan codes to a part ensures that when a provider scans any of these codes on a part, the part will be identified by the SC Provider mobile app, and the provider will get the corresponding part information.

NOT TO BE CONFUSED WITH THE UPC (UNIVERSAL PRODUCT CODE)


Column
width40%


Rw ui expands macro

Rw expand
titleUniversal Product Codes (UPCs) are not scan codes or part numbers.

Tip

If you have a UPC for a part, feel free to add it to the UPC code field when uploading parts via the template. Note that the entered UPC will NOT be used as a part scan code or as a part number in ServiceChannel.

To be able to scan parts, you should enter the scan codes (from the manufacturer, supplier, and/or your internal inventory team) to the Scan Code field for a part.


Section


Column
width40%


Rw ui expands macro

Rw expand
titleWhat are the equivalent parts?

Tip

You can fill out the Equivalent Parts field for a part if this part can be replaced by another part in your inventory from another manufacturer.


Column
width40%


Rw ui expands macro

Rw expand
titleIs Non Catalog Part.Do you have non-catalog parts?

Tip

You might have parts that are stored at your inventory, but you don't want them to appear in the reports or anywhere throughout the app. If you do have such parts, enter True for these parts in the Is Non Catalog field in the template.


Whether you need to create your inventory catalog from the ground up or update the existing one, check the instruction below.

Note

When you configure Inventory Manager, adding parts to your catalog is the next step you need to take after creating inventory locations.


Panel
bgColor#F9F9F9
titleColor#0e3367
titleBGColor#EAEAEA
borderStylenone
title⦿ How to Upload Parts
  1. On the Parts Catalog page, click Download, and select Parts Catalog Template from the drop-down list. A blank template gets downloaded to your device.
  2. Open the template, and fill it out.

    Expand
    titleExpand this section to learn how to complete the template.

    1. Fill out or update the mandatory columns:

    Completed Excel template for uploading parts to the general catalog

    • Part number
    • Part type
    • Part group
    • Part name
    • Description
    • Unit of measure. The field accepts any unit of measurement, including EA (each), lbs (pounds), gal (gallon), ton, case, pack, box, FT (foot), quart.
    • Price valuation. There are three price valuation options; each option has an effect on how inventory is priced.
      1. Standard: The part price is always taken from the parts catalog. Prices specified in the location stock records template will not be used if different from the main catalog.
      2. Manual: Price will always be taken from the location stock records template.
      3. Average: Price will always be calculated as an average taken from the location stock records template (Current price*Current QTY) + (New Price * added QTY) / (Total QTY).Average: Calculate the most average price for a part by summing the total cost of the part for all parts purchased in Service Automation dividing by the total number of parts ever purchased. 
      4. Price: The market value of an item at sale
      5. Replacement Cost: The amount it will cost to replace an item in inventory 
    • Price. The market value of a part.
    • Is standard. Enter either True or False. A standard part is a part that has not been modified, augmented, or specially combined with another part to make a new part type. For example, a non-standard part would include a special blend of paint, combined refrigerants, or a combination of two component parts that make a new part.
    • Is regulated. Enter either True or False. A regulated part is a part that has to comply with special regulations for its use and disposal. For example, ozone depleting refrigerants, fluorescent light bulbs, or mercury vapor light bulbs — all have the EPA guidelines for their use and disposal.

    2. (Optional) Based on your company’s business needs, specify the following information:

    • UPC code. Universal Product Code of a part
    • Equivalent parts. Parts that are available in your inventory and can be used to replace the part to which they serve as equivalents
    • Brand
    • Inventory catalog ID
    • Average price. The average purchase price of a part
    • Replacement price. The last purchase price of a part
    • Asset type ID
    • Is non catalog. Enter either True or False. A non-catalog part is a part that can appear at a location but is not an item that your company keeps in inventory.
    • Supplier
    • Scan code. Enter the QR code, barcode, or another code that should be used to allow your technicians to scan codes on parts to quickly identify the required parts and associate them with work orders in SC Provider.


  3. When ready, save the file.

  4. Click Upload, and pick the Parts Catalog option.
  5. In the overlay that appears, either drag and drop the file, or browse to choose the file from your device.
  6. If no errors upon processing the file are found, click DoneIn case there are errors in the file, download the results file, and check the last column in the file. Correct the errors, and reupload the file.

Anchor
partstransfer
partstransfer
Transferring Parts

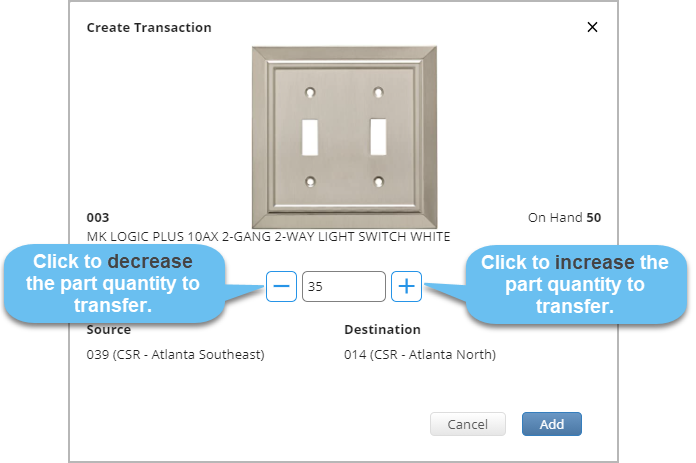
There may be times when the parts stored at location A will be needed at location B. With Inventory Manager, you can easily transfer parts from one location to another via template, for example from a warehouse to a truck.


Tip

Take advantage of our new feature that allows you to create transfers of inventory parts from one location to another and keep track of each transfer lifecycle without the need to use MS Excel templates! Learn more about Inventory Transfers.

Image Added


Panel
bgColor#F9F9F9
titleColor#0e3367
titleBGColor#EAEAEA
borderStylenone
title⦿ How to Transfer Parts Between Locations
  1. On the Parts Catalog page, click Download, and select Inventory Transfer Template from the drop-down list. A blank template gets downloaded to your device.
  2. Open the template, and provide the following information:
    1. Part number: Enter the number of the part you need to transfer.
    2. Source location ID (optional): Indicate the ID of the location from which the part should be transferred.
    3. Source is truck: Tell whether or not the source location is a truck. Enter either True or False.
    4. Destination location ID: Specify the ID of the location to which the part should be transferred.
    5. Quantity: Enter the part quantity that should be transferred.
    6. Cost/Unit: Type in the part cost per unit.
  3. When ready, save the file. 
  4. Click Upload on the Parts Catalog page, and pick the Inventory Parts Transfer option.
  5. In the overlay that appears, either drag and drop the file, or browse to choose the file from your device.
  6. If no errors upon processing the file are found, click Done.
    In case there are errors in the file, download the results file, and check the last column in the file. Correct the errors, and reupload the file.


Info

For any reports and templates downloaded for viewing and/or adding information for uploading into Service Automation, items such as decimal separators, date & time formats, currency codes and address forms displays based on your computer settings if the format is Excel (.xls) and if it is a CSV file (.csv), then ServiceChannel settings takes precedence.

If the Currency Code Support feature is enabled, a currency field is added to reports and templates. If the Localization Address Format feature is enabled, headers and values are updated with the specific country’s address format for Excel (.xls) and CSV(.csv) only headers are affected while headers and values are affected for a PDF (.pdf). 


Live Search
spaceKeySCU
additionalpage excerpt
placeholderSearch our Knowledge Base
typepage

Panel
titleColor#ffffff
titleBGColor#5fa7d0
borderStylegroove
titleIn this Article

Table of Contents
maxLevel3
minLevel2
indent20px

Image RemovedImage Added

Panel
titleColorwhite
titleBGColor#75a346
titleRelated Articles

Filter by label (Content by label)
showLabelsfalse
max8
showSpacefalse
sorttitle
cqllabel = "enhanced-inventory" and space = currentSpace ( )