Viewing and Taking Actions on Invoices
Joseph Yarborough (Unlicensed)
Anastasia Medovkina (Deactivated)
Natalia Larina (Unlicensed)
You can view all invoices that you submit to your clients on the Invoices List. It gives you high transparency along the invoice processing cycle, so you know which invoices are open, approved, placed on hold, rejected, or paid.
- On the top navigation bar, click Invoices. The Invoices List appears.
Invoices List
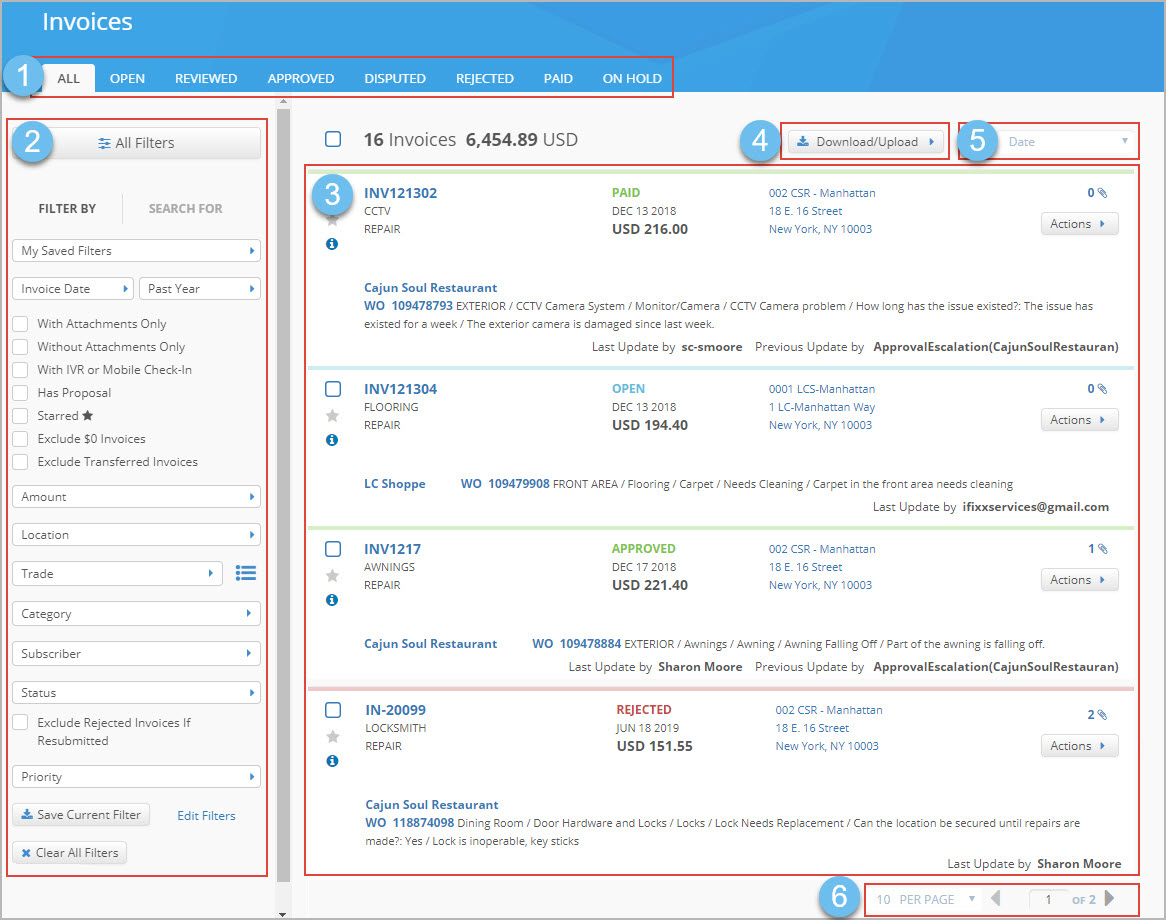
The Invoices List can be divided into six sections.

- Status tabs atop of the Invoices List. Each tab displays a list of invoices in the corresponding status — Open, Reviewed, Approved, Disputed, Rejected, Paid, and On Hold. To view invoices in all statuses, click All. Find more information about invoice statuses.
- Left panel used to filter and search for invoices. On the Filter By tab, you can filter invoices by one or multiple criteria. To find a particular invoice, go to the Search For tab. For more details, see Filtering and Searching for Invoices.
- Invoices list. All your invoices show up here as a list. Apart from viewing the details, you can take action on an invoice.
- Download/Upload option. You can either download an MS Excel report on existing invoices or upload a template if you want to create invoices in batch. Look for the details in Creating Invoices Using Templates.
- Sorting options. You may sort invoices in ascending or descending order by the following criteria:
- Date — the default sorting parameter
- Invoice number
- Purchase order number
- Batch ID
- Trade
- Location ID
- Subscriber
- Status
- Pagination. You can change the number of invoices displayed per page — 10, 20, or 50 invoices — and switch between pages if there are more than one.
Accessing Invoice-Related Info From the List View
The Invoices List shows key details of each invoice, such as the invoice number, status, date, amount, and more. The invoice status also appears as a colored bar along the top of each invoice.

- Basic Invoice Information:
The invoice number leads you to the invoice details page where you can check the invoice date, status, amount, work order trade, provider, location where the work was done, detailed charges, and other info.
Alternatively, click the Info icon on the left of the listed invoice to go to the invoice details page.
- The invoice status shows if the invoice is Open, Approved, Rejected, or Put on Hold.
- The invoice date indicates when the invoice was submitted.
The invoice amount specifies the total billed.
Hover over the invoice amount to view invoice charges in detail. Note charges with zero amounts will not be detailed.

- Service Overview:
- The work order number opens the work order details page of the invoiced service request.
The proposal number redirects you to the proposals list where you can see the short overview of the proposal.
The proposal number appears on the Invoices List only for invoiced work orders that have an associated proposal.
- The invoice description contains information on the services performed for the work order.
Last Update By. Shows you the username of the last person who took action on the invoice.
Hover over this field to view the invoice status it was moved to and the date when this change happened.
- The location info shows the location ID and address. This section can also display up to 2 location note headers. Clicking the location ID leads you to the location details page.
- By clicking the Action button, you can choose the appropriate action to take on the invoice: View, Void.
- Attachments. Click the paperclip icon to the right of an invoice to land on the Attachments tab of the invoice details page. The tab shows all files attached to the invoice and its associated work order.
Taking Action on Invoices From the Invoices List
From the Invoices List, you can access the invoice details, print, or void invoices. You may take action on a single, multiple, or all invoices at once.
Taking Action on a Single Invoice
On the Invoices List, to the right of each invoice is the Actions button. It allows you to take the appropriate action on that specific invoice:
- View. Allows viewing the full details of an invoice.
- Void. Annuls the invoice in the Open status. As you cannot edit a submitted invoice, you should void the invoice, and then resubmit it with the appropriate changes.

- Locate the desired invoice, and click Actions > View.
Alternatively, click the invoice number in the upper-left corner of the desired invoice. The invoice details page appears. - (Optional) To print the invoice, click Print at the bottom of the invoice details page. The page with the print layout appears.
- (Optional) Use the Next and Previous buttons to navigate between the invoices without going back to the Invoices List.
- To exit the detailed view, click Close in the upper-right corner.
When you go to the invoice details page, it opens with a unique link in your browser. You may share the link with other people, such as your colleagues or permissioned client users, for a quick review of the invoice.
- Locate the desired invoice in the Open status, and select Actions > Void. The Void Invoice overlay appears.
- Click OK. The confirmation message pops up at the top of the page, and the invoice disappears from the Invoices List.
Taking Action on Multiple Invoices
When you need to take action on a batch of invoices, you can select multiple or all invoices on the Invoices List.
- To select multiple invoices, use the checkbox next to the desired invoices.
- To select all invoices, use the checkbox at the upper-left of the Invoices List.
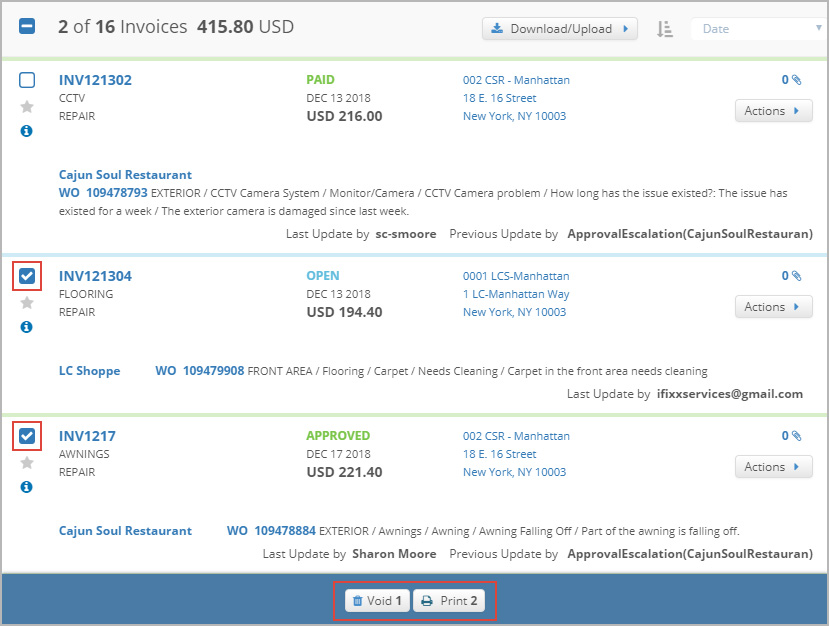
After you select the required invoices, two options appear at the bottom of the page — Void and Print — showing the number of invoices on which you can take that action. The Void option lets you annul Open invoices, while the Print option allows both printing and viewing selected invoices.
In the example below, two invoices are selected: one is Open and the other one is Approved. At the bottom of the page, notice that a “1” is next to Void, but a “2” is next to Print. This means that out of the two invoices selected, you can void only one invoice — in the Open status.

- Select the required invoices.
- At the bottom of the page, click Print. The Print Choice overlay appears.
- Select Invoices Only, Attachments Only, or Invoices and Attachments, and then click Print. The list of invoices appears in a new browser tab.
- View the listed invoices, or hit Print to print all of them.
- Select the required invoices.
- At the bottom of the page, click Void. The Void Invoice overlay appears.
- Click OK. The confirmation message pops up at the top of the page, and the invoices disappear from the Invoices List.
-
Page:
-
Page:
-
Page:
-
Page:
-
Page:
-
Page:
-
Page:
-
Page:
