Assets
TemplateAssets can be added in bulk, using one of the supplied templates. Adding assets using the template allows you to add multiple assets, of the same asset type, at once, therefore simplifying the process. When No Template (Custom Attributes) is used, any excel template with your own unique attributes for assets can be added. When uploaded into Service Automation, there is a mapping process to convert your unique attributes to the ones within Service Automation. When uploads are completed, a history for each individual upload is available. It includes the:
- File name
- Asset Type
- Record Added/Upload
- Provider (If template uploaded by a provider)
- User
- Date
- Back Up File (Downloadable excel file)
- Results File (Downloadable excel file)
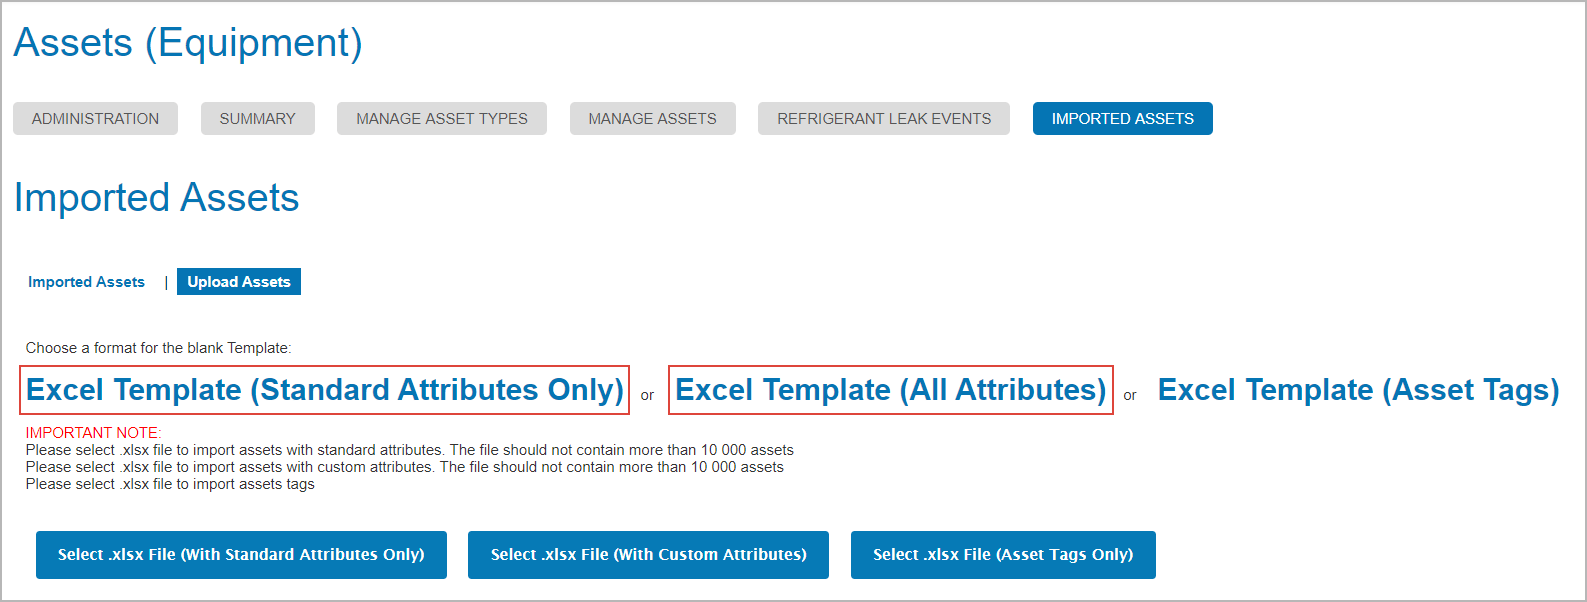
Service Automation provides three different templates for uploading assets and adding asset tags to assets. The templates are located under the Imported Assets link in Asset Manager:
- Excel Template (Standard Attributes Only)
- Excel Template (All Attributes)
- Excel Template (Asset Tags)
The "Excel Template (All Attributes)" and "Excel Template (Asset Tags)" only have columns' headers. You will not be provided with prompts on how to fill out the fields. The "Excel Template (Standard Attributes Only)" provides you with hints as to the type of data you should enter in a particular field.


| Note |
|---|
The fields are case sensitive. Therefore, when entering Asset Types for your coffee machines, you must enter “Coffee Machines”, not “coffee machine”. |
Navigating Asset Template Columns
The columns in the template will indicate which are required and optional. Adding as much information onto the template helps with repair and maintenance as well as data collection on the assets. All or Custom attributes have the same attributes as Standard Attributes plus columns related to refrigerant assets.

| Info |
|---|
The follow attributes with an * asterisk is required information for the template. |
Standard Attributes:
- *Asset Type: Must be validated against the Asset Type list against the Asset Module.
- *Location: Location ID in Service Automation.
- Area: Free text field to help identify the asset.
- *Work Order Area: Drop-down to select work order area for the asset.
- *Tag ID: Unique name to identify specific asset.
- *Brand: Name or producer of the asset.
- *Model No: Specific type of asset.
- *Serial No: Asset’s unique identity number.
- *Install Date: Date which the asset has been installed.
- *Manufactured Date: Date which the asset was built.
- *Purchase Date: Date for when the asset was bought.
- *Condition: Asset is either: broken, poor, average, good or excellent.
- *Is Leased: Is the asset being borrowed. (True or False)
- Lease Date: Start date for the leasing contract.
- Lease Period: Number of months the asset is being leased.
- Warranty Period: Number of months for the warranty on the asset.
- Warranty Provider: The external technician who will service the warranty.
- Warranty Starts from Install Date: If true, starts from install date, if false, starts from purchase date.
- Warranty Category: Select a category for the warranty work order.
- Warranty Priority: Select a priority for the warranty work order.
- Life Expectancy (months): Longevity of the asset.
- Original Value: Cost of the asset.
- Currency: Type of money used to buy the asset.
- Energy Efficiency: Specific energy efficiency of the asset.
- Capacity: Maximum amount of weight the asset can contain.
- Asset Tag: Specific identify for scanning and validating.
- Deactivated: Is the asset deactivated. (True or False)
- Has Component: A part that helps with other parts for the asset. (True or False)
- Has Circuit: A system within an asset that performs a task. (True or False)
- *Asset Status: Whether the asset is verified. Confirm or Unconfirmed.
- *Asset Repair Status: Is the asset being used. In Use or Out for Repair
All or Custom Attributes:
- CARB ID: California Air Resources Board number
- System Location: Indoor or Outdoor or both.
- *Total Charge: Amount of coolant in the asset.
- Vendor: Refrigerant Asset external technician.
- Has Leaked Detector: Does the asset have a leak detector. (True or False)
- *Rack ID: Unique number for rack asset.
- *Description: EPA calculation method.
Asset Tags:
- Location ID: Location for the asset.
- Tag ID: Unique asset name.
- Asset Tag: Unique name for scanning and validating.
Receiving Error Messages During Upload
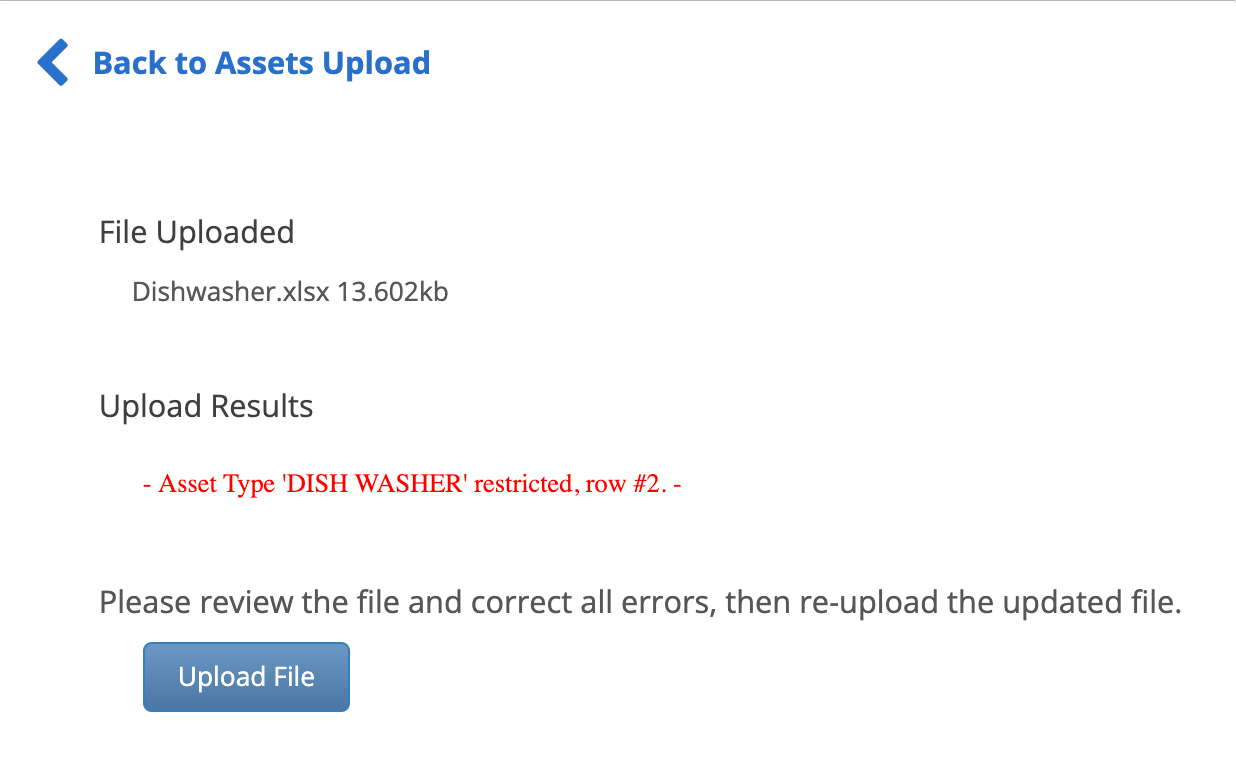
Certain columns go through a validating process on the content. For example, validating occurs on the Asset Type column to compare and match with Service Automation before the upload process happens.
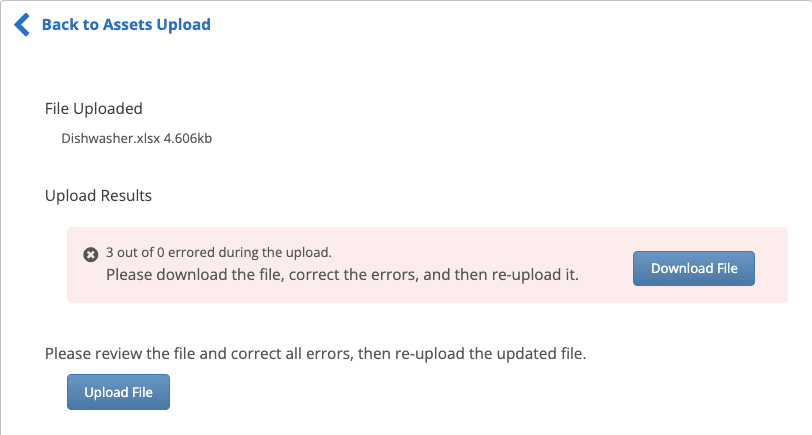
Once the file is processed and the information are inaccurate, it provides a new file with error messages on what needs changing for a successful upload.
| Panel | ||||||||||
|---|---|---|---|---|---|---|---|---|---|---|
| ||||||||||
|


| Note |
|---|
Depending on the number of assets being uploaded, there may be a slight delay while the system processes the upload. Therefore, recently uploaded asset files will appear as "Queued" until they are completely processed. |

Adding Assets of Different Asset Types via Template
| Panel | ||||||||||
|---|---|---|---|---|---|---|---|---|---|---|
| ||||||||||
|

| Panel | ||||||||||
|---|---|---|---|---|---|---|---|---|---|---|
| ||||||||||
|

| Live Search | ||||||||
|---|---|---|---|---|---|---|---|---|
|
| Panel | ||||||||
|---|---|---|---|---|---|---|---|---|
| ||||||||
|

| Panel | ||||||||||||
|---|---|---|---|---|---|---|---|---|---|---|---|---|
| ||||||||||||
|