To bring standardization and clarity to you and your clients in terms of communicating problems and actions taken to address the problems, we introduce a concept of resolution and root cause codes. With them, your customers will get a better insight into on-site services so that they can better predict and prevent recurring issues with their equipment and locations. Your technicians will be able to capture real-time resolution and root cause information for every repair using a simple and straightforward flow when they complete a work order.
| Tip |
|---|
Resolution and root cause codes are currently available to companies located in the USA only. |
What Are Resolution and Root Cause Codes?
A Resolution Code is an action that a technician takes to resolve a problem. A Root Cause is a reason why the problem occurred to begin with.
The codes are standardized based on the primary trade a work order belongs to. It means that for every work order of a trade, you will see a standardized list of codes for all subscribers across the ServiceChannel platform. The free text resolution code field is accessible for 6 months after the live date for all primary trades with standardized resolution codes.
Below are the trades for which resolution and root cause codes are available now or will be available throughout the year:
| Section |
|---|
| Column |
|---|
| Standardize Codes: - Alarms
- Automation
- Automotive Equipment
- Dock Doors & Equipment
- Doors
- Doors & Grills
- Electrical
- Exterior Lighting
- Fire Protection & Safety
- Flooring
- Gates & Grills
- HVAC
- Lighting
- Locks & Keys
- Pest Control
- Plumbing
- Refrigeration
- Security
|
| Column |
|---|
| Non-standardize Free Text |
|
| Info |
|---|
|
| Expand |
|---|
| title | Click here to expand the full list of Resolution and Root Cause Codes for each trade. |
|---|
|
Click View in New Tab to expand the list and use filters. | Google drive sheets |
|---|
| width | 1200 |
|---|
| showLink | true |
|---|
| url | https://docs.google.com/spreadsheets/d/1-9Vaid3hdGnuc6uyWjN72BtL_hD4VQuG3GSNQZK2kpQ/edit#gid=1261396896 |
|---|
| height | 600 |
|---|
|
|
|
Resolution and Root Cause Codes for Assets
Your client has the option of selecting whether they want to implement Resolution and Root Cause Codes for Assets. This means, when servicing a work order for an asset and during check-out, you are required to provide resolution and root cause codes. The client will have groups of specific asset types placed into a category. Depending on the asset, you will be given a specific list of resolution and root cause codes tied to the asset category. Resolution and Root Cause Codes can be added from the list view just like you would normally enter them on work orders where the trade allows for it.
How Does It Work?
When a technician checks out of a work order via the ServiceChannel Provider mobile app and moves the WO to the Completed status, they select:
- From one to three resolution codes — to give a clear explanation of what was done on-site to resolve the issue, and
- One root cause that, in their opinion, was the reason why the issue happened.

For example, you receive a work order from a subscriber about a leaking faucet in a toilet. A technician comes on-site and fixes the issue by replacing the worn-out cartridge in the faucet. So, when completing this service request, the technician will select:
- Replace Cartridge and Repair Faucet — as resolution codes
- Normal Wear & Tear — as the root cause
To better understand how it works in the ServiceChannel Provider mobile app, read about checking out of work orders with a technician account or checking out with a company PIN.
| Anchor |
|---|
| ProcessingRRCs |
|---|
| ProcessingRRCs |
|---|
|
Processing Resolution and Root Cause Codes
If a technician doesn’t enter a resolution and root cause code while being in the field, for example, by checking out via IVR, you can add the codes in Provider Automation later on. You may also edit those codes that might have been captured by mistake.
| Note |
|---|
You can make changes to the resolution and root cause codes of a work order in any status until the work order gets invoiced. |
| Anchor |
|---|
| SearchiingRRC |
|---|
| SearchiingRRC |
|---|
|
Searching for Resolution and Root Cause Codes
The search functionality helps you find the most accurate resolution and root cause codes. You can search for resolution and root causes by their keywords.
| Panel |
|---|
| bgColor | #F9F9F9 |
|---|
| titleColor | #0e3367 |
|---|
| titleBGColor | #EAEAEA |
|---|
| borderStyle | none |
|---|
| title | ⦿ How to Add Resolution and Root Cause Codes |
|---|
|
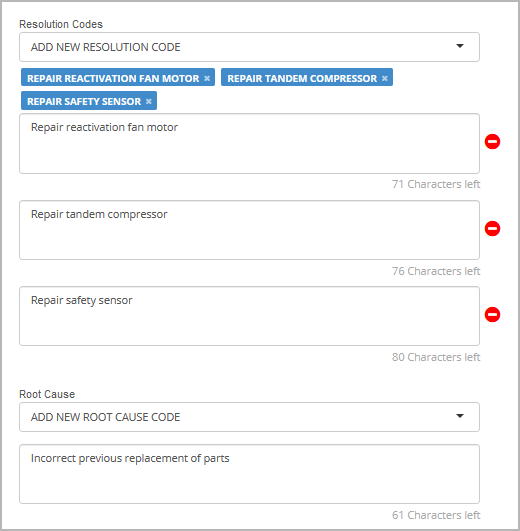
- On the Work Orders List, click the Additional WO Views button above the list, and select Resolution Codes Processing. The Res. Codes tab gets added to other tabs on the page.

- Locate the required work order, and do the following:
- Select 1–3 options in the Resolution Codes dropdown.
If you don’t see an appropriate resolution code in the list, select Add New Resolution Code, and enter your understanding of the resolution in the text field that appears. You can add up to three custom resolution codes.
Select 1 option in the Root Cause list.
If no root cause in the list describes the problem, pick Add New Root Cause Code, and specify your root cause in the text field.
 | Note |
|---|
The work order becomes selected and the batch actions bar appears in the lower part of the screen. |
- Hit Submit to apply the added resolution and root cause codes to the work order.
- (Optional) Add a note to the work order by clicking Add Note in the batch actions bar.
- (Optional) Click Copy to Clipboard to copy the selected work order to the clipboard to further paste it to an email message or a file.
| Info |
|---|
Your client may require you to enter resolution and root cause codes to be able to move work orders to specific statuses: Completed, Completed/Pending Confirmation, and Completed/Confirmed. In this case, when you try to assign one of these statuses to a work order upon adding a note in Provider Automation, you will see a notification pop-up prompting you to add resolution and root cause codes. Once you have added the codes, you can move the work order to the mentioned statuses.

|
|
The codes get added to the work order and appear:
- In the Resolution field in the WO list view
- In the Resolution Codes & Root Cause section of the WO details page
In case when a technician checks out of a work order and adds an erroneous resolution or root cause code, you may edit it in Provider Automation at any time until the WO is invoiced.
| Panel |
|---|
| bgColor | #F9F9F9 |
|---|
| titleColor | #0e3367 |
|---|
| titleBGColor | #EAEAEA |
|---|
| borderStyle | none |
|---|
| title | ⦿ How to Edit Resolution and Root Cause Codes |
|---|
|
- On the Work Orders List, click the Additional WO Views button above the list, and select Resolution Codes Processing. The Res. Codes tab gets added to other tabs on the WOs list.
- Find the desired work order, and make the necessary changes:
- Update the resolution codes, for example, remove the unwanted code by clicking the cross icon ⨯ right on the code, and select the new one(s) from the Resolution Codes drop-down list.
Update the root cause code if required.

| Note |
|---|
The work order becomes selected, and the batch actions bar appears in the lower part of the screen. |
- (Optional) Add a note to the work order by clicking Add Note in the batch actions bar.
- (Optional) Click Copy to Clipboard to copy the selected work order to the clipboard.
- Hit Submit to apply the edited resolution and root cause codes for the work order.
|
The codes get updated on the work order and appear:
- In the Resolution field in the WO list view
- In the Resolution Codes & Root Cause section of the WO details page
